Starting in March I will be employed as a Service Desk Operator by the Royal Devon University Hospital Trust to provide Level 1 IT support and EPIC roll out service desk operation for the upcoming Go-Lives for Torbay and South Devon hospitals and later on in June for the University Hospital of Plymouth.
This is a great opportunity for me to gain some high-level experience in the IT sector. It is a 6 month contract with strong opportunities to become permanent partly due to my qualifications.
Epic is an electronic patient record (EPR) system being adopted by several NHS trusts to replace paper records and legacy IT systems with a single, secure digital record.
Torbay and South Devon (TSD) will Go-Live first on Good Friday 2026 and then later in June University Hospital Plymouth (UHP) will also go digital with a Go-Live.
If you are struggling with responding to interview questions then try using AI to improve your confidence and vocabulary. I recently had an interview that was a total disaster. I just didn’t have the right words to respond to the questions put to me. Once you start hesitating the pressure mounts rapidly. So, for the next interview I told myself I need to sort this out.
You can practice with your work coach or friends but this is limited by time and their willingness to help you. I employed AI to do the work for me. The advantage with this is that you can practice as much as you like and when suits you. You can easily copy and paste the questions, responses and advice to review later on.
And this is what AI Large Language Models, like ChatGPT and DeepSeek, are good at. Language! I use many different AIs but for this I found that DeepSeek works the best and there is no restriction on the number of responses you require and there is no cost.
If you have a laptop or PC with a microphone this is a very practical way of doing this, you can organise and save your interview practice responses in Word or any word processor. Using a phone is also a workable option although more fiddly for adding the job descriptions and saving the responses and advice.
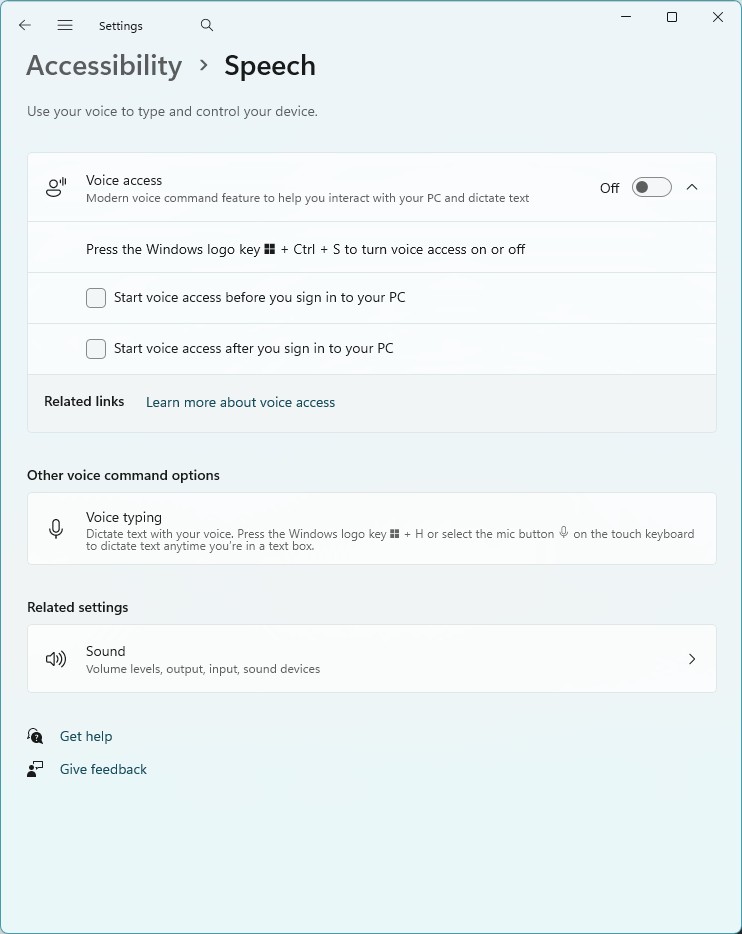
Voice Typing/Dictation
On a Windows PC you can search settings for Voice Typing to set up the ability for the computer to listen to your voice and transcribe into text. You can use the windows key + H to activate it when you have selected a text box.
And use the Voice Typing icon
Or if you are on Android phone there is a microphone icon to the top right of the keyboard.
Practice using these to speak to the device. You will find that this is useful tool for a lot of things. Especially on your phone.
Strategy
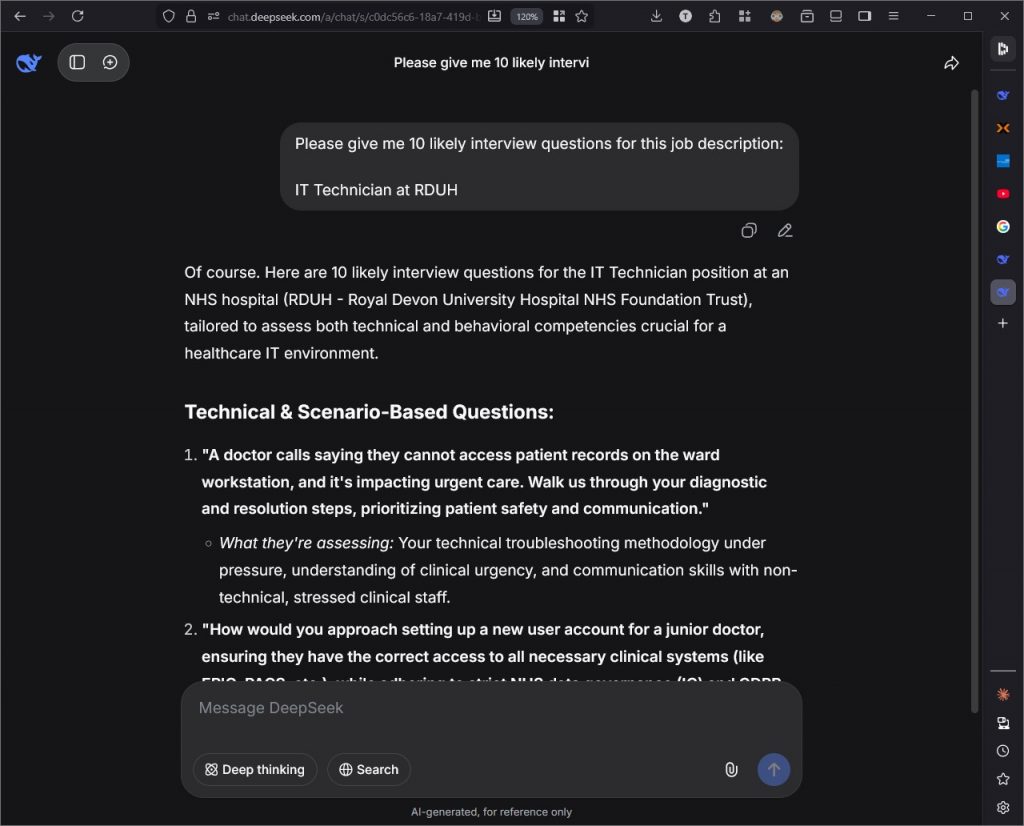
First of all, get the AI to suggest likely questions. Feed it as much information as possible. Again, this will be easier if you can use a computer so you can copy and paste whole job descriptions to the prompt but it is possible on a phone.
You can even attach job descriptions that you have downloaded in PDF format by using the paperclip icon in the prompt window.
Save Them For Later
At this point I would copy and paste these into Word so I can review them later. Eventually I will have the questions in this Word doc and then underneath a few bullet points that highlight the key points to make and the best keywords that will have the interviewers ticking their boxes.
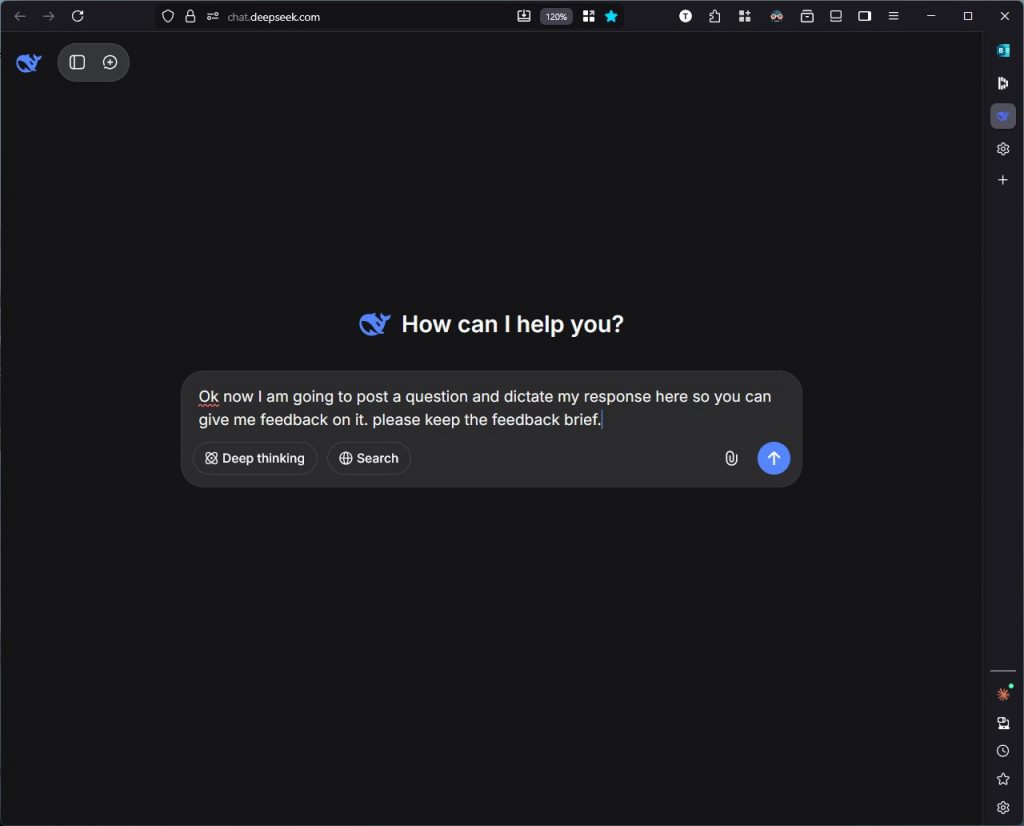
Instructions For The AI
Now we can tell the AI what we want it to do for us. Essentially you want the AI to give you feedback on your response in a way that is useful to you. AI and DeepSeek in particular can be a bit too verbose (too many words) with their responses so you can tell it to give a brief response if that suits you.
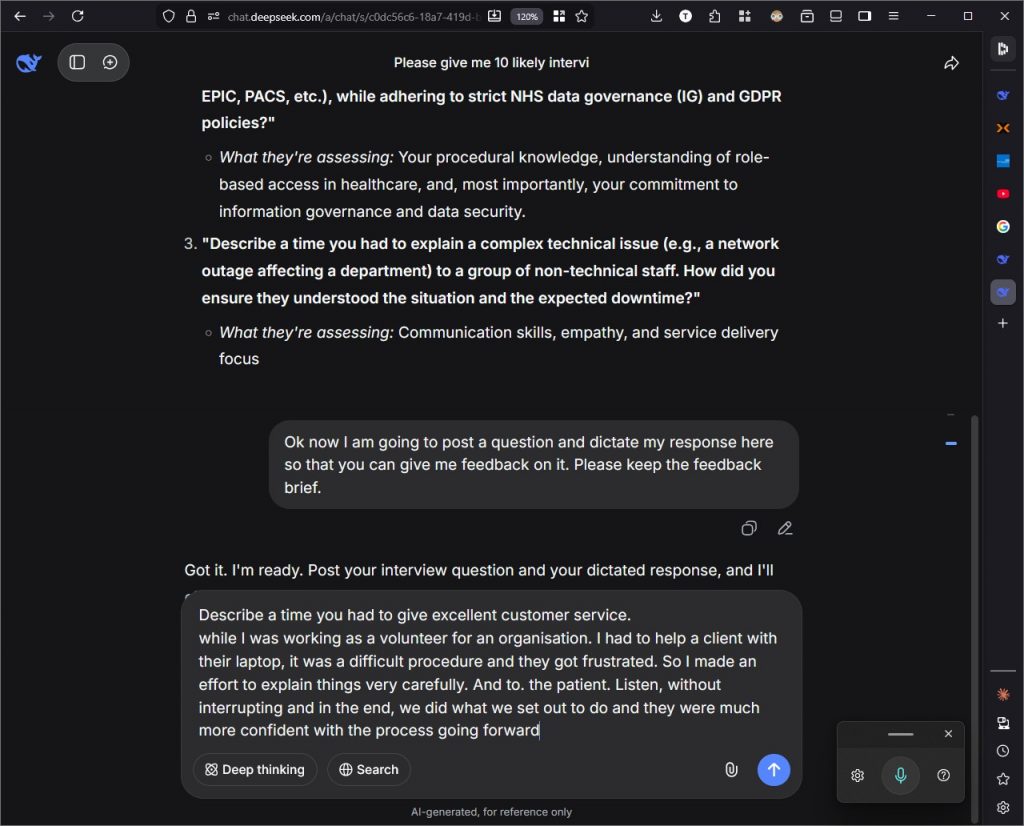
Make Your First Effort At Answering The Question
This is the useful part. Now you can practice speaking your response out loud to the AI. You’ll find that you stumble over your responses and that is fine. That is the point of the exercise. Whatever you come up with let the AI give you feedback. Then you can take it in and improve the next effort you make.
You might find the dictating software makes some errors in your response but usually the AI will understand.
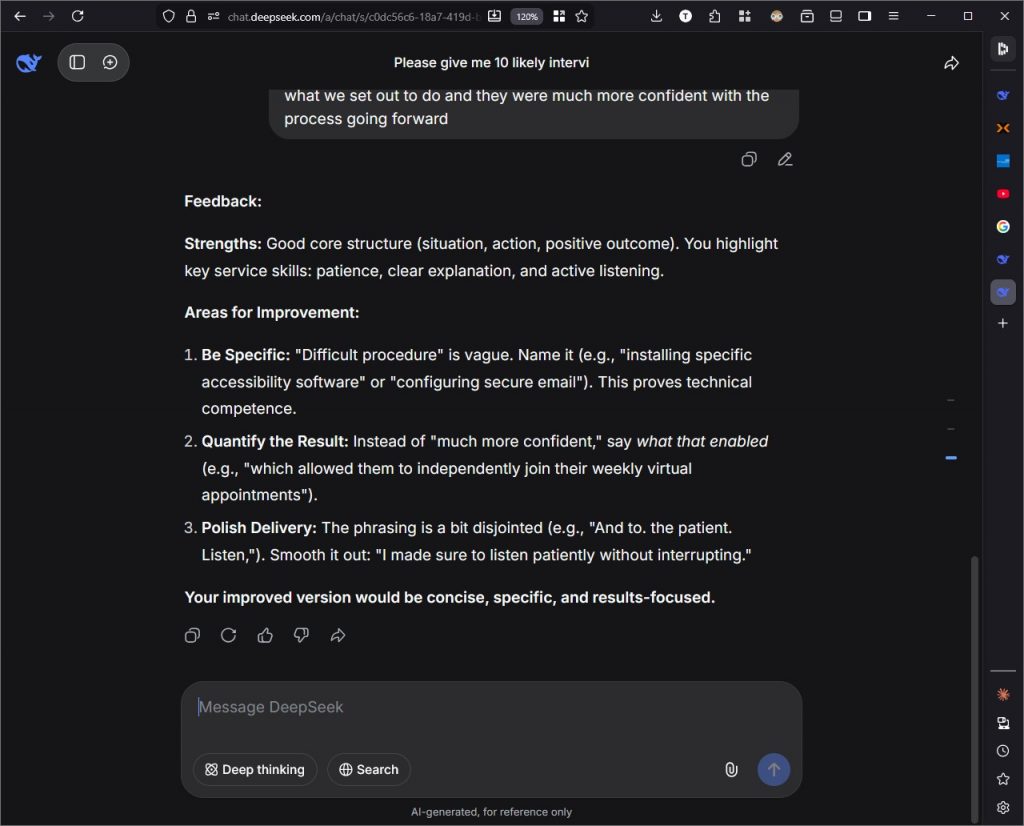
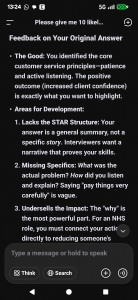
Feedback
Hit enter and see what the AI comes up with. As I mentioned earlier this is what Large Language Models are good at. It will give useful feedback on your response to the question. So, take it in and then have another go.
Repetition
You can and should practice your response many times so it becomes second nature. You will find however that as you practice various questions you will get better at freestyling your answers, you will learn the keywords that are relevant and they can be used in other responses too. The AI is giving you clear areas for improvement and these are definitely relevant.
You will learn the structure of the best responses to give. STAR method is something that the interviewers love. The AI will give you examples of this. What about a question you hadn’t prepared for? Ask the AI about this. I did and it gave me the PRE method. Position, Reason and Example.
Most of all it will give you confidence that you have good responses and keywords in your memory for when the interview is happening and you are nervous.
Conclusion
Many people are hesitant to use AI but it is so incredibly useful. You can get an advantage using AI and it doesn’t have to cost you anything. My police interview was a bad day for me but by using this technique and technology I greatly increased my confidence and vocab for interview questions. In my very next interview I had good solid responses for the questions they asked me. I noticed them raising an eyebrow and muttering ‘oh very comprehensive’.
Ultimately I got the job and this practice made the difference.
I own a MeLE Quieter HD3 Mini PC which is an inexpensive but useful fanless mini desktop PC. One of its features is an SD Card slot. This has never worked but it didn’t bother me much until recently when I needed to transfer video files to a computer from an SD Card.
I needed to fix this problem.
The Immediate Issue
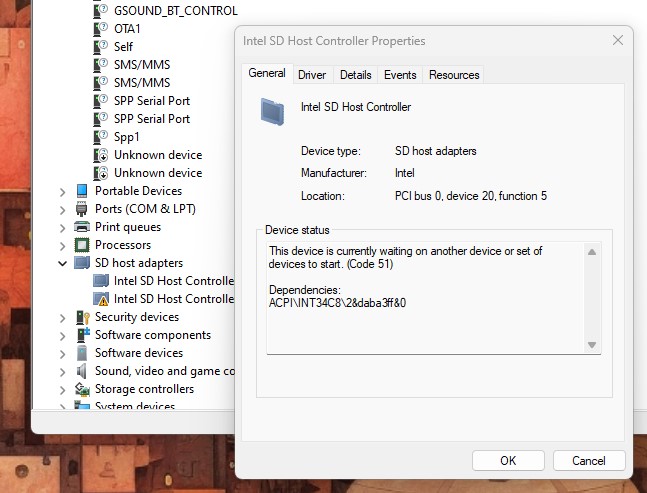
Looking in the Device Manager I could clearly see that the SD Host Controller did not have a working driver.
However, when I tried to update the driver or try uninstalling it and rebooting the system I would receive the response:
Working It Out
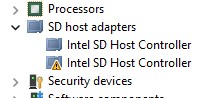
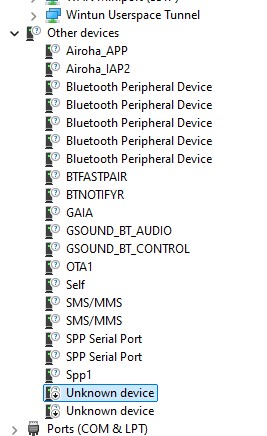
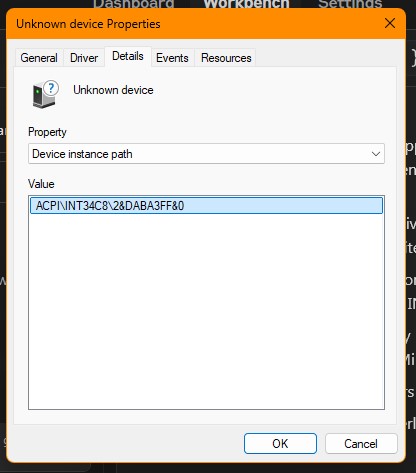
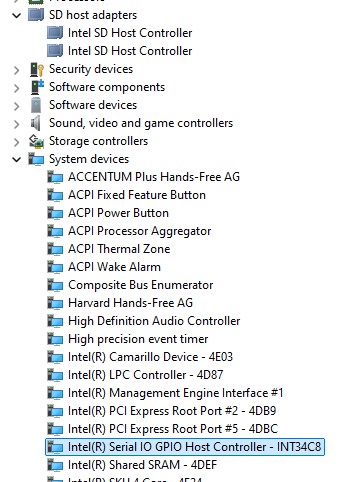
I tried for a good while to find this device without luck until I received a response from the manufacturer with the information that this device would present as an unknown device with the Hardware ID INT34C8. I needed to install the driver for this device before the Intel SD Host Controller would function. Knowing this information, I was able to find the device in Device Manager under Other devices:
INT34C8 is in the device instance path.
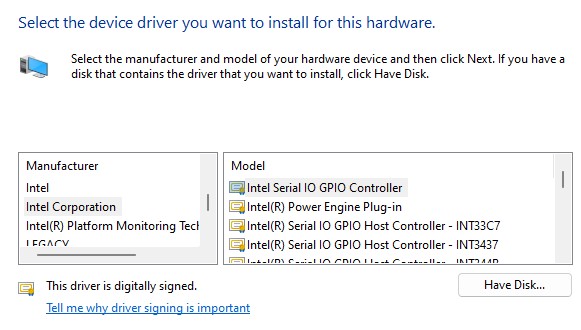
With the help of Google and Anthropic I was able to find out that this was an Intel Serial IO GPIO Host Controller. So, I tried updating the driver using Device Manager in the usual fashion:
But, unsurprisingly, INT34C8 wasn’t listed and so I needed to go and find this driver. Looking for drivers online is a bit of a minefield there is a site on the Microsoft domain that VirusTotal passes as clean. https://www.catalog.update.microsoft.com/Search.aspx?q=INT34C8
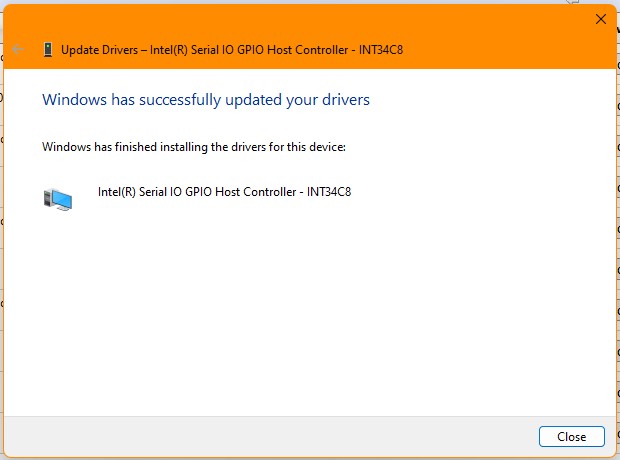
This provided a list of ‘System’ drivers so I chose the first one, for Windows 10 and later. A Cabinet File was downloaded and I opened that. Going back to Device Manager I chose once again to update the driver and then pointed at the C:\Users\tim folder. After a moment or two the installation was declared successful:
Looking in Device Manager confirmed that not only was the INT34C8 device working but also the SD Host Controller:
Conclusion
The crucial piece of information in this troubleshoot was finding the INT34C8 device and it was only when MeLE support let me know that this was going to show as an Unknown Device with Hardware ID INT34C8 that I was able to fix this problem.
Windows Task Scheduler is a handy tool that lets you automate routine tasks and keep your system running smoothly. Admins have full control over what gets scheduled, while regular users can set up tasks too, but with some limits. In places where security is a big deal, Task Scheduler might be locked down to prevent any funny business. To use it safely, it’s best to set up special accounts just for tasks, keep a close eye on who can do what, and check up on things regularly. It’s also smart to only give tasks the bare minimum permissions they need to work, and avoid using super-powerful accounts like SYSTEM if you can help it. Regular users can’t set up tasks that affect the whole system or run with top-level permissions. Don’t forget to review your tasks now and then to make sure they’re still needed and not causing any security headaches.
System Account?
The differences between using the Administrator account and the System account in Task Scheduler:
Admin account:
Runs tasks with administrative privileges
Has access to network resources
Can interact with the desktop
Tasks run in the user’s context
Requires password to be stored
System account:
Highest level of privileges on the local system
Limited network access
Cannot interact with the desktop
Runs in the system context
No password required
Better for system maintenance tasks
Choose based on task requirements and security considerations.
Creating a Task
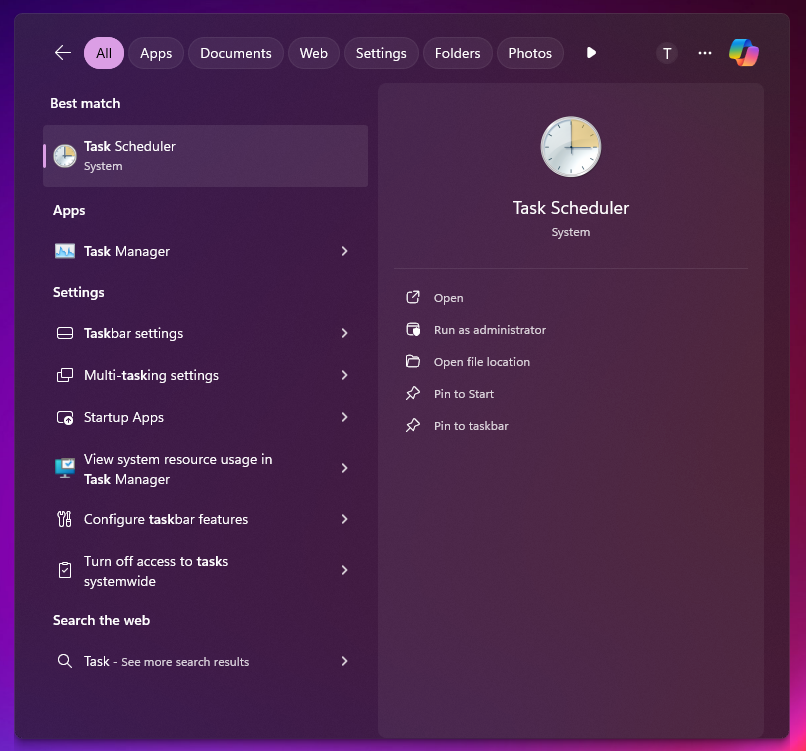
Open Task Scheduler in your administrator account:
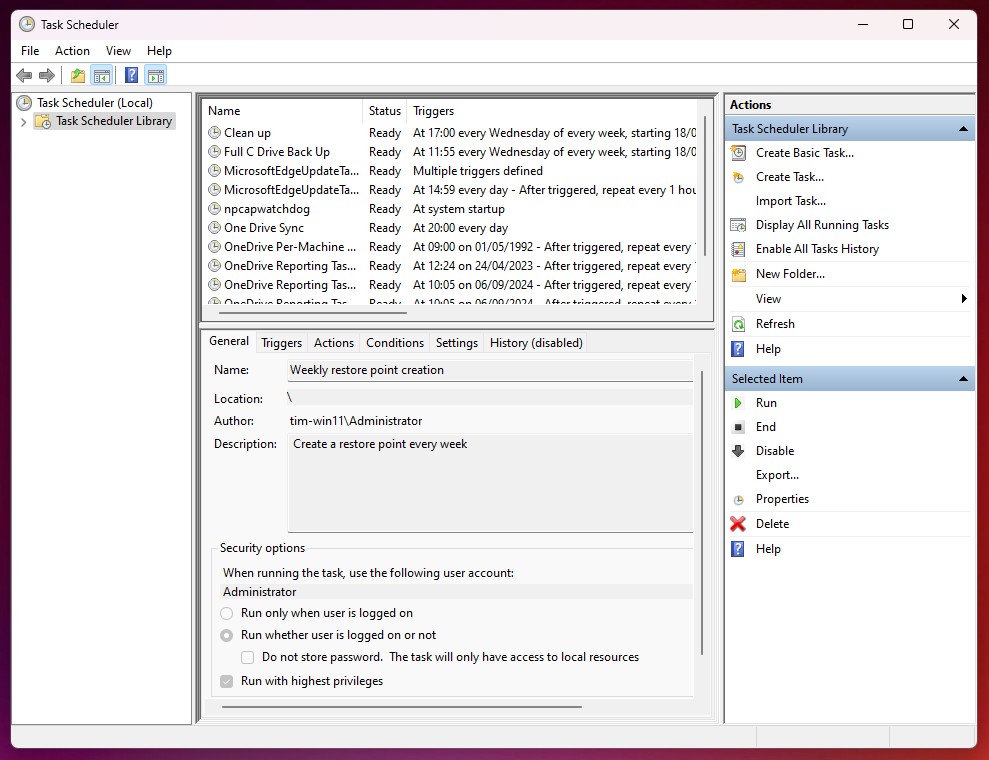
The main GUI window:
We have three main sections here: On the left the Task Libraries then we have the created tasks which can be selected and show their configuration below and on the right we have Actions.
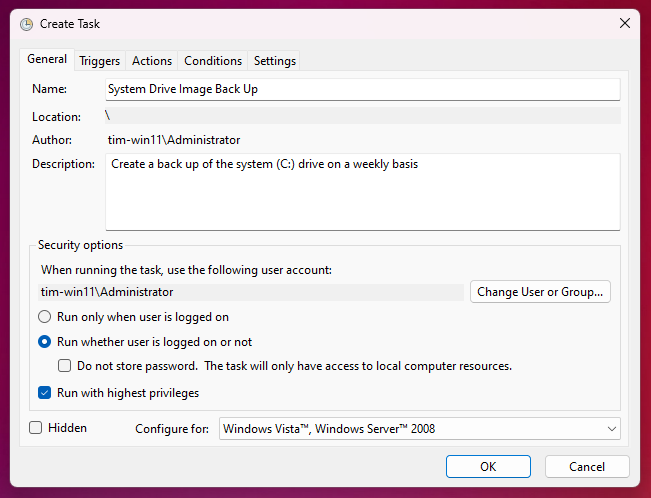
Under actions on the right select Create a Task:
Give the task a name and a description and choose security options. I want this to be run whether the admin is logged in or not and it needs highest privileges.
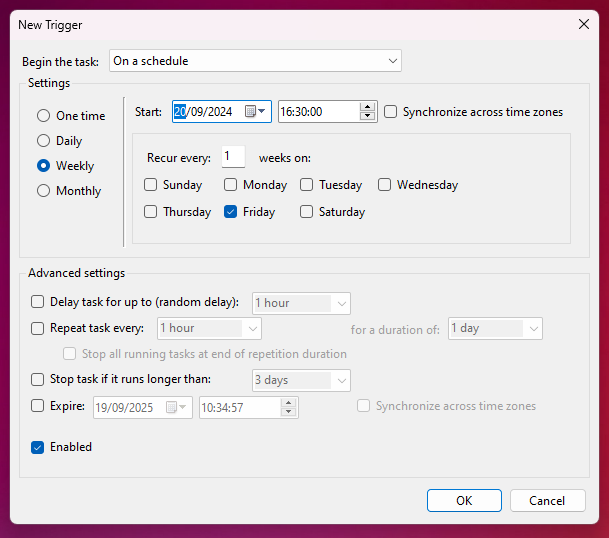
Then go to the Triggers tab:
This task is now set to run weekly on Fridays at 16:30 starting on the 20th of September 2024.
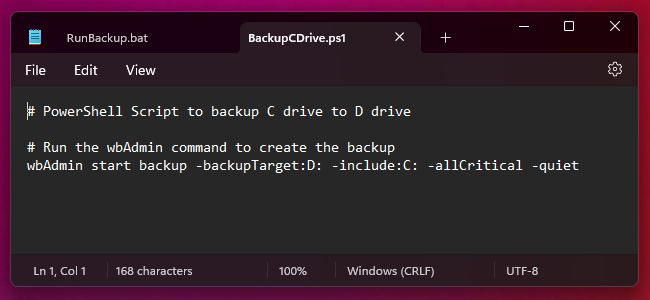
For the next stage we need some pre-requisites. We need a batch script that will be the action that is triggered by the scheduler and in turn the batch script will call the Powershell script that will effect the process required. In this case it will be an image back up of the C drive:
@echo off is commented out as it is useful for such a task to have the user notified that it is happening.
The powershell script also has comments to describe the process:
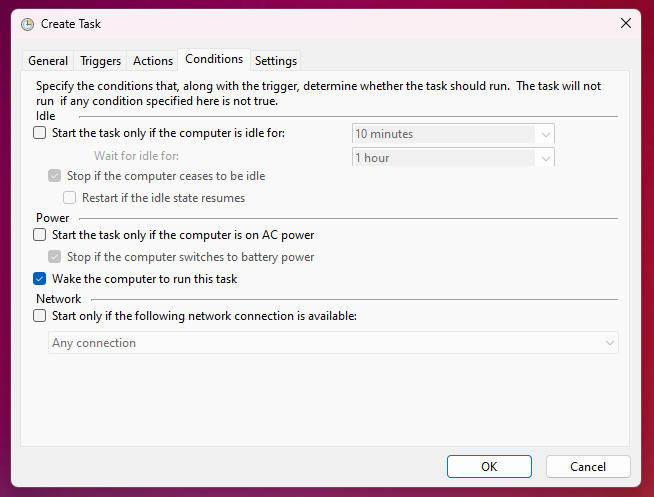
Next up is the Conditions tab:
I have selected one option.
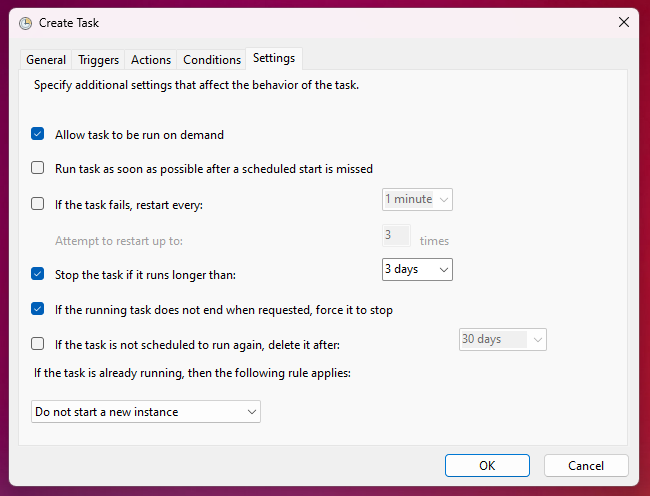
Finally, the Settings tab which I leave as default. It is useful to allow the task to be run on demand for testing and for manually starting the task:
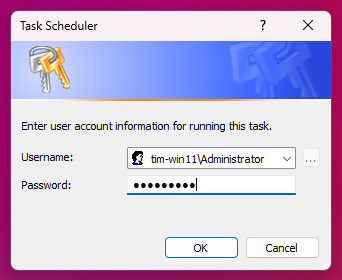
Administrator authentication is required:
There are many more uses for Task Scheduler but it is not without it’s idiosyncrasies and setting task to run at a set time reminds me of the good old days of setting VHS recorders to automatically record Starsky and Hutch. Sometimes it was successful, other times less so.
However with diligence and a bit of testing it can be an excellent time saving tool.
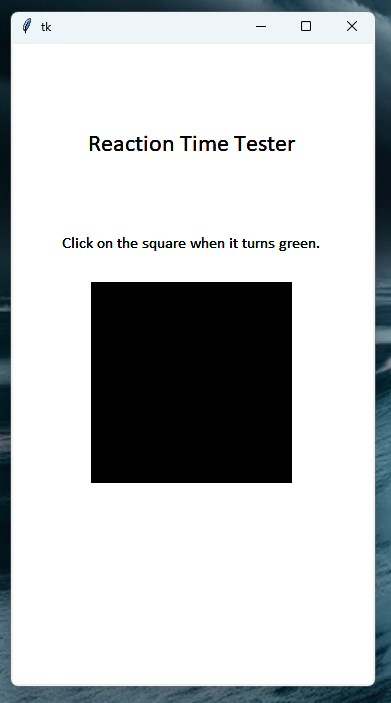
The brief for this exercise was to create a reaction time tester with a graphical interface. It proves to be a good exercise to learn about the tkinter module
import time
import random
import tkinter as tk

# Initialize the window
root = tk.Tk()
canvas = tk.Canvas(root, width=360, height=640, bg="white")
canvas.pack()

# Create the square and bind the click event
black_square = canvas.create_rectangle(80, 240, 280, 440, fill="black")
start_time = 0
reaction_text = None
best_time_text = None

# Create a best time
best_time = float('inf')  # Initialize with infinity

def update_square(event):
    global start_time, reaction_text, best_time, best_time_text
    end_time = time.time()
    reaction_time = round(end_time - start_time, 4)
    canvas.itemconfig(black_square, fill="black")
    if reaction_text is not None:
        canvas.delete(reaction_text)
    reaction_text = canvas.create_text(180, 500, text=f"Reaction Time: {reaction_time}s", font=("Calibri", 18), fill="black")

    if reaction_time < best_time:
        best_time = reaction_time
        if best_time_text is not None:
            canvas.delete(best_time_text)
        best_time_text = canvas.create_text(180, 600, text=f"Best time: {best_time}s", font=("Calibri", 12), fill="black")

    root.update()
    root.after(6000, initialize_app)  # reset after 6 seconds

def show_green():
    global start_time
    canvas.itemconfig(black_square, fill="green")
    start_time = time.time()

def initialize_app():
    global reaction_text, best_time_text
    # Clear the canvas
    canvas.delete("all")

    # Recreate the square
    global black_square
    black_square = canvas.create_rectangle(80, 240, 280, 440, fill="black")

    # Draw the title and instructions
    canvas.create_text(180, 100, text="Reaction Time Tester", font=("Calibri", 18), fill="black")
    canvas.create_text(180, 200, text="Click on the square when it turns green.", font=("Calibri", 12), fill="black")

    # Display the current best time
    best_time_text = canvas.create_text(180, 600, text=f"Best time: {best_time:.4f}s", font=("Calibri", 12), fill="black")

    # Bind the click event
    canvas.tag_bind(black_square, "<Button-1>", update_square)

    # Clear the previous reaction time text
    reaction_text = None

    # Wait a random interval between 2 to 4 seconds, then turn the square green and start the timer
    root.after(2000 + random.randint(0, 2000), show_green)

# Initialize the app and start the main loop
initialize_app()
root.mainloop()
Imports
Three modules are imported. time, random and tkinter. tkinter is for the graphical interface and random and time are used together to create the core function of the app.
This initialises a Tkinter window and creates a canvas within it. The window is the main application container, while the canvas is a drawing area. The canvas is set to 360×640 pixels with a white background. The canvas is then packed into the window, making it visible and ready for drawing or adding other elements.
Create The Square
# Create the square and bind the click event
black_square = canvas.create_rectangle(80, 240, 280, 440, fill="black")
start_time = 0
reaction_text = None
best_time_text = None
This code creates a black square on a canvas. It sets up variables to track the start time, and variables for displaying reaction time and best time. The square will be the target for user clicks, initiating the timing mechanism when interacted with.
Create a Best Time
# Create a best time
best_time = float('inf')  # Initialize with infinity
Here we initialise a variable called ‘best_time’ with positive infinity. In Python, float(‘inf’) represents infinity. This is a common technique used when you want to find the minimum value in a set of numbers. By starting with infinity, any real number will be smaller, allowing you to update ‘best_time’ as you compare values.
Define Update Square Function
def update_square(event):
global start_time, reaction_text, best_time, best_time_text
end_time = time.time()
reaction_time = round(end_time - start_time, 4)
canvas.itemconfig(black_square, fill="black")
if reaction_text is not None:
canvas.delete(reaction_text)
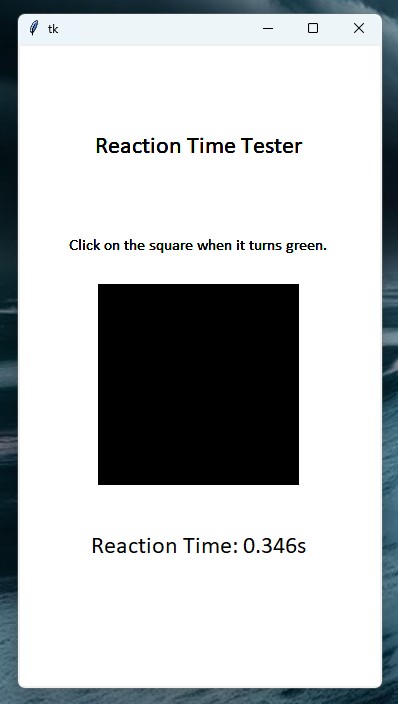
reaction_text = canvas.create_text(180, 500, text=f"Reaction Time: {reaction_time}s", font=("Calibri", 18), fill="black")
if reaction_time < best_time:
best_time = reaction_time
if best_time_text is not None:
canvas.delete(best_time_text)
best_time_text = canvas.create_text(180, 600, text=f"Best time: {best_time}s", font=("Calibri", 12), fill="black")
root.update()
root.after(6000, initialize_app) # reset after 6 seconds
This function updates the game state after a player clicks the square. It calculates the reaction time, updates the display with the current time, and checks if it’s a new best time. The function then resets the game after a 6-second delay. Key actions include:
Calculate reaction time
Update square color
Display reaction time
Update best time if applicable
Schedule game reset
The function uses global variables to maintain state across multiple function calls and interacts with a canvas object to update the visual elements of the game.
Define Show Green Function
def show_green():
    global start_time
    canvas.itemconfig(black_square, fill="green")
    start_time = time.time()
Now we define the function that turns the square to green which is the signal to the user that the timer has started and they should click on the square asap. The global variable start_time is used to record the start of the timing.
Define the Initialise App Function
def initialize_app():
    global reaction_text, best_time_text
    # Clear the canvas
    canvas.delete("all")

    # Recreate the square
    global black_square
    black_square = canvas.create_rectangle(80, 240, 280, 440, fill="black")

    # Draw the title and instructions
    canvas.create_text(180, 100, text="Reaction Time Tester", font=("Calibri", 18), fill="black")
    canvas.create_text(180, 200, text="Click on the square when it turns green.", font=("Calibri", 12), fill="black")

    # Display the current best time
    best_time_text = canvas.create_text(180, 600, text=f"Best time: {best_time:.4f}s", font=("Calibri", 12), fill="black")

    # Bind the click event
    canvas.tag_bind(black_square, "<Button-1>", update_square)

    # Clear the previous reaction time text
    reaction_text = None

    # Wait a random interval between 2 to 4 seconds, then turn the square green and start the timer
    root.after(2000 + random.randint(0, 2000), show_green)
This function initialises the reaction time test. It clears the canvas, creates a black square, displays instructions, and shows the best time. It then sets up a click event on the square and schedules the square to turn green after a random delay of 2-4 seconds. This prepares the game for a new round, resetting the display and setting up the next test.
Function Calls
initialize_app()
root.mainloop()
The initialize_app function is called which is the core of the program and the mainloop method is called on the root that starts the event loop for the GUI. It listens for user interactions (like button clicks) and keeps the window open.
Conclusion
There we have it. A simple GUI python program for testing how slow or fast your reactions are.
The brief for this exercise was to create a python script that would emulate the basic operation of an online bank account. The exercise is a good way to learn to create classes for efficient implementation of code.
# Create the class for the bank account
class BankAccount:
    def __init__(self, balance=0):
        self.balance = balance

    def deposit(self, amount):
        self.balance += amount
        print(f"Deposited £{amount} New balance: £{self.balance}")

    def withdraw(self, amount):
        if amount <= self.balance:
            self.balance -= amount
            print(f"Withdrawn: £{amount} New balance: £{self.balance}")
        else:
            print(f"Insufficient funds you loser")

    def check_balance(self):
            return self.balance

# Define the function for interaction with the online banking system
def cashier():
    cashier_prompt = input(f"Cashier: Good morning. Would you like to make an account?: ")
    if cashier_prompt.lower() == "yes":
        account_name = input("Cashier: Under what name? max 5 letters: ")
        account = BankAccount()
        initial_deposit = int(input("Cashier: How much will you be depositing?: £"))
        account.deposit(initial_deposit)
        print(f"Cashier: Your account {account_name} has been created with the balance of: £{initial_deposit}")
    else:
        print("ok")
    customer = input("Is the anything else I can help you with? ")
    if customer == "yes":
        while customer != "quit":
            customer = input("Request: deposit, withdraw, balance or quit: ")
            if customer == "deposit":
                deposit = int(input("How much? "))
                account.deposit(deposit)
            elif customer == "withdraw":
                withdraw = int(input("How much? "))
                account.withdraw(withdraw)
            elif customer == "balance":
                balance = account.check_balance()
                print(f"£{balance}")
            else:
                print("Good day to you.")

cashier()
Cashier: Good morning. Would you like to make an account?: yes Cashier: Under what name? max 5 letters: timmy Cashier: How much will you be depositing?: £1000 Deposited £1000 New balance: £1000 Cashier: Your account timmy has been created with the balance of: £1000 Is the anything else I can help you with? yes Request: deposit, withdraw, balance or quit: deposit How much? 246000 Deposited £246000 New balance: £247000 Request: deposit, withdraw, balance or quit: balance £247000 Request: deposit, withdraw, balance or quit: quit Good day to you.
The Bank Account Class
class BankAccount:
    def __init__(self, balance=0):
        self.balance = balance

    def deposit(self, amount):
        self.balance += amount
        print(f"Deposited £{amount} New balance: £{self.balance}")

    def withdraw(self, amount):
        if amount <= self.balance:
            self.balance -= amount
            print(f"Withdrawn: £{amount} New balance: £{self.balance}")
        else:
            print(f"Insufficient funds you loser")

    def check_balance(self):
            return self.balance
The BankAccount class is the foundation of this banking simulation program. It represents a bank account with methods for basic financial operations. The class initialises an account with a balance (defaulting to 0), and provides methods to deposit money, withdraw funds (with a check for sufficient balance), and check the current balance. These methods also print informative messages about each transaction, making the program more interactive and user-friendly.
The Cashier Function
def cashier():
    cashier_prompt = input(f"Cashier: Good morning. Would you like to make an account?: ")
    if cashier_prompt.lower() == "yes":
        account_name = input("Cashier: Under what name? max 5 letters: ")
        account = BankAccount()
        initial_deposit = int(input("Cashier: How much will you be depositing?: £"))
        account.deposit(initial_deposit)
        print(f"Cashier: Your account {account_name} has been created with the balance of: £{initial_deposit}")
    else:
        print("ok")
    customer = input("Is the anything else I can help you with? ")
    if customer == "yes":
        while customer != "quit":
            customer = input("Request: deposit, withdraw, balance or quit: ")
            if customer == "deposit":
                deposit = int(input("How much? "))
                account.deposit(deposit)
            elif customer == "withdraw":
                withdraw = int(input("How much? "))
                account.withdraw(withdraw)
            elif customer == "balance":
                balance = account.check_balance()
                print(f"£{balance}")
            else:
                print("Good day to you.")
The cashier function simulates a bank teller interaction. It prompts the user to create an account, collecting necessary information like account name and initial deposit. If an account is created, it then enters a loop allowing the user to perform various banking operations (deposit, withdraw, check balance) until they choose to quit. This function effectively ties together the BankAccount class functionality with a user-friendly interface, creating an interactive banking simulation.
Finally we call the cashier function:
cashier()
Conclusion
We created a class that is then utilised by the cashier function to provide the basic function of a banking system.
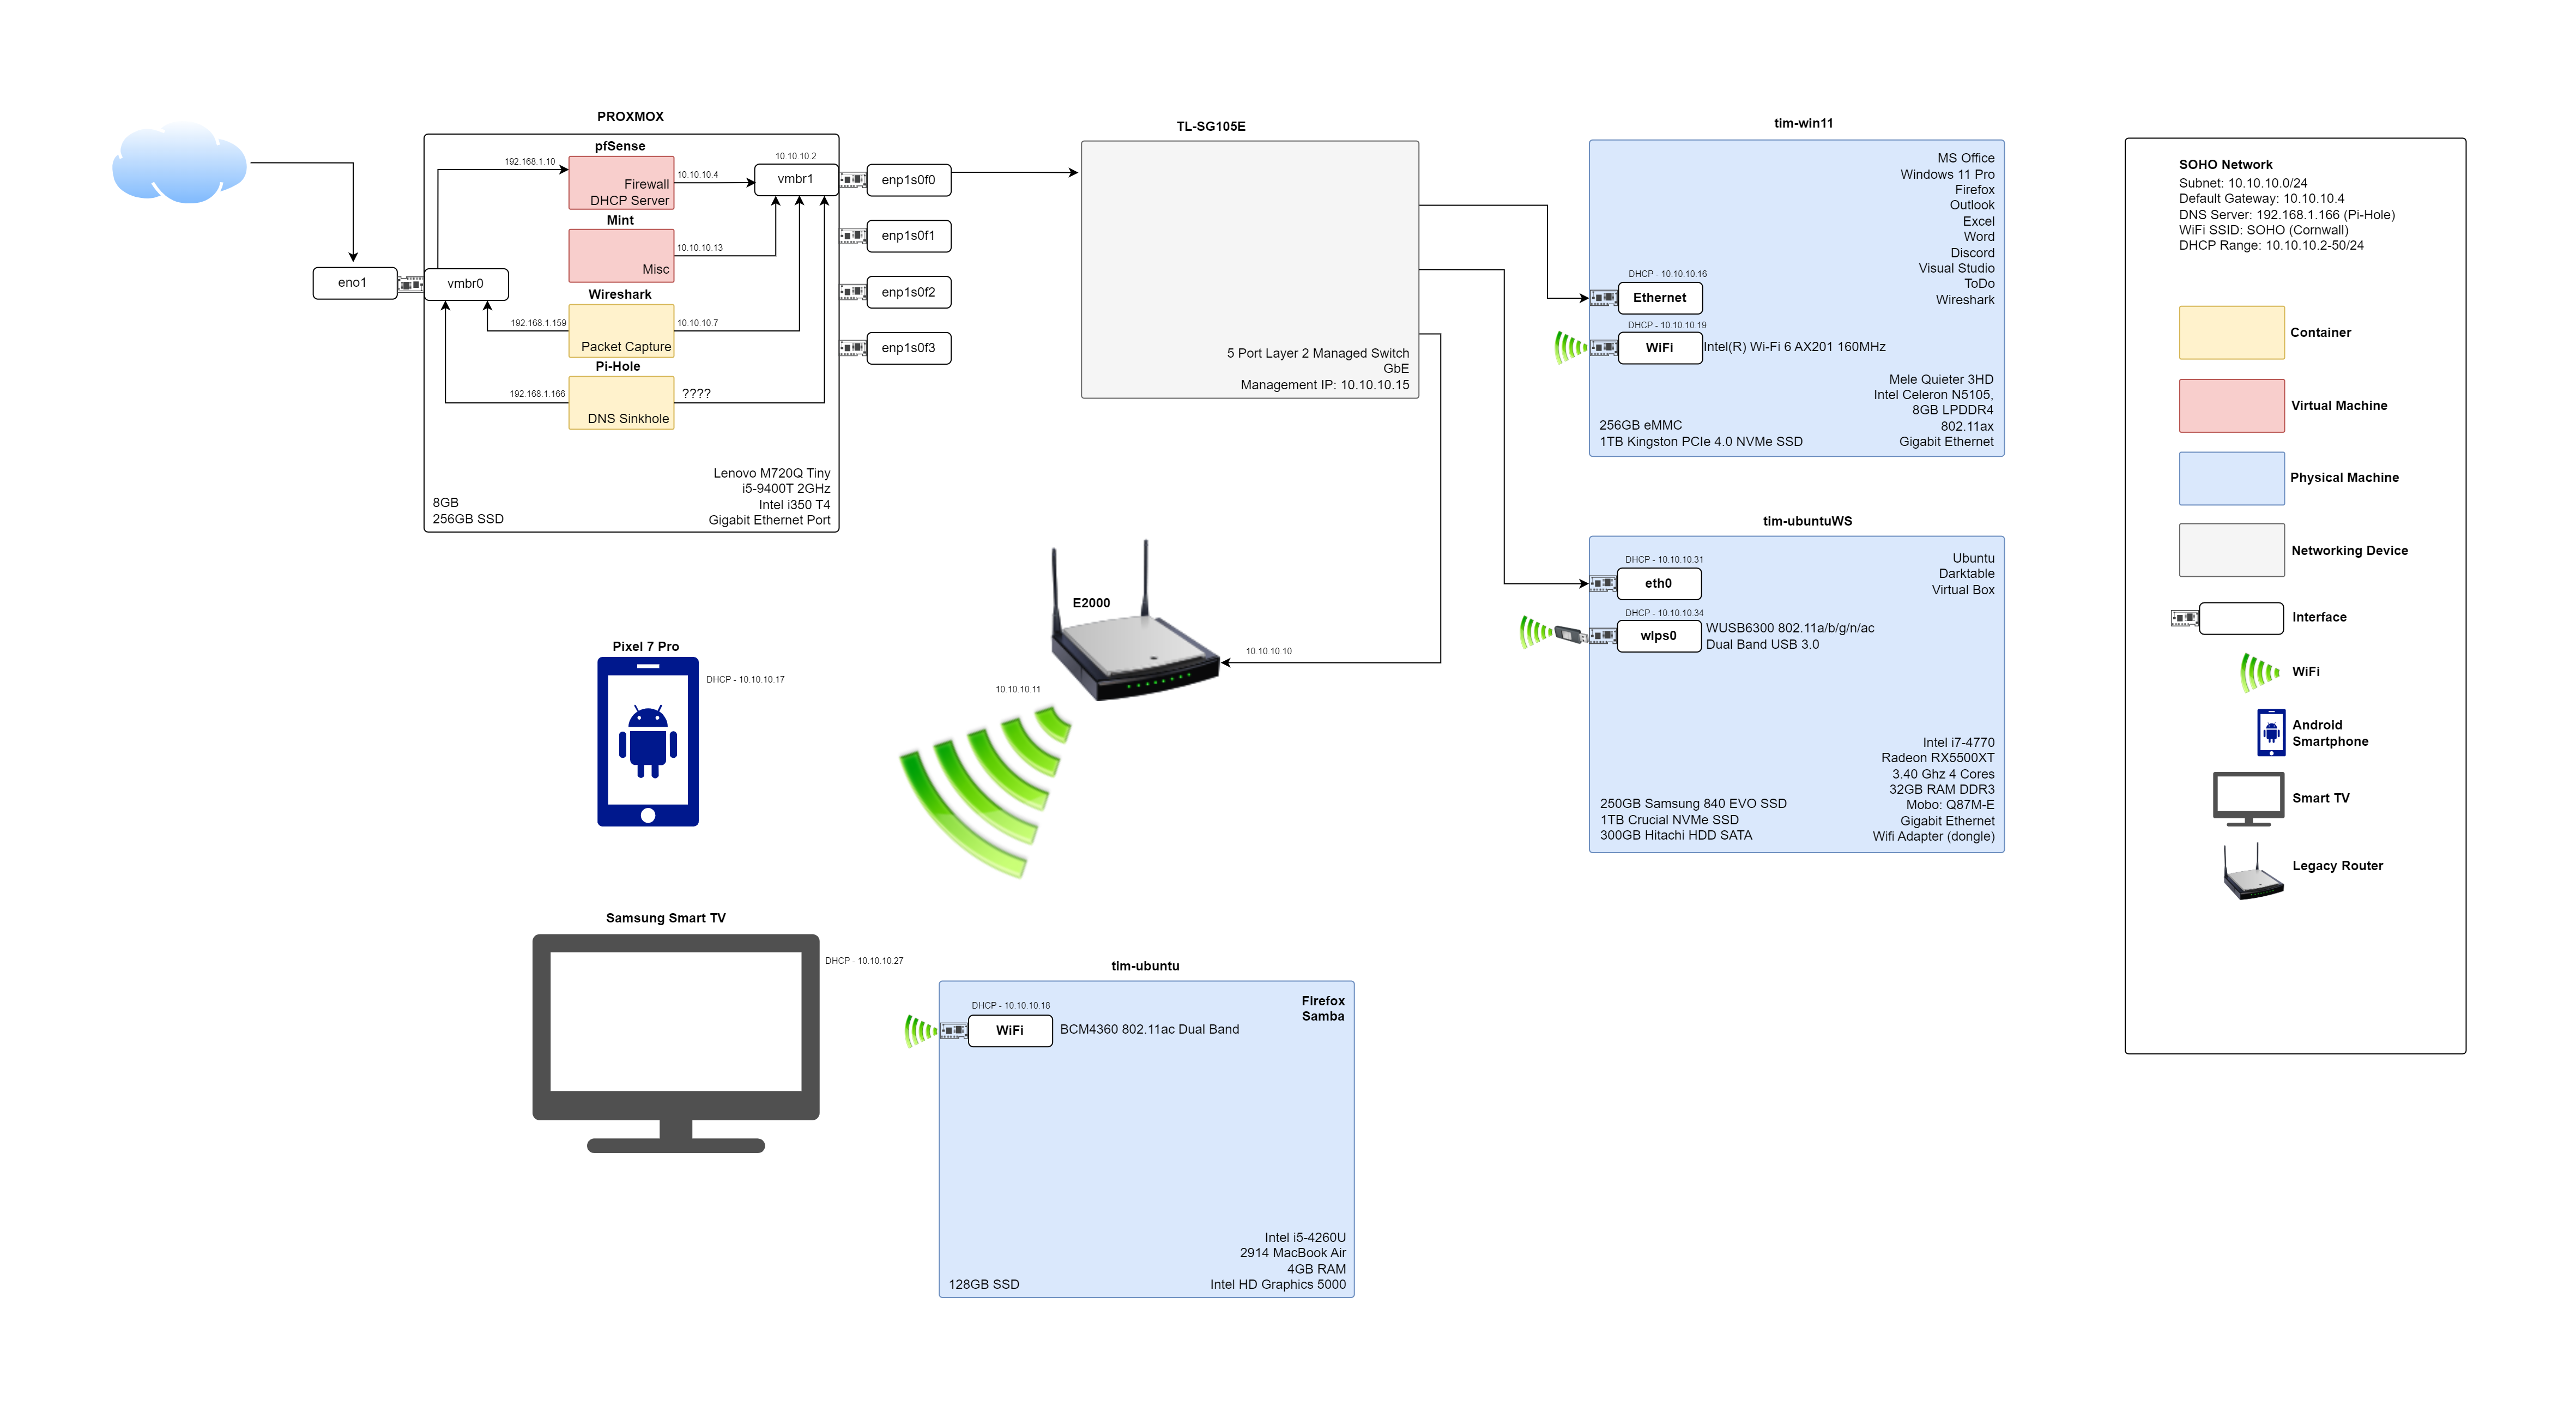
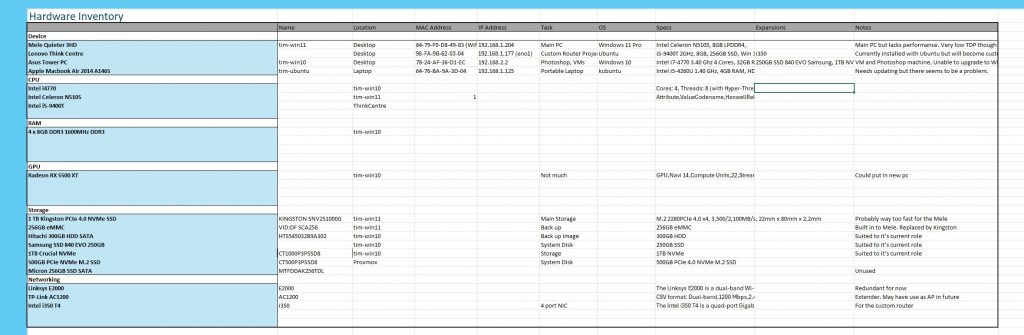
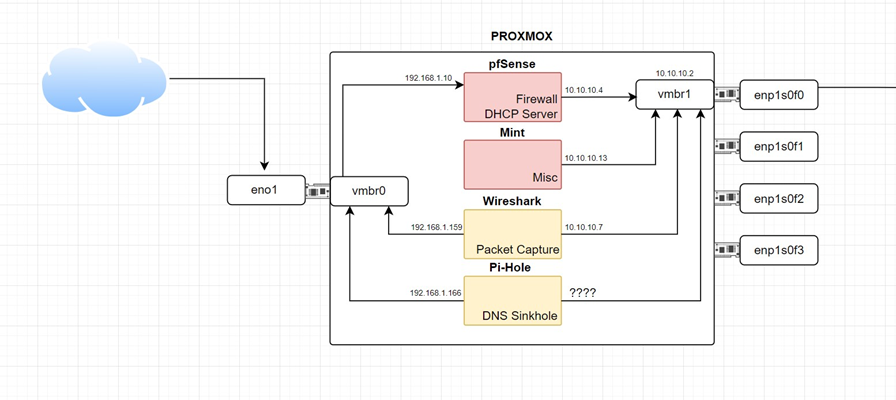
Create a network diagram, with some logical elements, to keep track of all the machines, virtual and physical, their IP addresses and all of the associated hardware.
This is diagram is created with draw.io which is available in the your browser or as a desktop app.
We have Proxmox running on a Lenovo mini-PC. Within this we are running two VMs and two containers. We can see the extra interfaces the i350 provides although we are only using one along with the gigabit port that is native to the PC.
pfSense is the primary application which is providing router, firewall and DHCP services. The Mint VM is for miscallaneous exercises and also to have a look at the distro. The ‘Wireshark’ container is work in progress for a dedicated process of sniffing the network packets and providing a summary in text format at the end of the day. Pi-Hole is primarily for ad-blocking and malicious domain avoidance.
Next in line is the TL-SG105E and the rest of the devices are connected via this managed switch. Then there is tim-win11 which is my daily driver and often acts as the thin-client to tim-ubuntuWS. There is a legacy Cisco router which has been repurposed as an AP. DCHP has been disabled to avoid conflicts with IP addresses.
By most standards this is a small homelab but nonetheless is a great source of hands-on experience.
After spending significant amounts of time on the Custom Router Build it soon became apparent that there was stacks of headroom left in the M720Q Tiny for other things. So how could I run pfSense, the primary reason for the device, along with other processes or applications that would be useful or just plain fun?
Enter Proxmox
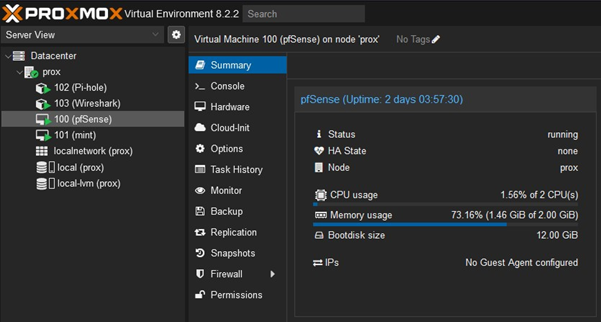
Proxmox is a Virtual Environment and open-source platform for virtualisation. With Proxmox we can make VMs and containers for pretty much anything we need. Fundamentally it is a Class 1 Hyper-visor that runs on bare metal. My initial plans were to run pfSense as a VM then DNS sinkhole Pi-Hole as a container. While I am at it why not spin up an instance of Mint Linux and a container purely to run tshark and learn how to automate packet captures?
Piece of Cake
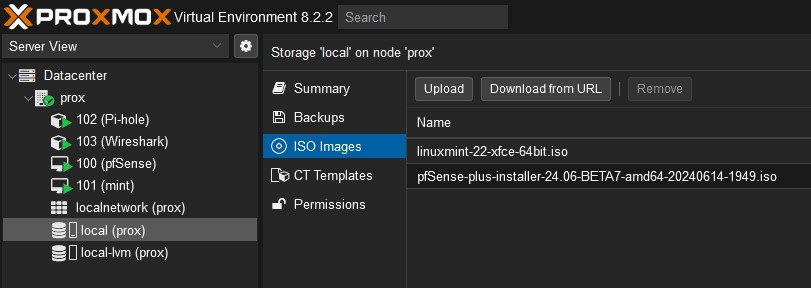
Installing Proxmox itself is as easy as creating a USB version of the ISO and booting from that. Once installed creating VMs and containers is even easier.
Uploading ISOs is straightforward.
On top of all that the GUI and overall set up of Proxmox is extremely intuitive.
Datacenter will show you the overall server or cluster. Then you have individual nodes – here we have just the one. Inside each node are the VMs and containers.
We can see the Network set up for our ‘Prox’ node. Notice the two virtual bridges that are assigned physical network adapters.
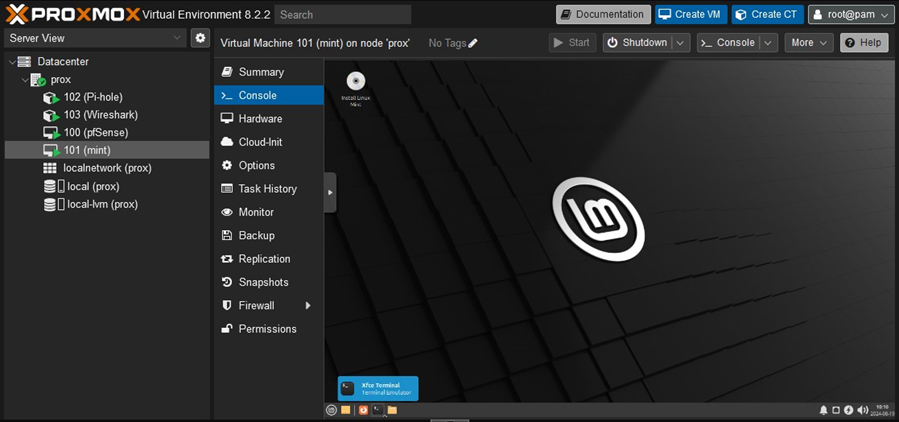
Mint installed as a VM
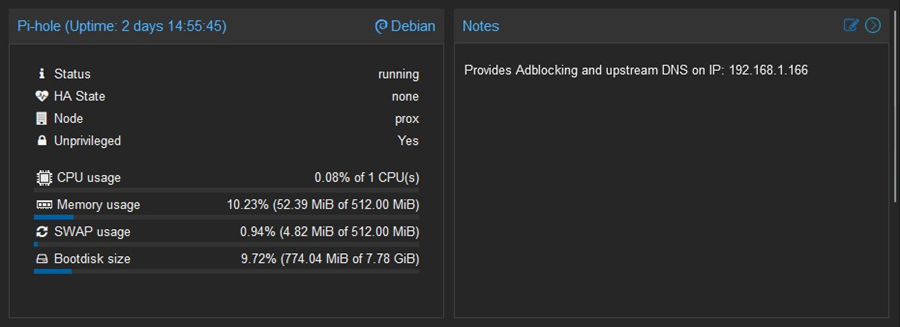
Pi-hole as a container
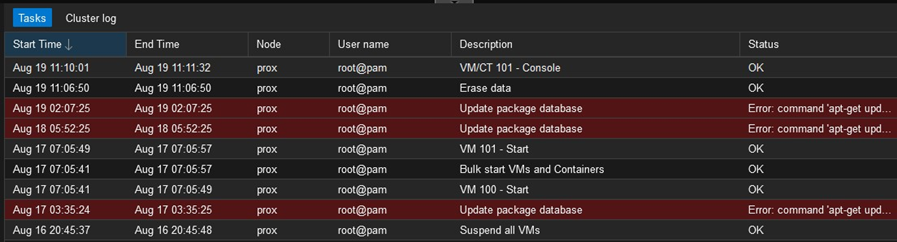
Logs
Making a diagram always helps. This set up is the core of my home SOHO network.
So, by using Proxmox on the M720Q Tiny I have pfSense, Pi-Hole and VM for Mint and a container for packet capture. So far the load on the device is not high at all. May want to get some more RAM soon.
The time for a new PC is approaching. Primarily this will be my main PC and for IT labbing and VMs. For years I have used Intel CPUs but AMD have been proving themselves as the superior chip maker in this department so I want to give them a shot with the next desktop. In two days they will be releasing the 9000 series with Ryzen 9 9950X, Ryzen 9 9900X, Ryzen 7 9700X and the Ryzen 5 9700.
Low power draw is high on my list so I am interested in the Ryzen 7 9700X. With an expected RRP of around £300 and a TDP of 65W it ticks a lot of boxes.
Specification
Details
Architecture
Zen 5 (Granite Ridge)
Cores
8
Threads
16
Base Clock
3.8 GHz
Max Boost Clock
Up to 5.5 GHz
L1 Cache
512 KB
L2 Cache
8 MB
L3 Cache
32 MB
TDP
65W
Manufacturing Process
TSMC 4nm FinFET
Socket
AM5
Supported Memory
DDR5
PCIe Version
5.0
That’s a lot of fives.
Performance
The Ryzen 7 9700X is designed for high-performance desktop computing, particularly for gaming and productivity tasks. Based on benchmarks, it shows significant improvements over its predecessors and competitive performance against Intel’s latest offerings:
Single-Core Performance: In CPU-z, it scored 863 points in single-core tests and 2218 points in Cinebench R23 single-core tests.
Multi-Core Performance: It scored 8237 points in CPU-z multi-core tests and 20,125 points in Cinebench R23 multi-core tests.
Gaming Performance: It is expected to perform well in gaming, with AMD claiming improvements over Intel’s 14900K by 4% to 23% in gaming and 7% to 56% in productivity tasks.
Key Features
Zen 5 Architecture: Offers a 16% improvement in Instructions Per Clock (IPC) over Zen 4, enhancing both gaming and productivity performance.
Energy Efficiency: Initially rated at 65W TDP, though there are considerations to revise this to 120W to boost gaming performance further.
Overclocking Support: The processor is unlocked for overclocking, allowing enthusiasts to push its performance further.
Advanced Memory and I/O: Supports DDR5 memory and PCIe 5.0, ensuring compatibility with the latest hardware and peripherals.
Is it right for Virtualisation and Productivity?
The AMD Ryzen 7 9700X appears to be well-suited for virtualization workloads and general IT cybersecurity tasks and learning. Here’s why:
Virtualization Support: The Ryzen 7 9700X supports AMD-V, which is AMD’s hardware virtualization technology. This greatly improves virtual machine performance, making it ideal for running multiple VMs simultaneously.
Core Count and Threading: With 8 cores and 16 threads, this CPU provides excellent multitasking capabilities. This is crucial for running multiple VMs concurrently, which is common in lab environments and cybersecurity testing scenarios.
Clock Speeds: The base clock of 3.8 GHz and boost clock up to 5.5 GHz offer strong single-threaded performance, which is beneficial for tasks that don’t scale well across multiple cores.
Cache: The Ryzen 7 9700X features 32 MB of L3 cache, which can help improve performance in various workloads, including virtualization.
Modern Architecture: Built on the Zen 5 (Granite Ridge) architecture using a 4 nm process, this CPU incorporates the latest improvements in AMD’s processor technology.
Memory Support: It supports DDR5 memory, which can provide faster data access for memory-intensive VM workloads.
PCIe Support: With PCIe 5.0 support and 24 lanes, it offers high-speed connectivity for storage and other peripherals, which can be crucial for VM performance.
Combine this CPU with fast RAM and storage and I think it will a good solid workhorse for my intentions. On top of that AMD have shown exceptional commitment to the AM4 socket which is still being supported and bodes well for the longevity of an AM5 motherboard.
On the face of it it appears to be a good choice, although I am a little weary of the TDP jump to 120W. This is marketed as a gaming CPU and that is the last thing I will be doing on this machine. Might there be better options?
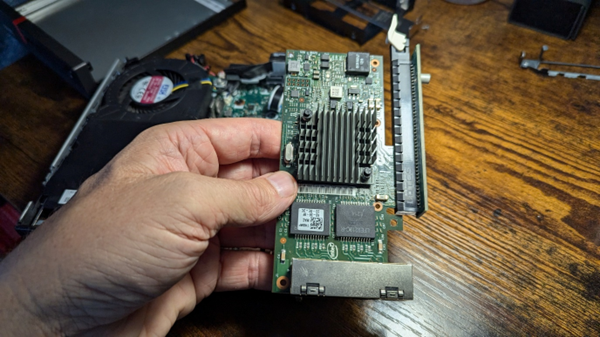
This project aims to identify and assemble components for a custom router that can serve as an alternative to standard commercial routers. By employing pfSense software and installing a quad-port Network Interface Card (NIC) into a Small Form Factor (SFF) PC, such as the Lenovo M720q, we can create a custom router. This router can be used for various purposes, including blocking ad servers, and serves as an excellent tool for learning and gaining hands-on experience in network management.
Considerations
How much compute? – Standard router and firewall do not need that much grunt but maybe we get into IDS/IPS or similar?
Budget – how much do we want to spend on this?
M.2 SSD – the NIC will take up the space for the SATA SSD.
Power usage – what is acceptable? 30W? Comments on the reddit claim 15W or so.
Managed switch – do we want to add this to the set up?
Parts Needed
This set up worked with the parts I chose. It is a tight fit and starting off with a different mini-PC will mean some research on how to make it work.
You will need:
Mini PC with a “PCIe” slot onboard – I chose a Lenovo m720q Tiny.
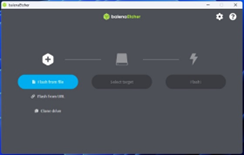
Use a tool like Balena Etcher or Rufus (Linux) to create a USB installer.
Insert the USB into the m720q.
Insert or have ready the ethernet cables for your WAN and LAN.
Reboot into the BIOS/UEFI or boot menu (Lenovo is F1).
Choose Full Install.
Select Destination Drive.
Choose ZFS.
Choose RAID 0 – no redundancy.
Choose interfaces for WAN and LAN.
At this point you can use AutoDetect and you may need to remove and replace the ethernet cables.
Wait for the installation to complete.
Remove installation media.
Allow the system to reboot.
Use a browser to access the webConfigurator.
Default credentials.
admin
pfsense
Check that the latest version has been installed.
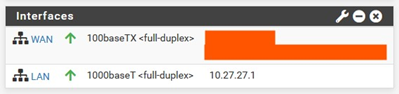
Check that the interfaces have IP addresses. (My public IP hidden)
Set Up DHCP for the LAN.
Choose a private address range such as 10.40.40.1/24
On the machine that you were using to access the webConfigurator, which is on the LAN side of the pfsense machine, you will need to release and renew the DHCP lease.
ipconfig /release and then ipconfig /renew (windows).
sudodhclient -r and then sudodhclient (linux).
IF you are using this as a device inside your SOHO network and the WAN interface is a private IP address supplied by the DHCP server on the SOHO router then you will need to uncheck the Block private networks and loopback addresses option in the Reserved Networks section of WAN interface configuration page.
Change the default admin credentials for the webConfigurator.
Finishing Up
Now that we have the pfsense up and running we can start playing with it. You can add widgets to the dashboard such as traffic graphs and you can add firewall rules and so much more.
Building your own router with pfSense on a compact PC like the Lenovo m720q is a great way to learn about networking and create a setup that’s just right for you. This project lets you get hands-on with network hardware, tweak software settings, and explore advanced routing features. In the end, you might find that your custom router works better, is more secure, and can do more than off-the-shelf routers.
To provide the best experiences, we use technologies like cookies to store and/or access device information. Consenting to these technologies will allow us to process data such as browsing behaviour or unique IDs on this site. Not consenting or withdrawing consent, may adversely affect certain features and functions.
Functional
Always active
The technical storage or access is strictly necessary for the legitimate purpose of enabling the use of a specific service explicitly requested by the subscriber or user, or for the sole purpose of carrying out the transmission of a communication over an electronic communications network.
Preferences
The technical storage or access is necessary for the legitimate purpose of storing preferences that are not requested by the subscriber or user.
Statistics
The technical storage or access that is used exclusively for statistical purposes.The technical storage or access that is used exclusively for anonymous statistical purposes. Without a subpoena, voluntary compliance on the part of your Internet Service Provider, or additional records from a third party, information stored or retrieved for this purpose alone cannot usually be used to identify you.
Marketing
The technical storage or access is required to create user profiles to send advertising, or to track the user on a website or across several websites for similar marketing purposes.


