You have found your next IT professional

Category: Study (Page 1 of 2)

Using hping3

Hping3 is a powerful command-line tool used for crafting and sending custom network packets. It goes beyond the basic ping function by allowing you to send various types of packets, including TCP, UDP, and ICMP. This versatility makes it a valuable asset for network administrators and security professionals.

Uses and syntax

Firewall Testing: By sending different types of packets to network hosts, you can test firewall rules and intrusion detection systems.

Test how a firewall responds to ICMP packets:

-1 sets ICMP mode

Test firewall against TCP SYN packets:

-S sets SYN mode

Network Performance Testing: HPING-3 can generate traffic to test network throughput, latency, and packet loss.

Send packets at a specific rate (e.g., 10 packets per second) to test throughput:

Port Scanning: It can scan ports on a network to identify open or closed ports, useful for network mapping.

TCP SYN scan on a specific port:

Scan a range of ports:

Traceroute: With HPING-3, you can perform advanced traceroutes, which can help identify the path packets take through a network.

Perform traceroute using ICMP:

Perform traceroute with TCP SYN packets:

Denial of Service (DoS) Simulation: It can simulate DoS attacks on a network by generating a high volume of traffic to test the network’s resilience.

Send a flood of TCP SYN packets to simulate a SYN flood attack:

Crafting Custom Packets: HPING-3 allows for the customization of packet headers, making it useful for testing how different network devices or protocols respond to various packets.

Send a packet with a specific TCP flag (e.g., RST):

-R sets RST flag

Network Services Testing: By sending packets with specific flags or payloads, you can test how network services respond, which can be useful for debugging or security assessments.

Test how a web server responds to ACK packets:

-A sets ACK

Send fragmented packets to test handling of such packets:

-f sets Frag

Without wanting to sound like an LLM, hping3 is a powerful tool that can get you in trouble if you point it at the wrong IP address.

Exploring iftop

Real-time network performance insights. This powerful command-line tool is an indispensable asset for system and network administrators aiming to keep a vigilant eye on TCP/IP connections and network bandwidth utilization.

What is iftop?

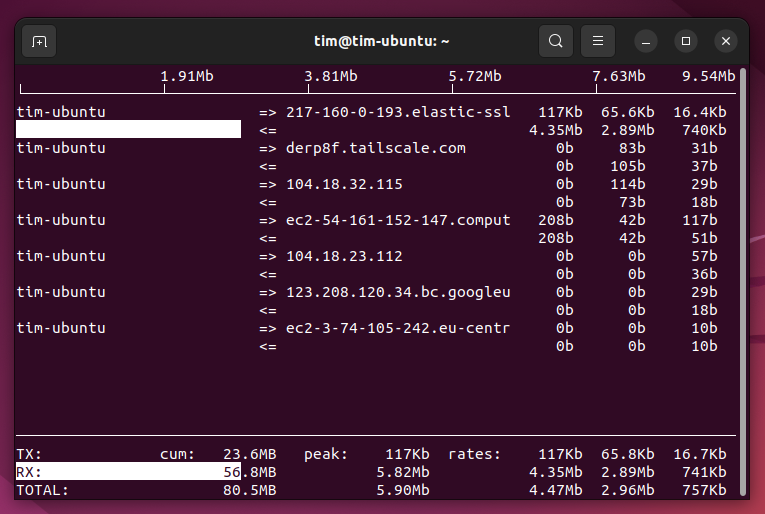
iftop, short for ‘interface top’, functions akin to the well-known Linux utility ‘top’, but with a focus on network activity. It provides a dynamic view of the data flowing through an interface, displaying bandwidth usage on a per-connection basis. This immediate feedback allows users to identify which hosts are consuming the most bandwidth, a crucial aspect in managing network resources efficiently and mitigating potential bottlenecks.

Key Features and Benefits

One of the core strengths of iftop is its simplicity and ease of use. By running a single command, users can observe the incoming and outgoing traffic from and to different hosts. The tool displays information such as the source and destination addresses, the current bandwidth usage, and the total data transferred over a specific period. This visibility is pivotal for troubleshooting network issues, planning bandwidth allocation, and ensuring that critical services have the necessary resources to operate smoothly.

Moreover, iftop offers several customization options to tailor its output to specific needs. Users can filter traffic by port or IP address, view bandwidth usage by network interface, and even display the network activity graphically in a terminal. These features make iftop a versatile tool that can adapt to various network analysis scenarios.

Getting Started with iftop

Installing iftop is straightforward on most Linux distributions.

For Debian-based systems:

Red hat-based distributions:

Once installed, running iftop is as simple as typing iftop in the terminal. For a more detailed view, users can employ flags such as -i to specify an interface or -n to prevent hostname resolution, enhancing the tool’s performance.

Conclusion

Exploring iftop: The Must-Have Network Monitoring Tool for Linux

In the bustling world of network administration, Linux users are constantly in search of efficient tools to monitor network traffic and bandwidth usage. Amid a plethora of options, iftop emerges as a standout choice for those seeking real-time network performance insights. This powerful command-line tool is an indispensable asset for system and network administrators aiming to keep a vigilant eye on TCP/IP connections and network bandwidth utilization.

What is iftop?

iftop, short for ‘interface top’, functions akin to the well-known Linux utility ‘top’, but with a focus on network activity. It provides a dynamic view of the data flowing through an interface, displaying bandwidth usage on a per-connection basis. This immediate feedback allows users to identify which hosts are consuming the most bandwidth, a crucial aspect in managing network resources efficiently and mitigating potential bottlenecks.

Key Features and Benefits

One of the core strengths of iftop is its simplicity and ease of use. By running a single command, users can observe the incoming and outgoing traffic from and to different hosts. The tool displays information such as the source and destination addresses, the current bandwidth usage, and the total data transferred over a specific period. This visibility is pivotal for troubleshooting network issues, planning bandwidth allocation, and ensuring that critical services have the necessary resources to operate smoothly.

Moreover, iftop offers several customization options to tailor its output to specific needs. Users can filter traffic by port or IP address, view bandwidth usage by network interface, and even display the network activity graphically in a terminal. These features make iftop a versatile tool that can adapt to various network analysis scenarios.

Getting Started with iftop

Installing iftop is straightforward on most Linux distributions. For Debian-based systems, one can install it using apt-get install iftop, while yum install iftop will suffice for Red Hat-based distributions. Once installed, running iftop is as simple as typing iftop in the terminal. For a more detailed view, users can employ flags such as -i to specify an interface or -n to prevent hostname resolution, enhancing the tool’s performance.

Conclusion

For Linux users tasked with monitoring and managing network traffic, iftop is a tool that combines power with simplicity. Its real-time monitoring capabilities provide immediate insights into network performance, making it easier to identify and address issues proactively. Whether you’re a seasoned network administrator or just starting out, iftop is a valuable addition to your toolkit, offering a clear window into the dynamics of your network traffic.

Understanding NAT

Introduction

NAT is one of the more obscure protocols that we use in IT/Networking. In brief, NAT translates private IP addresses of your devices on the local network to a single public address for internet access, acting like a guard for your devices and conserving valuable public IP addresses. 

Our home or office will have a public IP address. Use curl ifconfig.me in a command prompt to see your public IP address. Keep it secret, you don’t want people to know this just you don’t like random people to know your home address.

Your home or office will have many devices, each of which needing its own IP address so they will be given a private IP address by the router or DHCP server. 192.168.0.1 look familiar?

Private Address Ranges

RangeDescription
10.0.0.0 – 10.255.255.255Commonly used for private networks, large enough for most organizations.
172.16.0.0 – 172.31.255.255Another common private network range, divided into a larger usable space compared to 192.168.x.x.
192.168.0.0 – 192.168.255.255Most common default range for home routers, offering a smaller pool of addresses suitable for home networks.
169.254.0.0 – 169.254.255.255Link-local address range used for automatic configuration when a DHCP server is unavailable. Devices can communicate within the local network using these addresses but cannot access the internet.

This gives us a situation where a laptop in Japan wants to send information to a company’s server in Rome and how does each device know where to send data packets when that IP address is private?

The other problem to think about here is how many devices are there globally compared to how many IP addresses there are. IPv4 uses 32 bit addresses which equals 2^32 possible addresses. This is roughly 4.3 billion. In 2024 there are in the region of 15 billion devices on the internet. So there clearly are not enough IP addresses to go around.

We need devices to have private addresses associated with a public address via a router (or Default Gateway) and this is where NAT comes in and it essentially works in your router to manage the private address communications with other addresses around the world.

How Does It Actually Work?

NAT uses Ports and a NAT Table to manage the private IP communications

Ports – virtual channels on your router that are used for different devices and applications or protocols. Webpages are on Port 80, 443 (HTTP, HTTPS).

NAT Table – the router maintains a table that tracks local private IP addresses with the ports they are using.

The Process

Outbound Traffic

  1. Data Source: When a device on your network wants to access something online (e.g., browsing a website), it sends a data packet with its private IP address as the source.
  2. Translation: The router intercepts the packet. It replaces the private source address in the packet header with its own public IP address.
  3. Port Assignment: The router assigns a unique port number to the packet to differentiate it from other outgoing traffic (think adding a mailbox number for the specific device). This port-public IP combination becomes the “return address” for replies.
  4. NAT Table Update: The router records the internal device’s private IP address, port number, and the website’s destination address in its NAT table for future reference.
  5. Sending the Packet: The translated packet, now with the router’s public IP and a port number, is sent out to the internet.

Inbound Traffic

  1. Receiving a Reply: When a response from the website arrives at your router, it has the public IP and port number used earlier.
  2. NAT Table Lookup: The router consults its NAT table to match the public IP and port with the original internal device that initiated the request.
  3. Address Swap: The router replaces the public IP address in the reply packet with the private IP address of the requesting device on your network.
  4. Delivering the Reply: The router forwards the modified packet with the correct internal address to the intended device within your network.

NAT Table

Internal DevicePrivate IP AddressPort NumberPublic IP Address (Router)Destination IP AddressProtocolStatus
Laptop192.168.1.10443123.45.67.89www.example.comhttpsActive
Smartphone192.168.1.2080123.45.67.89[invalid URL removed]httpActive
Gaming Console192.168.1.303074123.45.67.8950.11.12.13 (Game Server)udpEstablished
This is a fabricated NAT Table for demonstration purposes

This imaginary NAT table shows how the IP address is associated with a Port Number and Destination IP Address. So when data is received from that Destination IP Address and on which Port, the router will know which private IP address to send it to.

In reality NAT is much more involved than this but the concept is clear. It uses Ports and Protocols to associate traffic with private IP addresses that are communicating on the world wide web.

Git/GitHub – Basics

What is git?

Open source and free Source Control Management – SCM. You can manage changes to files over time. Download for your system. Use gitbash to control. Other command line tools can be used.

Configure git

Specify name and email address – so git knows who is doing stuff

    Specify default branch name – (this was done in the installation too)

      Initialise Repository

      there will now be a hidden file in the folder – .git

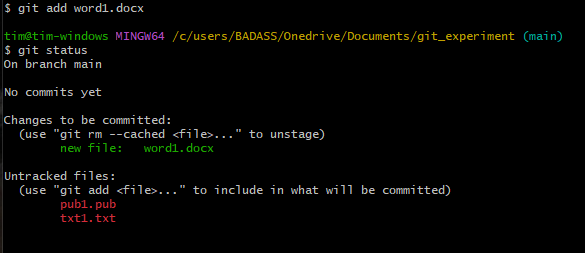
        git Status

          All the files are untracked

            Track a File

              Unstage a file (stop tracking)

                Ignore files

                • create new text file called .ignore
                • insert files you want to ignore

                Commit

                Takes a snapshot of the repository

                  Changes to files

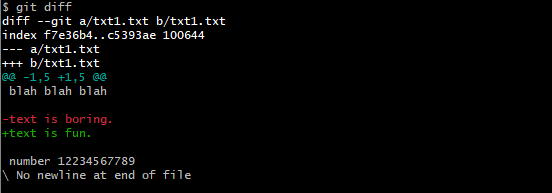
                  If you change a file git will recognise this

                    To see the difference

                      Environments

                      • Working Files
                      • Staging
                      • Commit

                      Add/remove modified file to ‘snapshot’

                      Places this file into Staging where it will stay until we are ready to commit

                      This will remove the file from Staging

                        Bypass Staging

                        Commits all

                          Restore a file

                          You could delete a file from the folder and then git status would show

                            We can then restore this file with

                              Change filename

                              Use mv

                                git Log

                                    Amend Commit

                                      Reset to Previous Commit

                                        Rebase

                                          Branches

                                          • A copy of your main branch which you can edit and then merge once you are satisfied with the changes
                                          • Used a lot in coding development

                                          Create New Branch

                                          creates new branch

                                          shows branches

                                            switches to this branch

                                              Merge branches

                                                Delete Branch

                                                  Merge Conflicts

                                                  • if you change the main branch whilst the fixbug branch is also edited you encounter a conflict when you try and merge them

                                                  Set Up github Account

                                                  Create Cloud Repo

                                                  • Create a new repository
                                                  • Give it a name
                                                  • Public/Private – depends on who you are working with
                                                  • Create repository

                                                  Push Existing Repo

                                                  We already have a repository on our local computer. github gives it the commands for pushing it to the cloud.

                                                    CompTIA Troubleshoot Model

                                                    Using the CompTIA troubleshooting model to fix a simple problem.

                                                    Troubleshoot – Kali Install on Macbook unable to use Wireless Adapter.

                                                    1. Identify the problem

                                                    • After installing Kali Linux on my old (2011) Macbook Pro laptop everything seems to be working good except there is no option to enable WiFi.
                                                    • lspci command shows that there is an entry for Network Controller:
                                                      • Broadcom Inc. BCM4331 802.11a/b/g/n
                                                    • The Network Settings feature does allow setting for a wireless connection to be set up but so far this has had no effect on creating an actual Wireless connection.

                                                    2. Establish a theory of probably cause

                                                    • The install of Kali somehow didn’t include the necessary software/drivers to operate the adapter.
                                                    • Kali linux isn’t compatible with the adapter.
                                                    • The manual set up of a wireless connection in Kali has not been done correctly.
                                                    • In the Network Connections edit dialogue box the options available for Band are a, b and g. There is no option for n or ac. The router that we are trying to connect to is transmitting on b, g, and n however.
                                                    • Disable DHCP and setting a manual IP address has no effect.

                                                    3. Test theory

                                                    • Find and install driver for the adapter
                                                      • Some googling found: sudo apt install firmware-b43-installer
                                                      • This worked. After a restart the laptop connected to the Cisco48530 AP.

                                                    4. Establish a plan to resolve the problem

                                                    • Use – sudo apt install firmware-b43-installer
                                                    • Restart the laptop

                                                    5. Implement this solution

                                                    6. Verify full system functionality

                                                    • Setting this command produced a flurry of activity in the command window.
                                                    • Finishing with no errors or fail notices
                                                    • After restarting the computer the WiFi was fully functional.

                                                    7. Document

                                                    • So this was a simple driver missing or update that was required after the installation of Kali.
                                                    • Presumably because I was installing Kali into a 11 year old machine and a Mac as well the wireless adapter was not in the list of drivers included in the Kali installation.
                                                    • A simple install of the correct driver fixed the problem.

                                                    CompTIA. ITProTV vs Professor Messer

                                                    Currently I am approaching the time to book a CompTIA Network+ N10-008 exam. Having previously completed ITF and A+ using the video courses from ITProTV. I was using other sources to supplement my learning , such as Mike Meyers A+ Complete Guide, but ITProTV was my main source.

                                                    However after completing a few practice exams for the Network+ certificate I wasn’t getting good scores. So I started looking around for more insight in how to study. I found Professor Messer and quickly realised that his approach is very much based on the CompTIA Objectives, something that I had admittedly paid little attention to up to this point.

                                                    So after downloading Messer’s notes and comparing them to the objectives I saw that they correlated directly. Section 2.3 related exactly to section 2.3 in the objectives for example

                                                    ITProTV don’t do this. Consequently it’s harder to know if you have learned everything that they might ask you in the exam. I would say however that ITProTV will give you useful insights into the IT industry and how it works. It’s a more encompassing approach. Messer delivers the exact material that you need to learn to pass the exam.

                                                    Yes, you always need to have more than one source of tutoring when studying for an exam, something which ITProTV point out at the start of their courses, but if you haven’t already I would recommend looking in to Professor Messer. His videos are free and the extensive and well laid out notes are $25. He also does live study groups on his YouTube channel.

                                                    Most importantly – get and read the CompTIA Objectives as soon as you can when studying a new course.

                                                    Wireshark – MasterClass

                                                    Taken from Chris Greer https://www.youtube.com/c/ChrisGreer

                                                    This is a simple posting of the notes I took from going through Chris Greer’s Wireshark beginners series. IF you haven’t already go to his channel and learn about Wireshark.

                                                    Screen layout

                                                    • Preferences > Layout

                                                    Change from packet bytes to header values

                                                    • Layout > Panes

                                                    Add button

                                                    • Right click packet > Prepare as filter > Selected > Add Button (top right)

                                                    Colour rules

                                                    • View > Colouring Rules

                                                    Custom column

                                                    • Preferences > Appearance > Columns > Add

                                                    Simple display filters

                                                    • tcp.flags.syn==1

                                                    How to Capture Network Traffic

                                                    To see which library WS is using to capture the packets

                                                    • File > About Wireshark

                                                    To edit capture options

                                                    Snaplength

                                                    • Can be set to reduce the amount of data captured in each frame
                                                    • Often 64B is enough to get the header information etc

                                                    Output

                                                    Command Line

                                                    Add program path ???

                                                    The Difference between Capture Filter and Display filter

                                                    • Capture Filter
                                                      • We determine the packets captured as we capture them
                                                      • simpler than display filters
                                                      • beware over doing the capture filer and then missing the packet you need to analyse
                                                    • Display Filter
                                                      • filtering packets we have already captured

                                                    Right click on a packet to select filter or Conversation filter

                                                    • Then you can use brackets to add an extra filter

                                                    Not filter

                                                    • not arp
                                                    • not (arp or ipv6 or ssdp)
                                                    • useful to slowly home in on the filter you need or the packets you need.

                                                    In parameter

                                                    • tcp.port in {80 443 8080}

                                                    Clear text strings

                                                    • frame contains google (case sensitive)
                                                    • frame matches Google (case insensitive)

                                                    Name Resolution

                                                    • You can also hover over a frame and right click and choose Edit Resolved Name. Then you can name ‘gateway’ or ‘client’ etc

                                                    Time Column

                                                    • You can set the time column to various options
                                                    • You can right click on a frame and choose Set/Unset Time reference to reset the time to 0.00 on that frame
                                                    • This is useful as it shows the time relevant to the conversation. Not just the frame above which could be from many other conversations. Set it as a column.
                                                    • Then you can sort the column and look for the responses that were particularly slow.
                                                    • The ones coming from the server are often pertinent.

                                                    Statistics

                                                    • Don’t look at each individual packet. Use statistics!!
                                                    • Statistics > Conversations

                                                    How to Extract Files from a pcap?

                                                    • Frame 14 contains a .png file and this is what we want to extract.
                                                    • Firstly Right-Click on TCP layer and go to
                                                      • Protocol Preferences
                                                      • Allow subdissector to reassemble TCP streams
                                                    • Reassembles the TCP stream. Otherwise it treats them one packet at a time..
                                                    • Then go to File > Export Objects and we can see that there are 5 types of Objects that WS can export by default
                                                    • So this is how we can extract files from the pcap
                                                    • Executables, binaries
                                                    • Be careful with malware that you don’t execute it!
                                                    • If this export feature does not work, we can look at
                                                      • Right-Click on the frame
                                                      • Choose Follow TCP steam
                                                      • Here we can see the data that comprises the file

                                                    Map IP Address Locations with Wireshark Using GeoIP

                                                    • First, we need to download and extract the databases from MaxMind.
                                                    • Now all we have to do is point WS at these databases
                                                    • With this set we can look at the IP layer of a packet and view the GeoIP which will include the City, Country and even map coordinates
                                                    • Now go to Statistics > Endpoints > Map > View In Browser

                                                    Enrolled in GICAST, The Open University.

                                                    I have enrolled and at the time of writing am halfway through this course provided by The Open University. Personally I find the ‘gamified’ element to be a bit strange but the actual content is relevant and a useful round up of the fundamentals of Cyber Security .

                                                    Main page here.

                                                    “The ‘Gamified Intelligent Cyber Aptitude and Skills Training’ (GICAST) course is developed by the Cyber security experts from The Open University and funded by Nesta and the Department for Education.”

                                                    “This course uses unique game-based assessment, which presents you with a series of cyber security scenarios to help assess your intuitive cyber behaviour and current understanding of cyber security concepts.”

                                                    “On completing the game, you’ll be provided with a personalised course pathway to support you with developing knowledge and understanding in cybersecurity.”

                                                    Basic Linux Commands

                                                    If you are just getting started in Linux then these commands should be useful.

                                                    File System:

                                                    ls     : listing

                                                    cd     : change directory

                                                    cat     : concatenate

                                                    pwd     : print working directory

                                                    find    : find stuff    https://tryhackme.com/room/thefindcommand

                                                    grep    : find a value within a file. i.e. IP address

                                                    man      : manual

                                                    help    : help. More info than manual

                                                    touch  : create file

                                                    mkdir  : create directory/folder

                                                    cp           : copy (needs destination too)

                                                    scp    : secure copy

                                                    mv    : move

                                                    rm    : remove (need -R to remove directory)

                                                    file    : determine the type of file

                                                    echo    : output

                                                    nano    : text editor

                                                    vim    : advanced text editor

                                                    wget    : download from internet

                                                    strings: look for strings in a file

                                                    chmod: change mode/permissions

                                                    Operators:

                                                    &    : allows you to run commands in the background of your terminal

                                                    &&    : allows you to run multiple commands together in one line of your terminal

                                                    >    : direct output elsewhere

                                                    >>    : as above but appends so no overwriting

                                                    Switches

                                                    su    : switch user

                                                    l    : login

                                                    Common Directories

                                                    etc     : stores system files for OS

                                                    var    : variable data

                                                    root     : home directory for ‘root’ user

                                                    tmp    : temporary. wiped when session ended.

                                                    Processes

                                                    ps        : list processes

                                                    ps aux        : list all processes

                                                    top        : show all processes in live table

                                                    kill        : stop process

                                                    systemctl    : interact with systemd

                                                    ctrl z        : background process

                                                    fg        : foreground process

                                                    Automation

                                                    cron    : process to execute crontabs. Time based. https://crontab-generator.org/

                                                    Programming Expert

                                                    Recently started a new course called Programming Expert.

                                                    Coding is not essential for an IT career but it sure as helps and although intimidating it is also fascinating. Getting a program to work for the first time is a buzz. If you intend to go into Cyber Security then you definitely need some coding skills and Python is a great language for this and also is beginner friendly.

                                                    I tried the usual YouTube offerings:

                                                    (too name just a few) for learning to code and no doubt this is absolutely a viable option but it is hard to get a structure to your learning going this way. So I signed up to an official course from a group of programmers including Tim Ruscica.


                                                    It was $59 for a year from the videos I’ve watched on his YT channel his style came across as easy to follow and he clearly knows what he’s talking about. In my opinion if you are going to be listening the same person for hours while they try and teach you to code, surely a experience which will get you frustrated at times, then you need to get on with their general style.

                                                    More importantly this course boasts the following features:

                                                    • Streamlined Platform
                                                    • A Comprehensive Curriculum
                                                    • Designed By Experts. Taught By Experts
                                                    • High-Quality Videos
                                                    • Hundreds Of Practice Questions
                                                    • Practical Programming Projects
                                                    • Feature-Rich Coding Workspace
                                                    • Certificate Of Completion

                                                    These add up to an experience which is on another level compared with trying to learn from a “Learn Python in 6 Hours” video. For example on the more challenging Practice Questions (most of them) there’s not just the solutions revealed but also a separate video to explain how to solve the problem.

                                                    I am halfway through the fundamentals stage and will post updates as I go.

                                                    « Older posts

                                                    © 2025 timnott-it

                                                    Theme by Anders NorénUp ↑