You have found your next IT professional

Category: Security

Are Passkeys just better?

Internet security is an ever-increasing issue for all of us. Let me ask you something. How do you keep track of your passwords? Memorise them all? Yeah, sure. Write them down in a little black book with random passwords and usernames scribbled all over the place? Or maybe use a password manager such as Dashlane, BitWarden etc? How about two-factor authentication?

What if I were to tell you about a, relatively, new way to sign in? Passkeys use public key cryptography to safeguard your accounts but is this better than using any of the above? Well for a start anything is better than memorising all the passwords, they would have to be far too basic and repetitive, and what happens if you lose your device and little black book at the same time? Don’t even think about it.

Passkeys are more secure than both username/password and two-factor authentication (2FA).

It is true. Passkeys are based on public key cryptography. This means that the user has a public key and a private key. The private key is never given to anyone but the public key is available to the website during the registration/login process. When the user wants to sign in, the website sends them a large, never used before, random number which the user signs (encrypts) with their private key. This is then sent to the website which uses the user’s public key to decrypt the number and compares it with the original it sent out. If it matches then the authentication is approved. (Simplified, but you get the idea.)

The point here is that the website never stores any ‘secret’ that belongs to the user so in the event of a breach there is nothing for an attacker to obtain.

Now compare this with traditional logins and two-factor authentication. Both of these require the website to store secrets that belong to the user. The username, hashed password and 2FA key, all of which can be stolen, either from the websites storage servers or in transit as the authentication process takes place.

Passkeys are more convenient – no need to remember passwords or enter codes.

Yes using passkeys is almost too easy and actually feels less secure than 2FA. Usually it is just a case of agreeing to login using your passkeys.

Is it that simple?

Well sadly no. If the website still uses traditional logins as on option to login then a lot of the security gained from using passkeys is naturally lost. During the transition phase as passkeys are, hopefully, fully adopted then this scenario will remain widespread. If you can then try and have this option disabled and have your credentials removed from their servers. Also if you do use a dedicated password manager, two thirds of internet users don’t, then remove the entries for username and password for the account. This will deny attackers of the password manager these credentials.
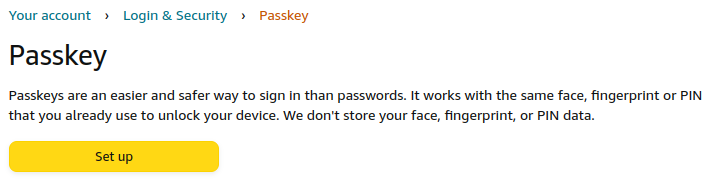
Setting Up Passkeys

Let’s actually set up a login to Amazon using Passkeys

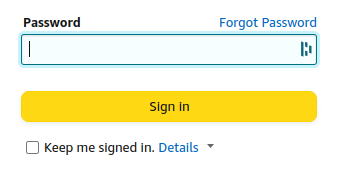
Log in to your account using Chrome.

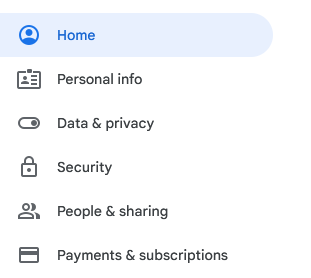
Go to Your Account > Login & Security

Scroll down to:

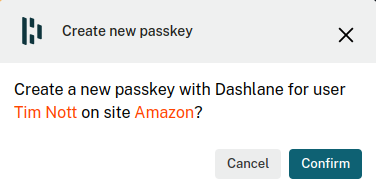
Now follow instructions:

Then supply password for security:

Dashlane, my password manager:

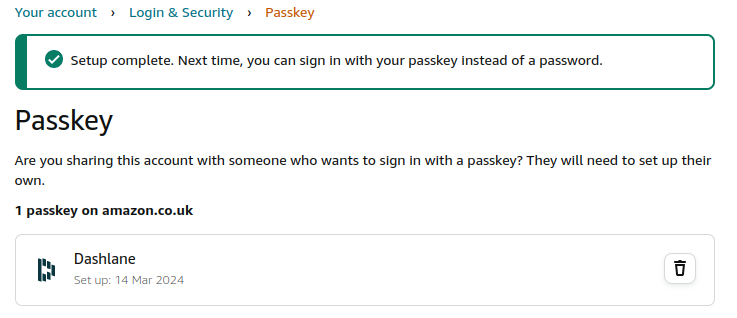
And the setup is complete.

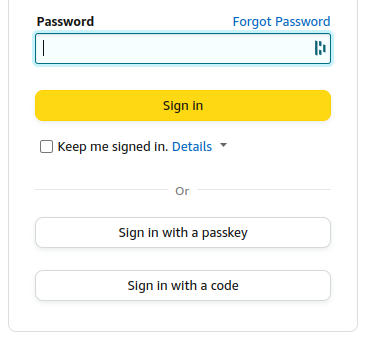
Now when we sign in to Amazon we get the option to use a passkey.

So what are we waiting for?

It is a good question. Passkeys have been around for some time now but the internet is moving slowly in adopting them. At the time of writing Chrome will allow Passkeys for Amazon but Firefox will not. These things take time to mature and for people to feel safe switching to new technologies. Most dedicated password managers are supporting passkeys but not all browsers are. Find out more:

Passkey Support by Major Organizations: A Work in Progress

Here’s a glimpse into the current state of support by some key players:

  • Apple: A frontrunner in Passkeys, Apple has implemented them in iOS and macOS. You can expect smooth Passkey integration if you use Apple devices and Safari browser.
  • Google: While not fully rolled out yet, Google is actively developing Passkey support for Chrome and Android. We can expect wider availability from Google soon.
  • Microsoft: While not directly offering Passkeys yet, Microsoft has a strong focus on passwordless authentication with options like Windows Hello. Their approach might converge with Passkeys in the future.
  • Browser Support: Support for Passkeys is gradually increasing. Look for updates in popular browsers like Chrome and Firefox. You can check resources like Passkeys.directory for the latest compatibility information: https://passkeys.directory/.

Additional Resources:

Remember: Passkey adoption is ongoing. These resources will help you stay updated on which websites and platforms offer this secure login method.

Website Under Attack!

The website is under attack.

This is clearly the reality of the internet. Many random attempts at gaining access into any web server that is available/insecure/badly configured. As far as I can tell so far none of these attempts has actually succeeded.

First response I had was to limit the Login Attempts to 1 allowed try and 24 hours until reset. This worked well but actually restricted me from getting in a couple of times. I ended up with these settings to restrict the attack as much as possible without making it a pain if I got the password wrong.

I have always used a strong password to protect the site and even though this seems like a lot of attacks it would take centuries, maybe even millennia to luck upon the right password that these bot-nets are guessing.

To make it effectively impossible for these particular attacks to gain access I have added a plugin called WordFence to add Multi-Factor Authentication to the mix.

On top of this looking in the WPScan plug in it is telling me that the XML-RPC is enabled and this will significantly increase your site’s attack surface which means there are many more points of entry that the attackers can use to attempt access to the site.

The WPScan blog has a good post on this https://blog.wpscan.com/is-wordpress-xmlrpc-a-security-problem/

Unfortunately it’s not a simple fix especially if you want to fully shut it down which many of the usual plug-ins won’t do.

For now the plan is to find one of these plug-ins to close it down as much as possible until I can figure out how to fully disable XML-RPC.

Update 11/07/22

After a couple of efforts at inserting code to disable XML-RPC I have gone with the XML-RPC Security plug-in as a quick fix. Let’s see how the failed attempts fare after this.

Now the WPS Scan is clear.

Final Update 14/07/22

So the XML-RPC disable plug in has fixed the problem. Reducing the size of the attack surface available to web has made all the difference.

I HACKED my wife’s web browser

My write up of NetworkChuck’s video on BeEF

BeEF – The Browser Exploitation Framework

(DISCLAIMER – DO NOT USE THIS TO ATTACK ANY COMPUTER OF ANY DESCRIPTION UNLESS YOU HAVE PERMISSION TO DO SO. IT’S COMPLETELY ILLEGAL)

What do you need?

  • Linux Server
  • BeEF
  • Victim (friends, family or even your own computer)

Linode sponsors NetworkChuck’s video and they are a good place to rent servers. They offer a minimalist server for $5 dollars a month and they also have an introductory offer of a certain amount of free credit when you sign up to an account. 

Setting up the BeEf Server

  • Go to Linode.com and set up an new account
  • Go to the Marketplace tab
  • Select BeEF
  • Go to BeEF options
  • Enter a password 
  • Enter an email address
  • Create a limited sudo user with password
  • Choose a region close to you
  • Select plan – go cheap
  • Label box
  • Password for root user (will be used for SSH)
  • Click ‘Create Linode’

The server will take a while to provision which basically means that the server is setting itself up with the BeEF software. Once that is done look for the Access panel and specifically the SSH Access option. There is a clipboard icon to the right which you can click to copy to the clipboard.

Open the Command Line (Windows) or Terminal (Mac/Linux) and paste the SHH command. It’s going to ask you if you want to continue, type yes and then give the root password.

So now you are in your BeEF server. Next enter cat /root/beef.info and it should come up with 

#BEEF INSTALLATION COMPLETE#

Below should be: Endpoint and then a URL. This is a legitimate SSL website. Grab this URL, copy and paste into notepad and then into a browser and there it is, the BeEF server!

User: beef

Password is the password you entered in the setup process under BeEF options.

This will take you to the Getting Started page. Notice on the left there are ‘Hooked Browsers’ where browsers that have been successfully attacked will be listed. To hook your first browser copy the ‘advanced version’ link. This is the link that you would send to your victim in the hope that they will click on it and then the browser they use will then be ‘hooked’ by your BeEF server! You can then go back to the BeEF console and you will see it listed under the hooked browsers. 

Attack!

To begin with, try this out on a dummy browser on your own computer. Once the browser is listed in the console then click on it and you will be given a page with various tabs available, go to Details and there is a whole list of information on the browser that has been hooked. Next go to Commands and this is where the fun begins. Let’s try:

Browser > Create Alert Dialog – enter “You just got hacked!!” in the ‘Alert text’ box. Click Execute and your victims browser will alert the user to this unfortunate fact.

Social Engineering > Google Phishing Page – this will create a fake google sign in page in the victim’s browser. Their google login details will then be captured by your BeEF server.

Social Engineering > Fake LastPass – this will create a LastPass pop up in their browser which will also capture their login details. In this case it will capture each keystroke so if they stop half way through because they get suspicious or something then you will still get some information.

Network > Identify LAN subnets, Ping Sweep, Get HTTP Servers, Fingerprint Local Network – various commands that will scan, map and log the victims network and systems.

Browser > Redirect Browser (RickRoll) – as the name suggests, will redirect their browser to a RickRoll video. Har har.

These are just a few of the many things that BeEF can do so go ahead and try some stuff out but only hack computers that you have permission for.  ETHICAL HACKING ONLY

If you are not already a follower of NetworkChuck then please go to his YouTube channel or website. He makes engaging and relevant IT videos.

PicoCTF – Static Ain’t Always Noise

https://play.picoctf.org/practice/challenge/163

Description:

Can you look at the data in this binary: static? This BASH script might help!

Solution:

So I had seen the term ‘bash’ around quite a bit but didn’t actually know what it was or what it meant. A search for ‘bash script’ gave me: 

“A Bash script is a text file containing a series of commands. Any command that can be executed in the terminal can be put into a Bash script. Any series of commands to be executed in the terminal can be written in a text file, in that order, as a Bash script.”

Not complicated. But how to set it in motion? That’s not difficult either:

bash filename.sh 
I used wget to get the script downloaded and that gave me a file: ltdis.sh

#!/bin/bash

echo "Attempting disassembly of $1 ..."

#This usage of "objdump" disassembles all (-D) of the first file given by 
#invoker, but only prints out the ".text" section (-j .text) (only section
#that matters in almost any compiled program...

objdump -Dj .text $1 > $1.ltdis.x86_64.txt

#Check that $1.ltdis.x86_64.txt is non-empty
#Continue if it is, otherwise print error and eject

if [ -s "$1.ltdis.x86_64.txt" ]
then
		echo "Disassembly successful! Available at: $1.ltdis.x86_64.txt"

		echo "Ripping strings from binary with file offsets..."
		strings -a -t x $1 > $1.ltdis.strings.txt
		echo "Any strings found in $1 have been written to $1.ltdis.strings.txt with file offset"


else
		echo "Disassembly failed!"
		echo "Usage: ltdis.sh <program-file>"
		echo "Bye!"
fi


This turns out to be an if statement and tells you what you are looking out for with a successful outcome. “Disassembly successful!” At this stage I don’t understand the detail contained in this script but I knew enough to run it and hopefully find a flag. But how to insert the ‘static’ file into the script?

Using wget to download the ‘static’ file the obvious thing to then try was just putting the filename after the bash script command in the webshell:

bash ltdis.sh static

And yes that worked:

Attempting disassembly of static ...
Disassembly successful! Available at: static.ltdis.x86_64.txt
Ripping strings from binary with file offsets...
Any strings found in static have been written to static.ltdis.strings.txt with file offset

and gave me two more files: static.ltdis.x86_64.txt and static.ltdis.strings.txt the second of which contained the flag.

PicoCTF – Speeds and Feeds

https://play.picoctf.org/practice/challenge/116?page=3

Description:

There is something on my shop network running at nc mercury.picoctf.net 59953, but I can’t tell what it is. Can you?

Solution:

So if we run nc mercury.picoctf.net 59953 in the webshell we get a whole bunch of data lines all starting with the letter G. The hint in the challenge asks what code does a CNC machine use? Google tells us that it is called gcode. 

Next we can look for a CNC simulator online and of course there is such a thing:

https://ncviewer.com/

But the webshell doesn’t make it easy to copy all of the lines to the clipboard so we need a way to download the them to our local machine where we can open them in a text editor and clipboard all of the text. So to do this I used the command:

nc mercury.picoctf.net 59953 > gcode.txt

This created a .txt file containing all the data lines. Then I needed to find a way to download this file to my local machine. After searching online for a while and only coming up with complicated answers that didn’t work or needed an install that the picoCTF webshell wouldn’t allow, I went back to basics and read the READme.txt file! In this file we see:

# Experimental features

– Exporting files from the webshell to the browser or vice versa

  is possible using `sz <filename>` / `rz`.

So then it was just a case of: 

sz gcode.txt

Open this file in a text editor, copy all the lines of data to the clipboard and paste in the gcode file field in the NCViewer, hit ‘Plot’ and see the result:

Obviously I’m not going to reveal the answer that would be far too easy for you.

© 2025 timnott-it

Theme by Anders NorénUp ↑