Windows Task Scheduler is a handy tool that lets you automate routine tasks and keep your system running smoothly. Admins have full control over what gets scheduled, while regular users can set up tasks too, but with some limits. In places where security is a big deal, Task Scheduler might be locked down to prevent any funny business. To use it safely, it’s best to set up special accounts just for tasks, keep a close eye on who can do what, and check up on things regularly. It’s also smart to only give tasks the bare minimum permissions they need to work, and avoid using super-powerful accounts like SYSTEM if you can help it. Regular users can’t set up tasks that affect the whole system or run with top-level permissions. Don’t forget to review your tasks now and then to make sure they’re still needed and not causing any security headaches.
System Account?
The differences between using the Administrator account and the System account in Task Scheduler:
Admin account:
Runs tasks with administrative privileges
Has access to network resources
Can interact with the desktop
Tasks run in the user’s context
Requires password to be stored
System account:
Highest level of privileges on the local system
Limited network access
Cannot interact with the desktop
Runs in the system context
No password required
Better for system maintenance tasks
Choose based on task requirements and security considerations.
Creating a Task
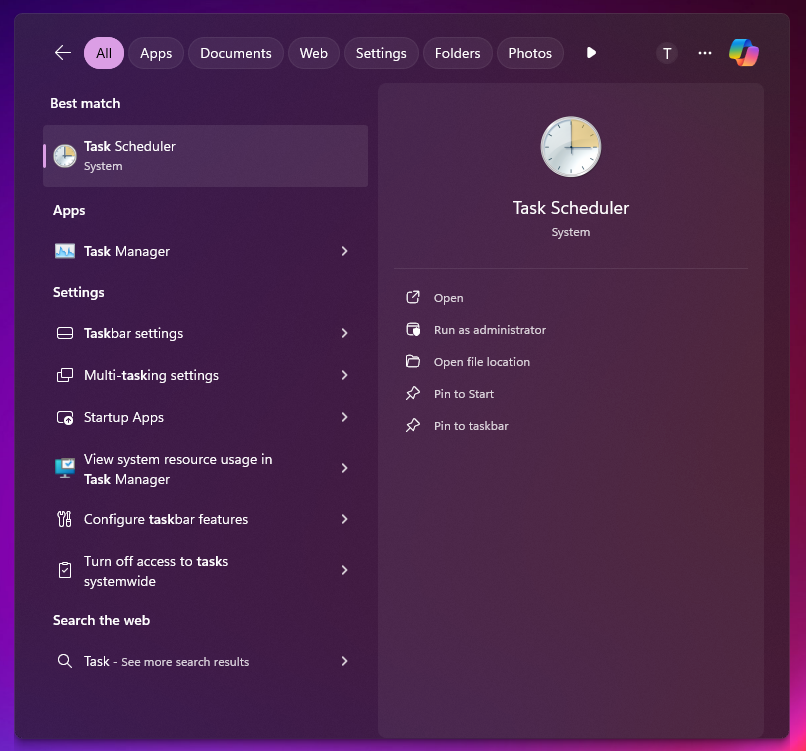
Open Task Scheduler in your administrator account:
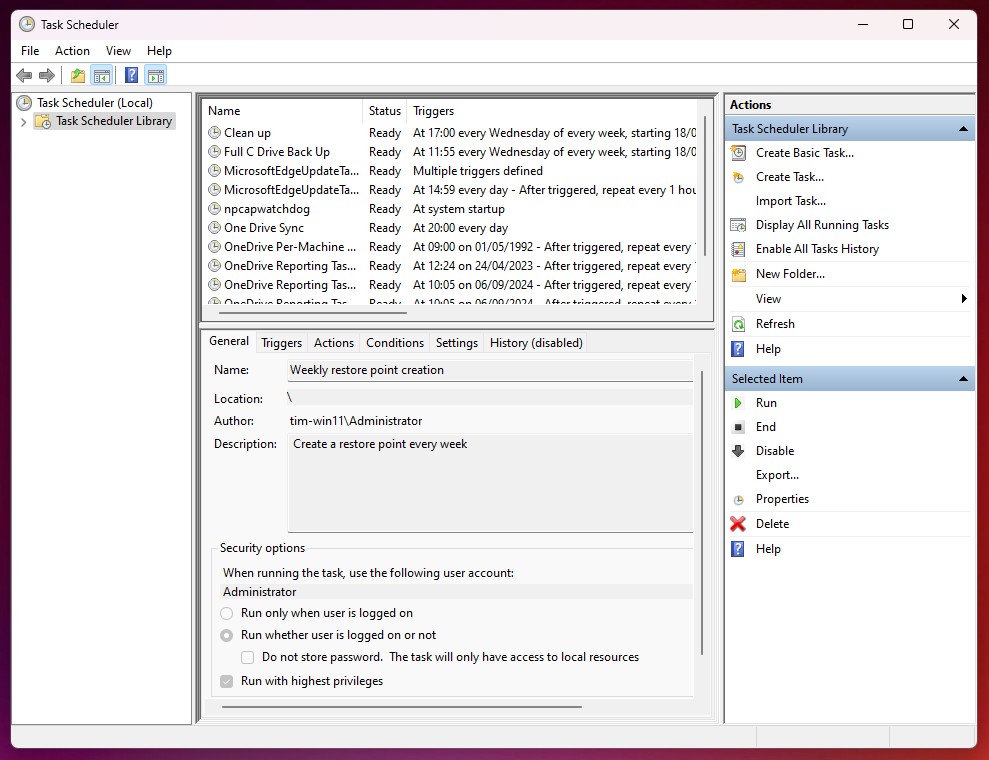
The main GUI window:
We have three main sections here: On the left the Task Libraries then we have the created tasks which can be selected and show their configuration below and on the right we have Actions.
Under actions on the right select Create a Task:
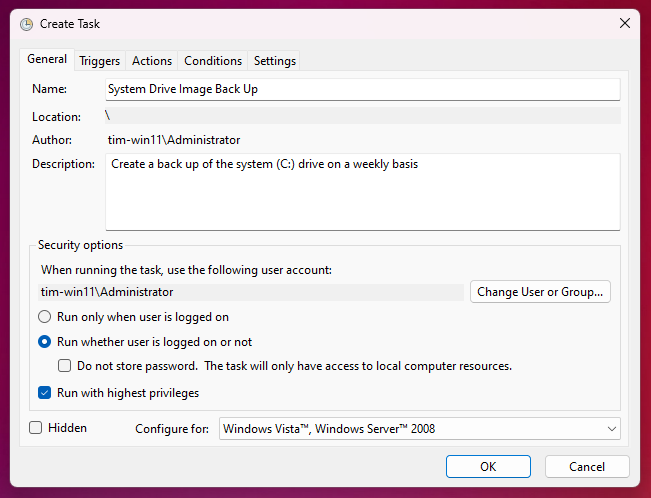
Give the task a name and a description and choose security options. I want this to be run whether the admin is logged in or not and it needs highest privileges.
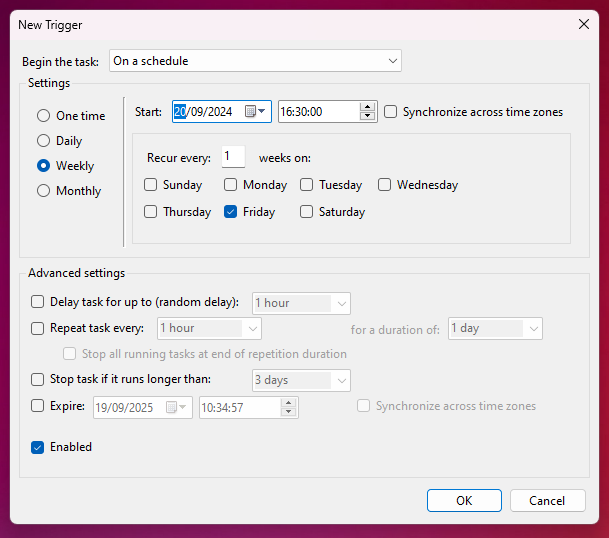
Then go to the Triggers tab:
This task is now set to run weekly on Fridays at 16:30 starting on the 20th of September 2024.
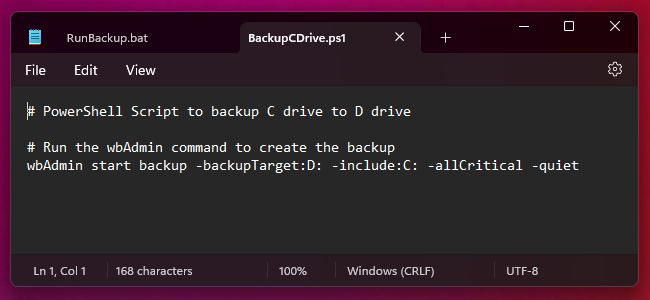
For the next stage we need some pre-requisites. We need a batch script that will be the action that is triggered by the scheduler and in turn the batch script will call the Powershell script that will effect the process required. In this case it will be an image back up of the C drive:
@echo off is commented out as it is useful for such a task to have the user notified that it is happening.
The powershell script also has comments to describe the process:
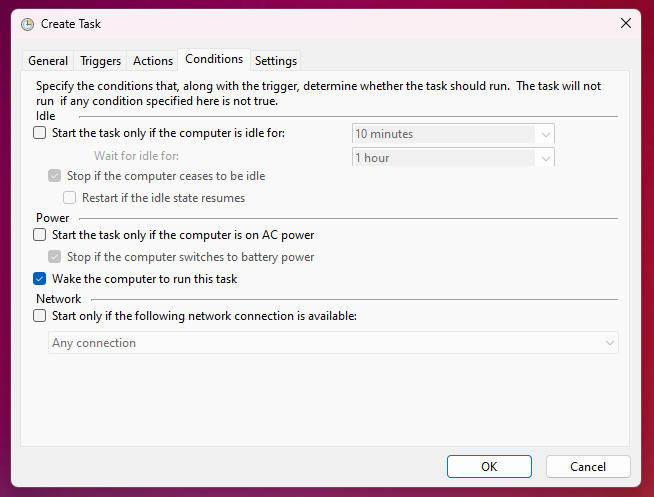
Next up is the Conditions tab:
I have selected one option.
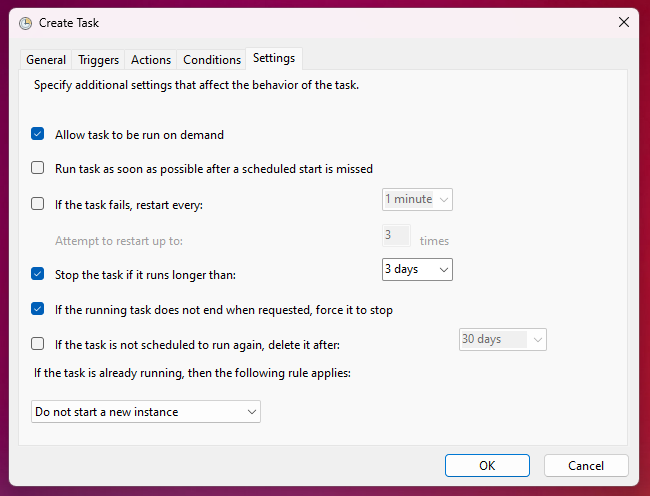
Finally, the Settings tab which I leave as default. It is useful to allow the task to be run on demand for testing and for manually starting the task:
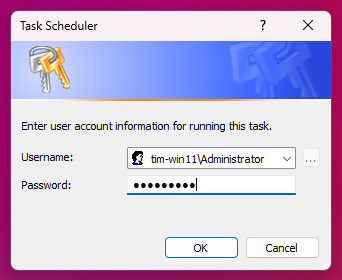
Administrator authentication is required:
There are many more uses for Task Scheduler but it is not without it’s idiosyncrasies and setting task to run at a set time reminds me of the good old days of setting VHS recorders to automatically record Starsky and Hutch. Sometimes it was successful, other times less so.
However with diligence and a bit of testing it can be an excellent time saving tool.
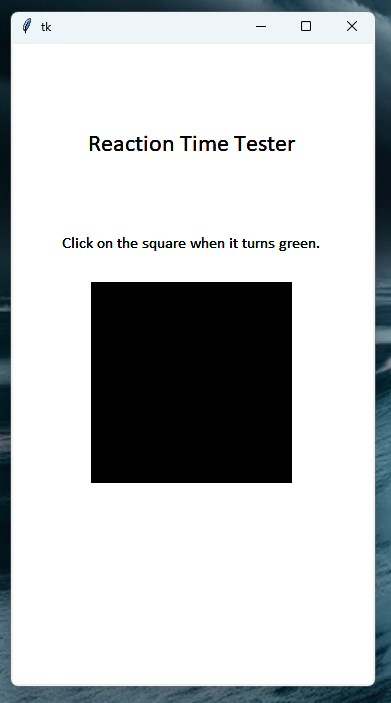
The brief for this exercise was to create a reaction time tester with a graphical interface. It proves to be a good exercise to learn about the tkinter module
import time
import random
import tkinter as tk
# Initialize the window
root = tk.Tk()
canvas = tk.Canvas(root, width=360, height=640, bg="white")
canvas.pack()
# Create the square and bind the click event
black_square = canvas.create_rectangle(80, 240, 280, 440, fill="black")
start_time = 0
reaction_text = None
best_time_text = None
# Create a best time
best_time = float('inf') # Initialize with infinity
def update_square(event):
global start_time, reaction_text, best_time, best_time_text
end_time = time.time()
reaction_time = round(end_time - start_time, 4)
canvas.itemconfig(black_square, fill="black")
if reaction_text is not None:
canvas.delete(reaction_text)
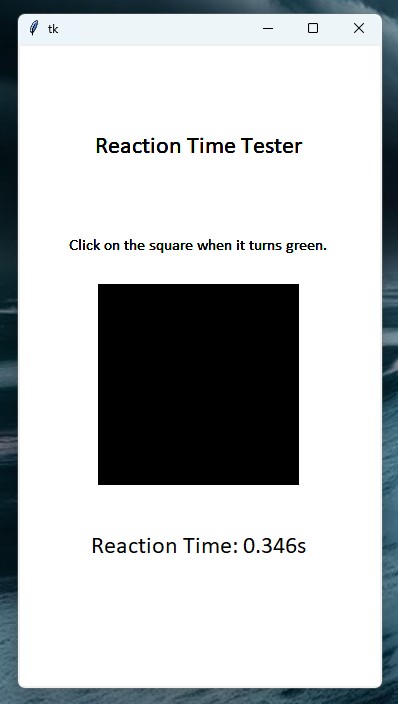
reaction_text = canvas.create_text(180, 500, text=f"Reaction Time: {reaction_time}s", font=("Calibri", 18), fill="black")
if reaction_time < best_time:
best_time = reaction_time
if best_time_text is not None:
canvas.delete(best_time_text)
best_time_text = canvas.create_text(180, 600, text=f"Best time: {best_time}s", font=("Calibri", 12), fill="black")
root.update()
root.after(6000, initialize_app) # reset after 6 seconds
def show_green():
global start_time
canvas.itemconfig(black_square, fill="green")
start_time = time.time()
def initialize_app():
global reaction_text, best_time_text
# Clear the canvas
canvas.delete("all")
# Recreate the square
global black_square
black_square = canvas.create_rectangle(80, 240, 280, 440, fill="black")
# Draw the title and instructions
canvas.create_text(180, 100, text="Reaction Time Tester", font=("Calibri", 18), fill="black")
canvas.create_text(180, 200, text="Click on the square when it turns green.", font=("Calibri", 12), fill="black")
# Display the current best time
best_time_text = canvas.create_text(180, 600, text=f"Best time: {best_time:.4f}s", font=("Calibri", 12), fill="black")
# Bind the click event
canvas.tag_bind(black_square, "<Button-1>", update_square)
# Clear the previous reaction time text
reaction_text = None
# Wait a random interval between 2 to 4 seconds, then turn the square green and start the timer
root.after(2000 + random.randint(0, 2000), show_green)
# Initialize the app and start the main loop
initialize_app()
root.mainloop()
Imports
Three modules are imported. time, random and tkinter. tkinter is for the graphical interface and random and time are used together to create the core function of the app.
This initialises a Tkinter window and creates a canvas within it. The window is the main application container, while the canvas is a drawing area. The canvas is set to 360×640 pixels with a white background. The canvas is then packed into the window, making it visible and ready for drawing or adding other elements.
Create The Square
# Create the square and bind the click event
black_square = canvas.create_rectangle(80, 240, 280, 440, fill="black")
start_time = 0
reaction_text = None
best_time_text = None
This code creates a black square on a canvas. It sets up variables to track the start time, and variables for displaying reaction time and best time. The square will be the target for user clicks, initiating the timing mechanism when interacted with.
Create a Best Time
# Create a best time
best_time = float('inf')  # Initialize with infinity
Here we initialise a variable called ‘best_time’ with positive infinity. In Python, float(‘inf’) represents infinity. This is a common technique used when you want to find the minimum value in a set of numbers. By starting with infinity, any real number will be smaller, allowing you to update ‘best_time’ as you compare values.
Define Update Square Function
def update_square(event):
    global start_time, reaction_text, best_time, best_time_text
    end_time = time.time()
    reaction_time = round(end_time - start_time, 4)
    canvas.itemconfig(black_square, fill="black")
    if reaction_text is not None:
        canvas.delete(reaction_text)
    reaction_text = canvas.create_text(180, 500, text=f"Reaction Time: {reaction_time}s", font=("Calibri", 18), fill="black")

    if reaction_time < best_time:
        best_time = reaction_time
        if best_time_text is not None:
            canvas.delete(best_time_text)
        best_time_text = canvas.create_text(180, 600, text=f"Best time: {best_time}s", font=("Calibri", 12), fill="black")

    root.update()
    root.after(6000, initialize_app)  # reset after 6 seconds
This function updates the game state after a player clicks the square. It calculates the reaction time, updates the display with the current time, and checks if it’s a new best time. The function then resets the game after a 6-second delay. Key actions include:
Calculate reaction time
Update square color
Display reaction time
Update best time if applicable
Schedule game reset
The function uses global variables to maintain state across multiple function calls and interacts with a canvas object to update the visual elements of the game.
Define Show Green Function
def show_green():
    global start_time
    canvas.itemconfig(black_square, fill="green")
    start_time = time.time()
Now we define the function that turns the square to green which is the signal to the user that the timer has started and they should click on the square asap. The global variable start_time is used to record the start of the timing.
Define the Initialise App Function
def initialize_app():
    global reaction_text, best_time_text
    # Clear the canvas
    canvas.delete("all")

    # Recreate the square
    global black_square
    black_square = canvas.create_rectangle(80, 240, 280, 440, fill="black")

    # Draw the title and instructions
    canvas.create_text(180, 100, text="Reaction Time Tester", font=("Calibri", 18), fill="black")
    canvas.create_text(180, 200, text="Click on the square when it turns green.", font=("Calibri", 12), fill="black")

    # Display the current best time
    best_time_text = canvas.create_text(180, 600, text=f"Best time: {best_time:.4f}s", font=("Calibri", 12), fill="black")

    # Bind the click event
    canvas.tag_bind(black_square, "<Button-1>", update_square)

    # Clear the previous reaction time text
    reaction_text = None

    # Wait a random interval between 2 to 4 seconds, then turn the square green and start the timer
    root.after(2000 + random.randint(0, 2000), show_green)
This function initialises the reaction time test. It clears the canvas, creates a black square, displays instructions, and shows the best time. It then sets up a click event on the square and schedules the square to turn green after a random delay of 2-4 seconds. This prepares the game for a new round, resetting the display and setting up the next test.
Function Calls
initialize_app()
root.mainloop()
The initialize_app function is called which is the core of the program and the mainloop method is called on the root that starts the event loop for the GUI. It listens for user interactions (like button clicks) and keeps the window open.
Conclusion
There we have it. A simple GUI python program for testing how slow or fast your reactions are.
The brief for this exercise was to create a python script that would emulate the basic operation of an online bank account. The exercise is a good way to learn to create classes for efficient implementation of code.
# Create the class for the bank account
class BankAccount:
    def __init__(self, balance=0):
        self.balance = balance

    def deposit(self, amount):
        self.balance += amount
        print(f"Deposited £{amount} New balance: £{self.balance}")

    def withdraw(self, amount):
        if amount <= self.balance:
            self.balance -= amount
            print(f"Withdrawn: £{amount} New balance: £{self.balance}")
        else:
            print(f"Insufficient funds you loser")

    def check_balance(self):
            return self.balance

# Define the function for interaction with the online banking system
def cashier():
    cashier_prompt = input(f"Cashier: Good morning. Would you like to make an account?: ")
    if cashier_prompt.lower() == "yes":
        account_name = input("Cashier: Under what name? max 5 letters: ")
        account = BankAccount()
        initial_deposit = int(input("Cashier: How much will you be depositing?: £"))
        account.deposit(initial_deposit)
        print(f"Cashier: Your account {account_name} has been created with the balance of: £{initial_deposit}")
    else:
        print("ok")
    customer = input("Is the anything else I can help you with? ")
    if customer == "yes":
        while customer != "quit":
            customer = input("Request: deposit, withdraw, balance or quit: ")
            if customer == "deposit":
                deposit = int(input("How much? "))
                account.deposit(deposit)
            elif customer == "withdraw":
                withdraw = int(input("How much? "))
                account.withdraw(withdraw)
            elif customer == "balance":
                balance = account.check_balance()
                print(f"£{balance}")
            else:
                print("Good day to you.")

cashier()
Cashier: Good morning. Would you like to make an account?: yes Cashier: Under what name? max 5 letters: timmy Cashier: How much will you be depositing?: £1000 Deposited £1000 New balance: £1000 Cashier: Your account timmy has been created with the balance of: £1000 Is the anything else I can help you with? yes Request: deposit, withdraw, balance or quit: deposit How much? 246000 Deposited £246000 New balance: £247000 Request: deposit, withdraw, balance or quit: balance £247000 Request: deposit, withdraw, balance or quit: quit Good day to you.
The Bank Account Class
class BankAccount:
    def __init__(self, balance=0):
        self.balance = balance

    def deposit(self, amount):
        self.balance += amount
        print(f"Deposited £{amount} New balance: £{self.balance}")

    def withdraw(self, amount):
        if amount <= self.balance:
            self.balance -= amount
            print(f"Withdrawn: £{amount} New balance: £{self.balance}")
        else:
            print(f"Insufficient funds you loser")

    def check_balance(self):
            return self.balance
The BankAccount class is the foundation of this banking simulation program. It represents a bank account with methods for basic financial operations. The class initialises an account with a balance (defaulting to 0), and provides methods to deposit money, withdraw funds (with a check for sufficient balance), and check the current balance. These methods also print informative messages about each transaction, making the program more interactive and user-friendly.
The Cashier Function
def cashier():
    cashier_prompt = input(f"Cashier: Good morning. Would you like to make an account?: ")
    if cashier_prompt.lower() == "yes":
        account_name = input("Cashier: Under what name? max 5 letters: ")
        account = BankAccount()
        initial_deposit = int(input("Cashier: How much will you be depositing?: £"))
        account.deposit(initial_deposit)
        print(f"Cashier: Your account {account_name} has been created with the balance of: £{initial_deposit}")
    else:
        print("ok")
    customer = input("Is the anything else I can help you with? ")
    if customer == "yes":
        while customer != "quit":
            customer = input("Request: deposit, withdraw, balance or quit: ")
            if customer == "deposit":
                deposit = int(input("How much? "))
                account.deposit(deposit)
            elif customer == "withdraw":
                withdraw = int(input("How much? "))
                account.withdraw(withdraw)
            elif customer == "balance":
                balance = account.check_balance()
                print(f"£{balance}")
            else:
                print("Good day to you.")
The cashier function simulates a bank teller interaction. It prompts the user to create an account, collecting necessary information like account name and initial deposit. If an account is created, it then enters a loop allowing the user to perform various banking operations (deposit, withdraw, check balance) until they choose to quit. This function effectively ties together the BankAccount class functionality with a user-friendly interface, creating an interactive banking simulation.
Finally we call the cashier function:
cashier()
Conclusion
We created a class that is then utilised by the cashier function to provide the basic function of a banking system.
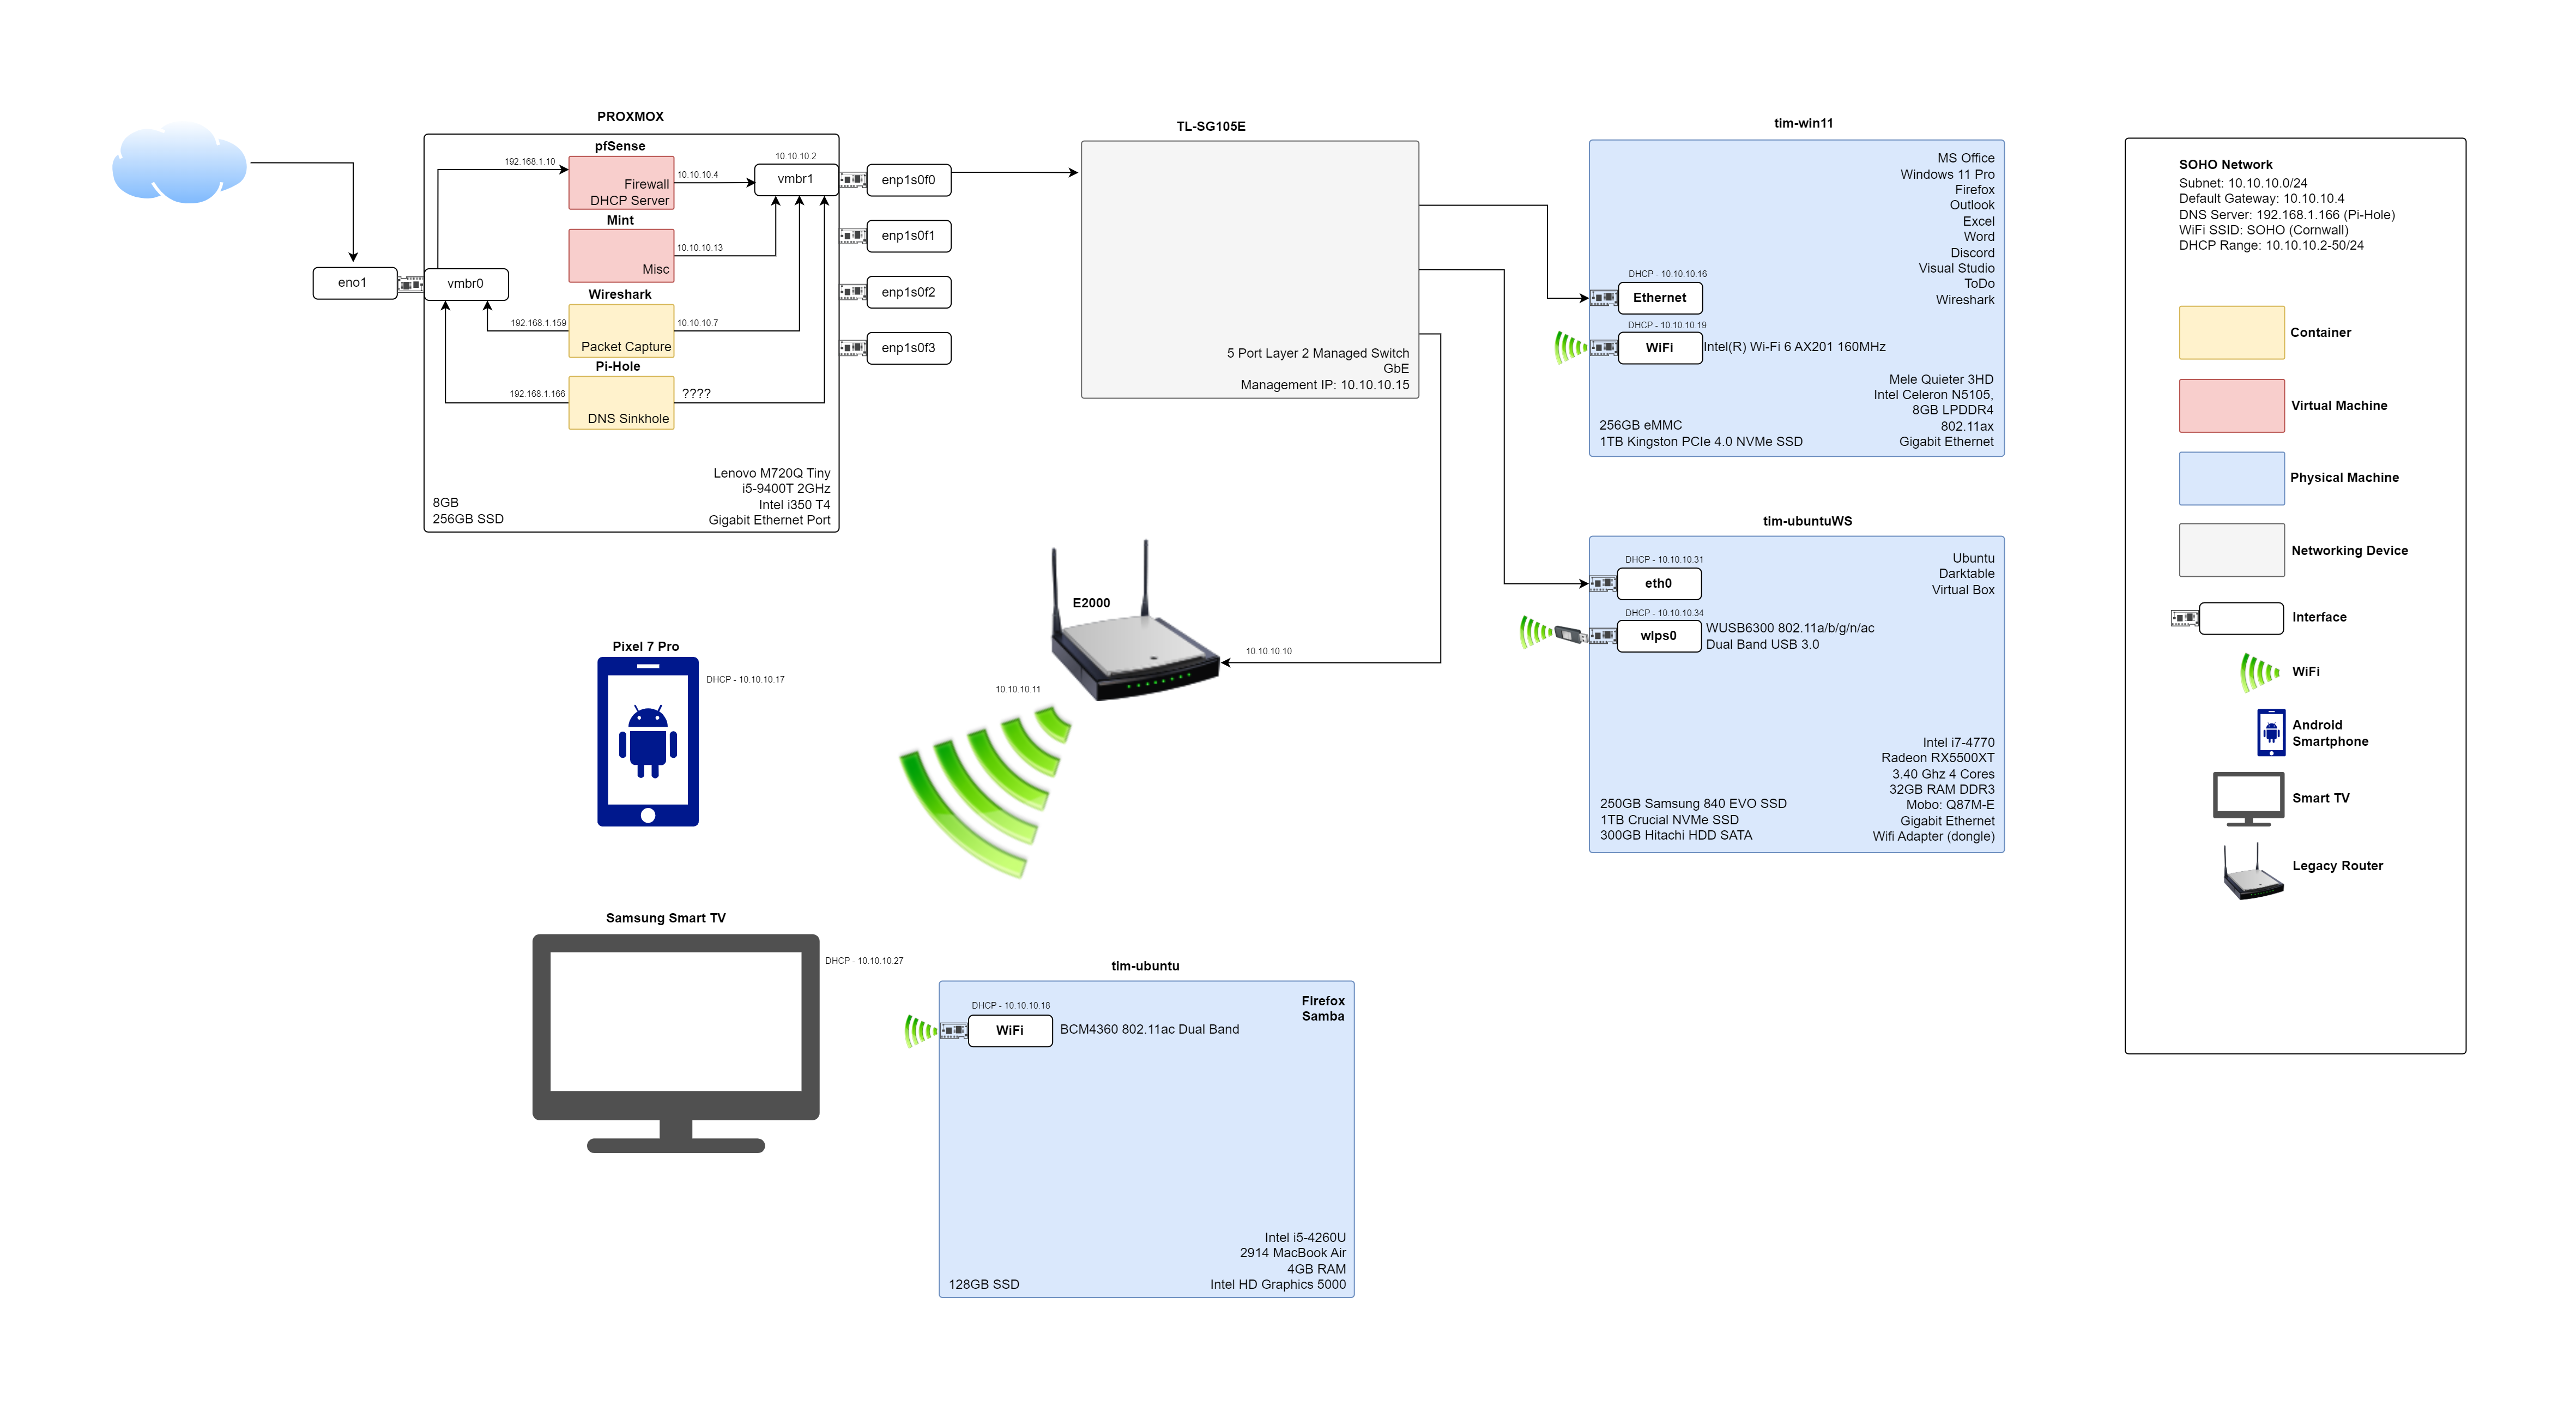
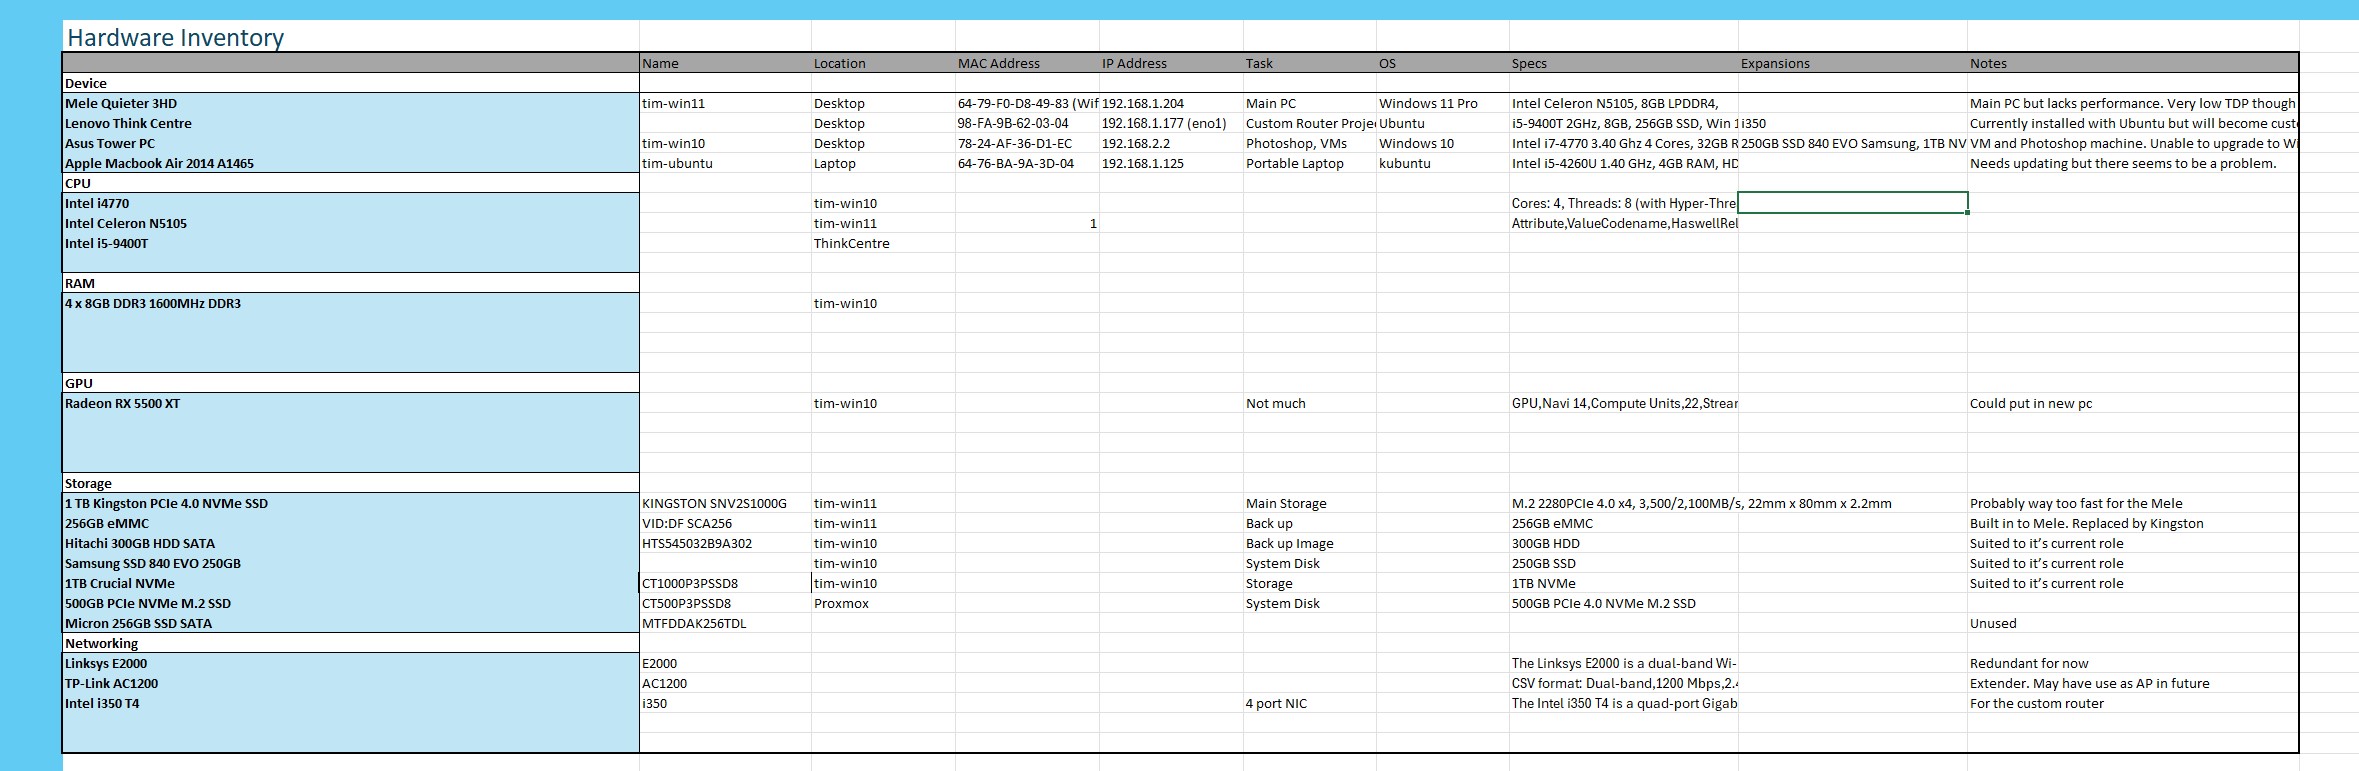
Create a network diagram, with some logical elements, to keep track of all the machines, virtual and physical, their IP addresses and all of the associated hardware.
This is diagram is created with draw.io which is available in the your browser or as a desktop app.
We have Proxmox running on a Lenovo mini-PC. Within this we are running two VMs and two containers. We can see the extra interfaces the i350 provides although we are only using one along with the gigabit port that is native to the PC.
pfSense is the primary application which is providing router, firewall and DHCP services. The Mint VM is for miscallaneous exercises and also to have a look at the distro. The ‘Wireshark’ container is work in progress for a dedicated process of sniffing the network packets and providing a summary in text format at the end of the day. Pi-Hole is primarily for ad-blocking and malicious domain avoidance.
Next in line is the TL-SG105E and the rest of the devices are connected via this managed switch. Then there is tim-win11 which is my daily driver and often acts as the thin-client to tim-ubuntuWS. There is a legacy Cisco router which has been repurposed as an AP. DCHP has been disabled to avoid conflicts with IP addresses.
By most standards this is a small homelab but nonetheless is a great source of hands-on experience.
To provide the best experiences, we use technologies like cookies to store and/or access device information. Consenting to these technologies will allow us to process data such as browsing behaviour or unique IDs on this site. Not consenting or withdrawing consent, may adversely affect certain features and functions.
Functional
Always active
The technical storage or access is strictly necessary for the legitimate purpose of enabling the use of a specific service explicitly requested by the subscriber or user, or for the sole purpose of carrying out the transmission of a communication over an electronic communications network.
Preferences
The technical storage or access is necessary for the legitimate purpose of storing preferences that are not requested by the subscriber or user.
Statistics
The technical storage or access that is used exclusively for statistical purposes.The technical storage or access that is used exclusively for anonymous statistical purposes. Without a subpoena, voluntary compliance on the part of your Internet Service Provider, or additional records from a third party, information stored or retrieved for this purpose alone cannot usually be used to identify you.
Marketing
The technical storage or access is required to create user profiles to send advertising, or to track the user on a website or across several websites for similar marketing purposes.


