You have found your next IT professional

Category: Windows

Device Waiting On Another Device

Brief

I own a MeLE Quieter HD3 Mini PC which is an inexpensive but useful fanless mini desktop PC. One of its features is an SD Card slot. This has never worked but it didn’t bother me much until recently when I needed to transfer video files to a computer from an SD Card.

I needed to fix this problem.

The Immediate Issue

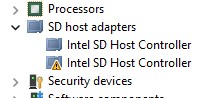
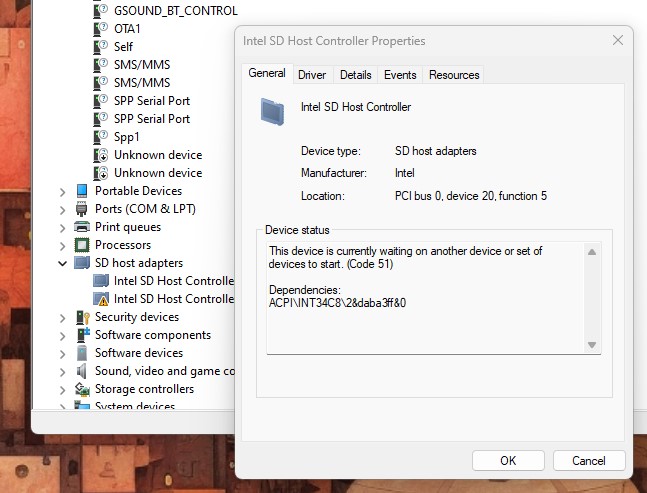
Looking in the Device Manager I could clearly see that the SD Host Controller did not have a working driver.

However, when I tried to update the driver or try uninstalling it and rebooting the system I would receive the response:

Windows Drivers Device Manager

Working It Out

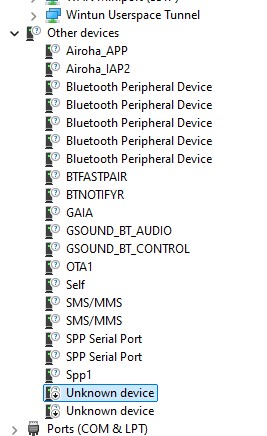
I tried for a good while to find this device without luck until I received a response from the manufacturer with the information that this device would present as an unknown device with the Hardware ID INT34C8. I needed to install the driver for this device before the Intel SD Host Controller would function. Knowing this information, I was able to find the device in Device Manager under Other devices:

Windows Drivers Device Manager

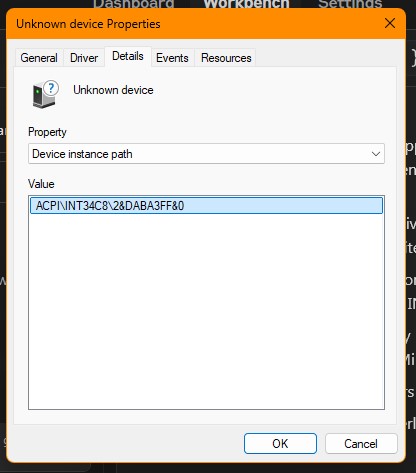
INT34C8 is in the device instance path.

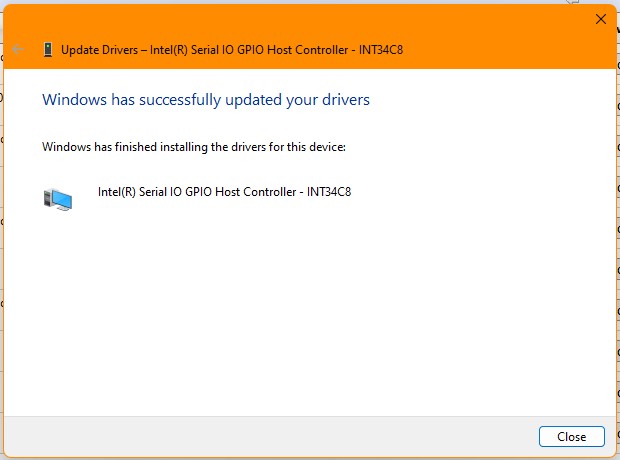
With the help of Google and Anthropic I was able to find out that this was an Intel Serial IO GPIO Host Controller. So, I tried updating the driver using Device Manager in the usual fashion:

Windows Drivers Device Manager

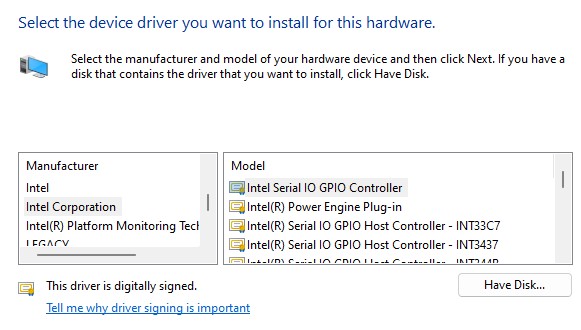
But, unsurprisingly, INT34C8 wasn’t listed and so I needed to go and find this driver. Looking for drivers online is a bit of a minefield there is a site on the Microsoft domain that VirusTotal passes as clean. https://www.catalog.update.microsoft.com/Search.aspx?q=INT34C8

This provided a list of ‘System’ drivers so I chose the first one, for Windows 10 and later. A Cabinet File was downloaded and I opened that. Going back to Device Manager I chose once again to update the driver and then pointed at the C:\Users\tim folder. After a moment or two the installation was declared successful:

Windows Drivers Device Manager

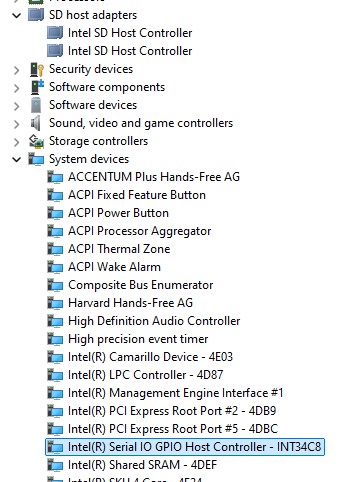
Looking in Device Manager confirmed that not only was the INT34C8 device working but also the SD Host Controller:

Windows Drivers Device Manager

Conclusion

The crucial piece of information in this troubleshoot was finding the INT34C8 device and it was only when MeLE support let me know that this was going to show as an Unknown Device with Hardware ID INT34C8 that I was able to fix this problem.

Using Task Scheduler

What is it for?

Windows Task Scheduler is a handy tool that lets you automate routine tasks and keep your system running smoothly. Admins have full control over what gets scheduled, while regular users can set up tasks too, but with some limits. In places where security is a big deal, Task Scheduler might be locked down to prevent any funny business. To use it safely, it’s best to set up special accounts just for tasks, keep a close eye on who can do what, and check up on things regularly. It’s also smart to only give tasks the bare minimum permissions they need to work, and avoid using super-powerful accounts like SYSTEM if you can help it. Regular users can’t set up tasks that affect the whole system or run with top-level permissions. Don’t forget to review your tasks now and then to make sure they’re still needed and not causing any security headaches.

System Account?

The differences between using the Administrator account and the System account in Task Scheduler:

Admin account:

  • Runs tasks with administrative privileges
  • Has access to network resources
  • Can interact with the desktop
  • Tasks run in the user’s context
  • Requires password to be stored

System account:

  • Highest level of privileges on the local system
  • Limited network access
  • Cannot interact with the desktop
  • Runs in the system context
  • No password required
  • Better for system maintenance tasks

Choose based on task requirements and security considerations.

Creating a Task

Open Task Scheduler in your administrator account:

Task Scheduler Microsoft Windows

The main GUI window:

Task Scheduler Microsoft Windows

We have three main sections here: On the left the Task Libraries then we have the created tasks which can be selected and show their configuration below and on the right we have Actions.

Under actions on the right select Create a Task:

Task Scheduler Microsoft Windows

Give the task a name and a description and choose security options. I want this to be run whether the admin is logged in or not and it needs highest privileges.

Then go to the Triggers tab:

Task Scheduler Microsoft Windows

This task is now set to run weekly on Fridays at 16:30 starting on the 20th of September 2024.

For the next stage we need some pre-requisites. We need a batch script that will be the action that is triggered by the scheduler and in turn the batch script will call the Powershell script that will effect the process required. In this case it will be an image back up of the C drive:

Batch script

@echo off is commented out as it is useful for such a task to have the user notified that it is happening.

The powershell script also has comments to describe the process:

Powershell script

Next up is the Conditions tab:

Task Scheduler Microsoft Windows

I have selected one option.

Finally, the Settings tab which I leave as default. It is useful to allow the task to be run on demand for testing and for manually starting the task:

Task Scheduler Microsoft Windows

Administrator authentication is required:

Task Scheduler Microsoft Windows

There are many more uses for Task Scheduler but it is not without it’s idiosyncrasies and setting task to run at a set time reminds me of the good old days of setting VHS recorders to automatically record Starsky and Hutch. Sometimes it was successful, other times less so.

However with diligence and a bit of testing it can be an excellent time saving tool.

Automating CrowdStrike Driver Fix

It’s a big one

In a global outage that is about as big as they come CrowdStrike made an update that has incapacitated Windows systems around the world. Individually the fix is not so taxing but in an enterprise with 1000s of endpoints down and a handful of IT workers to fix them it’s a mammoth task.

The Fix

  • Boot Windows into Safe Mode or the Windows Recovery Environment.
    • Restart and press F8 repeatedly (May be F4 or F5).
  • Navigate to the C:\Windows\System32\drivers\CrowdStrike directory.
    • Similar to normal Windows file exploring.
  • Locate the file matching “C-00000291*.sys” and delete it.
    • Make sure you find the right one.
  • Reboot the host normally.

Why that file?

Deleting that specific CrowdStrike driver file likely fixes the BSOD because:

  • The file may be corrupted or incompatible with the current system configuration.
  • It could be conflicting with other drivers or system components.
  • Removing it allows Windows to use a default or fallback driver instead.
  • The BSOD was potentially caused by an issue within that particular CrowdStrike driver file.

Solution for Automating This?

I came across a post on the r/CrowdStrike thread for this problem. It claims to have an automated solution to this problem for enterprise environments.

  • Create a modified WinPE image
  • Add command to startnet.cmd in WinPE image:
    • del C:\Windows\System32\drivers\CrowdStrike\C-00000291*.sys
  • Exit.
  • Set up PXE server with modified WinPE image.
  • Configure affected systems to boot from network.
  • Systems boot from PXE server.
  • WinPE environment loads on target systems.
  • startnet.cmd executes, deleting problematic driver.
  • Systems automatically reboot.
  • Normal boot process resumes without CrowdStrike issue.

WinPE

A modified WinPE (Windows Preinstallation Environment) image is a customized version of Microsoft’s lightweight operating system used for deployment, recovery, and troubleshooting. It’s tailored to include specific drivers, tools, or scripts to meet particular needs. Modified WinPE images are often used by IT professionals for tasks like system deployment or data recovery.

PXE Server

A PXE (Preboot Execution Environment) server allows network-based booting and installation of operating systems on client computers. It provides boot images and configuration files over the network, enabling diskless workstations or computers without local boot media to start up and install an OS remotely. PXE servers are commonly used in large-scale deployments and network management.

Using Storage Sense

Storage Sense


Introduction to Storage Sense

Storage Sense

Storage Sense is a built-in Windows feature that automatically manages disk space. It removes temporary files, empties the Recycle Bin, and deletes files from the Downloads folder. Users can customize the cleanup frequency and select specific files for removal. This feature maintains system performance by preventing low disk space issues and is available in Windows 10 and 11.

Storage Sense

In the era of modern computing, while hard drive capacities continue to increase, so does our demand for storage space. Regardless of the storage capacity we acquire, we invariably find ourselves filling it, particularly with video content. Storage limitations can impede system performance. Storage Sense is an efficient disk space optimization solution which offers an intuitive method for determining which files to remove. Storage Sense can be configured to operate at specified intervals, such as daily or weekly.

Key Features of Storage Sense

  • Automatic cleanup of temporary files
    • Automatically scans for temporary files.
    • Identifies unnecessary or outdated files.
    • Removes these files to free up disk space.
    • Focuses on temp folders, Recycle Bin, and Downloads.
    • Can be scheduled or run manually.
    • Helps maintain system performance and storage efficiency.
  • Frequency options for automatic cleanup
    • Run during low free disk space.
    • Run every day/week/month.
    • Run during Windows Update.
    • Run now (manual trigger).
  • Management of the Recycle Bin
    • Automatically deleting files that have been in the Recycle Bin for set period.
    • Allowing users to customize the period before deletion.
    • Freeing up disk space by removing unnecessary files.
    • Providing options to exclude certain file types from automatic deletion.
    • Offering manual cleanup options alongside automated management.
  • Removal of files from the Downloads folder
    • Automatically deleting files for a set period.
    • Focusing on temporary or unnecessary files first.
    • Allowing users to customize deletion settings.
    • Providing options to review files before deletion.
    • Running periodically or when storage space is low.
  • OneDrive smart cleanup
    • Automatically removing local copies of unused cloud files.
    • Keeping frequently accessed files locally.
    • Freeing up disk space while maintaining access to all files.

How to Configure Storage Sense

Storage Sense
  • To access Storage Sense settings in Windows 10/11:
    • Open Settings.
    • Go to System > Storage > Storage Management > Storage Sense.
    • You can also search for “Storage Sense” in the Windows search bar for quick access.
  • Customizing cleanup schedules
    • Configure Storage Sense or Run Storage Sense Now.
    • Under “Configure cleanup schedules” choose frequency (e.g., daily, weekly, monthly).
    • Adjust other cleanup settings as needed such as OneDrive.
Storage Sense
Storage Sense
  • Configuring specific cleanup options
    • Scroll to the specific cleanup option you want to configure.Adjust the settings as desired (e.g., frequency, file age).
Storage Sense

Benefits and Best Practices

  • Advantages of using Storage Sense
    • Freeing up disk space, allowing faster file access.
    • Reducing fragmentation on the drive.
    • Improving system responsiveness.
    • Enabling faster boot times.
    • Preventing slowdowns due to low disk space.
    • Enhancing overall system efficiency and speed.
  • Recommended settings for different user types
    • Casual users: Enable automatic cleanup, run monthly.
    • Power users: Enable, run weekly, customize cleanup options.
    • Low storage devices: Enable, run daily, aggressive cleanup.
    • Enterprise: Centrally managed policies, tailored to org needs.

Troubleshooting and FAQs

Storage Sense

© 2025 timnott-it

Theme by Anders NorénUp ↑