You have found your next IT professional

Month: July 2024

Ryzen 7 9700X

A Good CPU for an IT Workstation?

The time for a new PC is approaching. Primarily this will be my main PC and for IT labbing and VMs. For years I have used Intel CPUs but AMD have been proving themselves as the superior chip maker in this department so I want to give them a shot with the next desktop. In two days they will be releasing the 9000 series with Ryzen 9 9950X, Ryzen 9 9900X, Ryzen 7 9700X and the Ryzen 5 9700.

Low power draw is high on my list so I am interested in the Ryzen 7 9700X. With an expected RRP of around £300 and a TDP of 65W it ticks a lot of boxes.

SpecificationDetails
ArchitectureZen 5 (Granite Ridge)
Cores8
Threads16
Base Clock3.8 GHz
Max Boost ClockUp to 5.5 GHz
L1 Cache512 KB
L2 Cache8 MB
L3 Cache32 MB
TDP65W
Manufacturing ProcessTSMC 4nm FinFET
SocketAM5
Supported MemoryDDR5
PCIe Version5.0
That’s a lot of fives.

Performance

The Ryzen 7 9700X is designed for high-performance desktop computing, particularly for gaming and productivity tasks. Based on benchmarks, it shows significant improvements over its predecessors and competitive performance against Intel’s latest offerings:

  • Single-Core Performance: In CPU-z, it scored 863 points in single-core tests and 2218 points in Cinebench R23 single-core tests.
  • Multi-Core Performance: It scored 8237 points in CPU-z multi-core tests and 20,125 points in Cinebench R23 multi-core tests.
  • Gaming Performance: It is expected to perform well in gaming, with AMD claiming improvements over Intel’s 14900K by 4% to 23% in gaming and 7% to 56% in productivity tasks.

Key Features

  • Zen 5 Architecture: Offers a 16% improvement in Instructions Per Clock (IPC) over Zen 4, enhancing both gaming and productivity performance.
  • Energy Efficiency: Initially rated at 65W TDP, though there are considerations to revise this to 120W to boost gaming performance further.
  • Overclocking Support: The processor is unlocked for overclocking, allowing enthusiasts to push its performance further.
  • Advanced Memory and I/O: Supports DDR5 memory and PCIe 5.0, ensuring compatibility with the latest hardware and peripherals.

Is it right for Virtualisation and Productivity?

The AMD Ryzen 7 9700X appears to be well-suited for virtualization workloads and general IT cybersecurity tasks and learning. Here’s why:

  • Virtualization Support: The Ryzen 7 9700X supports AMD-V, which is AMD’s hardware virtualization technology. This greatly improves virtual machine performance, making it ideal for running multiple VMs simultaneously.
  • Core Count and Threading: With 8 cores and 16 threads, this CPU provides excellent multitasking capabilities. This is crucial for running multiple VMs concurrently, which is common in lab environments and cybersecurity testing scenarios.
  • Clock Speeds: The base clock of 3.8 GHz and boost clock up to 5.5 GHz offer strong single-threaded performance, which is beneficial for tasks that don’t scale well across multiple cores.
  • Cache: The Ryzen 7 9700X features 32 MB of L3 cache, which can help improve performance in various workloads, including virtualization.
  • Modern Architecture: Built on the Zen 5 (Granite Ridge) architecture using a 4 nm process, this CPU incorporates the latest improvements in AMD’s processor technology.
  • Memory Support: It supports DDR5 memory, which can provide faster data access for memory-intensive VM workloads.
  • PCIe Support: With PCIe 5.0 support and 24 lanes, it offers high-speed connectivity for storage and other peripherals, which can be crucial for VM performance.

Combine this CPU with fast RAM and storage and I think it will a good solid workhorse for my intentions. On top of that AMD have shown exceptional commitment to the AM4 socket which is still being supported and bodes well for the longevity of an AM5 motherboard.

On the face of it it appears to be a good choice, although I am a little weary of the TDP jump to 120W. This is marketed as a gaming CPU and that is the last thing I will be doing on this machine. Might there be better options?

Custom Router Build

Brief

This project aims to identify and assemble components for a custom router that can serve as an alternative to standard commercial routers. By employing pfSense software and installing a quad-port Network Interface Card (NIC) into a Small Form Factor (SFF) PC, such as the Lenovo M720q, we can create a custom router. This router can be used for various purposes, including blocking ad servers, and serves as an excellent tool for learning and gaining hands-on experience in network management.

Considerations

  • How much compute? – Standard router and firewall do not need that much grunt but maybe we get into IDS/IPS or similar?
  • Budget – how much do we want to spend on this?
  • M.2 SSD – the NIC will take up the space for the SATA SSD.
  • Power usage – what is acceptable? 30W? Comments on the reddit claim 15W or so.
  • Managed switch – do we want to add this to the set up?

Parts Needed

This set up worked with the parts I chose. It is a tight fit and starting off with a different mini-PC will mean some research on how to make it work.

You will need:

  • Mini PC with a “PCIe” slot onboard – I chose a Lenovo m720q Tiny.
  • Intel i350-T4 NIC – reference is 03T8760. https://www.ebay.co.uk/itm/285482522139.
  • Tiny baffle plate for the card – this came with the riser.
  • Tiny PCIe riser card – PCIEX16 Expansion Graphic Card for ThinkCentre. Part 01AJ902. https://www.ebay.co.uk/itm/394490519429.
  • Screwdriver – PH0/PH1 size.
  • To make sure your Tiny has the latest BIOS installed – Always best practice.

Lenovo m720q Tiny Specifications

  • CPU – i5-9400T 2GHz.
  • RAM – 8GB, PC4-2666v, DDR4 SODIMM.
  • SSD – 500GB Crucial P3 Plus PCIe NVMe M.2 Gen 4 SSD.
  • OS – N/A.

Intel i350 Specifications

  • Interface – PCI Express 2.1 (2.5 GT/s or 5 GT/s).
  • Ports – Available in single-port, dual-port, and quad-port configurations.
  • Ethernet Standards:
    • 10BASE-T.
    • 100BASE-TX.
    • 1000BASE-T (Gigabit Ethernet).
  • Data Transfer Rate – Up to 1 Gbps per port.
  • Full-duplex operation
  • Jumbo Frames – supported (up to 9.5 KB).
  • TCP/IP Offload Engine – (TOE).
  • IPv4 and IPv6 – supported.
  • Wake-on-LAN – supported.
  • VLANs (IEEE 802.1Q) – supported.
  • Link aggregation (IEEE 802.3ad) – supported.
  • Operating temperature range – 0°C to 55°C.
  • Typical power consumption:
    • i350-T2 (dual port): 2.8W.
    • i350-T4 (quad port): 4.4W.
  • OS Support – Windows, Linux, and FreeBSD.

pfSense Requirements

  • CPU – 64-bit x86-64 processor.
  • RAM – Minimum 1GB, recommended 2GB+.
  • Storage – 8GB+ for installation, more for logs/packages.
  • Network interfaces – At least 2 NICs. Impossible to install otherwise.
  • Compatible hardware – Check pfSense hardware compatibility list.
  • Virtualization support – (if running as VM).
  • BIOS/UEFI – with hardware virtualization enabled.

Installing the 4 Port NIC

This is a simple process of fitting the i350 into the m720q using the riser card:

With the cover for the m720q removed undo the screws for the original baffle

Custom router mini pc 4 port nic build

Remove the plate from the i350

Custom router mini pc 4 port nic build

Fit the i350 into the riser

Custom router mini pc 4 port nic build

Fit the new baffle onto the i350

Custom router mini pc 4 port nic build

This is the orientation of the riser when it is installed

Custom router mini pc 4 port nic build

The i350 in place

Custom router mini pc 4 port nic build

Replace the screws for the baffle and replace the cover

Custom router mini pc 4 port nic build

Installing pfSense

  • Download pfsense from their website.
  • Use a tool like Balena Etcher or Rufus (Linux) to create a USB installer.
Balena Etcher
  • Insert the USB into the m720q.
  • Insert or have ready the ethernet cables for your WAN and LAN.
  • Reboot into the BIOS/UEFI or boot menu (Lenovo is F1).
  • Choose Full Install.
  • Select Destination Drive.
  • Choose ZFS.
  • Choose RAID 0 – no redundancy.
  • Choose interfaces for WAN and LAN.
    • At this point you can use AutoDetect and you may need to remove and replace the ethernet cables.
  • Wait for the installation to complete.
  • Remove installation media.
  • Allow the system to reboot.
  • Use a browser to access the webConfigurator.
pfSense webConfigurator
  • Default credentials.
    • admin
    • pfsense
  • Check that the latest version has been installed.
  • Check that the interfaces have IP addresses. (My public IP hidden)
Interfaces on pfSense
  • Set Up DHCP for the LAN.
    • Choose a private address range such as 10.40.40.1/24
    • On the machine that you were using to access the webConfigurator, which is on the LAN side of the pfsense machine, you will need to release and renew the DHCP lease.
      • ipconfig /release and then ipconfig /renew (windows).
      • sudo dhclient -r and then sudo dhclient (linux).
  • IF you are using this as a device inside your SOHO network and the WAN interface is a private IP address supplied by the DHCP server on the SOHO router then you will need to uncheck the Block private networks and loopback addresses option in the Reserved Networks section of WAN interface configuration page.
Reserved Networks
  • Change the default admin credentials for the webConfigurator.

Finishing Up

Now that we have the pfsense up and running we can start playing with it. You can add widgets to the dashboard such as traffic graphs and you can add firewall rules and so much more.

Building your own router with pfSense on a compact PC like the Lenovo m720q is a great way to learn about networking and create a setup that’s just right for you. This project lets you get hands-on with network hardware, tweak software settings, and explore advanced routing features. In the end, you might find that your custom router works better, is more secure, and can do more than off-the-shelf routers.

Automating CrowdStrike Driver Fix

It’s a big one

In a global outage that is about as big as they come CrowdStrike made an update that has incapacitated Windows systems around the world. Individually the fix is not so taxing but in an enterprise with 1000s of endpoints down and a handful of IT workers to fix them it’s a mammoth task.

The Fix

  • Boot Windows into Safe Mode or the Windows Recovery Environment.
    • Restart and press F8 repeatedly (May be F4 or F5).
  • Navigate to the C:\Windows\System32\drivers\CrowdStrike directory.
    • Similar to normal Windows file exploring.
  • Locate the file matching “C-00000291*.sys” and delete it.
    • Make sure you find the right one.
  • Reboot the host normally.

Why that file?

Deleting that specific CrowdStrike driver file likely fixes the BSOD because:

  • The file may be corrupted or incompatible with the current system configuration.
  • It could be conflicting with other drivers or system components.
  • Removing it allows Windows to use a default or fallback driver instead.
  • The BSOD was potentially caused by an issue within that particular CrowdStrike driver file.

Solution for Automating This?

I came across a post on the r/CrowdStrike thread for this problem. It claims to have an automated solution to this problem for enterprise environments.

  • Create a modified WinPE image
  • Add command to startnet.cmd in WinPE image:
    • del C:\Windows\System32\drivers\CrowdStrike\C-00000291*.sys
  • Exit.
  • Set up PXE server with modified WinPE image.
  • Configure affected systems to boot from network.
  • Systems boot from PXE server.
  • WinPE environment loads on target systems.
  • startnet.cmd executes, deleting problematic driver.
  • Systems automatically reboot.
  • Normal boot process resumes without CrowdStrike issue.

WinPE

A modified WinPE (Windows Preinstallation Environment) image is a customized version of Microsoft’s lightweight operating system used for deployment, recovery, and troubleshooting. It’s tailored to include specific drivers, tools, or scripts to meet particular needs. Modified WinPE images are often used by IT professionals for tasks like system deployment or data recovery.

PXE Server

A PXE (Preboot Execution Environment) server allows network-based booting and installation of operating systems on client computers. It provides boot images and configuration files over the network, enabling diskless workstations or computers without local boot media to start up and install an OS remotely. PXE servers are commonly used in large-scale deployments and network management.

Using Storage Sense

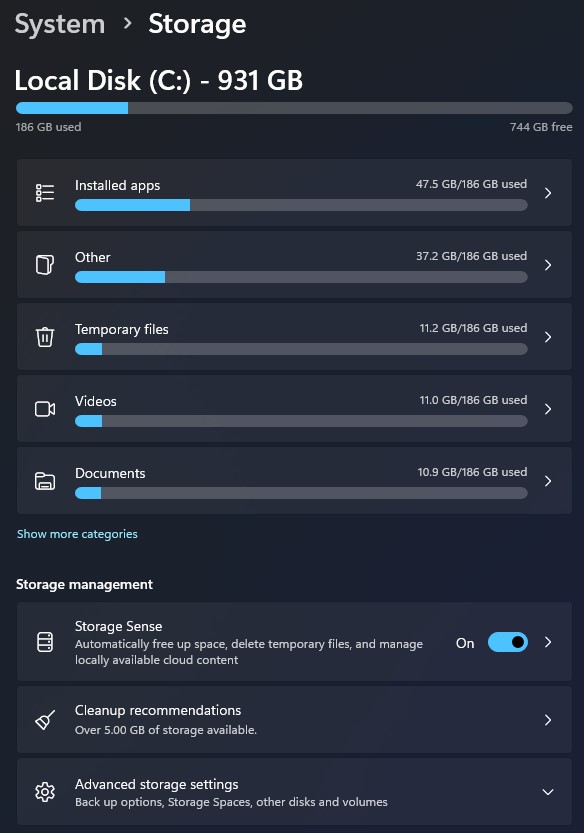
Storage Sense


Introduction to Storage Sense

Storage Sense

Storage Sense is a built-in Windows feature that automatically manages disk space. It removes temporary files, empties the Recycle Bin, and deletes files from the Downloads folder. Users can customize the cleanup frequency and select specific files for removal. This feature maintains system performance by preventing low disk space issues and is available in Windows 10 and 11.

Storage Sense

In the era of modern computing, while hard drive capacities continue to increase, so does our demand for storage space. Regardless of the storage capacity we acquire, we invariably find ourselves filling it, particularly with video content. Storage limitations can impede system performance. Storage Sense is an efficient disk space optimization solution which offers an intuitive method for determining which files to remove. Storage Sense can be configured to operate at specified intervals, such as daily or weekly.

Key Features of Storage Sense

  • Automatic cleanup of temporary files
    • Automatically scans for temporary files.
    • Identifies unnecessary or outdated files.
    • Removes these files to free up disk space.
    • Focuses on temp folders, Recycle Bin, and Downloads.
    • Can be scheduled or run manually.
    • Helps maintain system performance and storage efficiency.
  • Frequency options for automatic cleanup
    • Run during low free disk space.
    • Run every day/week/month.
    • Run during Windows Update.
    • Run now (manual trigger).
  • Management of the Recycle Bin
    • Automatically deleting files that have been in the Recycle Bin for set period.
    • Allowing users to customize the period before deletion.
    • Freeing up disk space by removing unnecessary files.
    • Providing options to exclude certain file types from automatic deletion.
    • Offering manual cleanup options alongside automated management.
  • Removal of files from the Downloads folder
    • Automatically deleting files for a set period.
    • Focusing on temporary or unnecessary files first.
    • Allowing users to customize deletion settings.
    • Providing options to review files before deletion.
    • Running periodically or when storage space is low.
  • OneDrive smart cleanup
    • Automatically removing local copies of unused cloud files.
    • Keeping frequently accessed files locally.
    • Freeing up disk space while maintaining access to all files.

How to Configure Storage Sense

Storage Sense
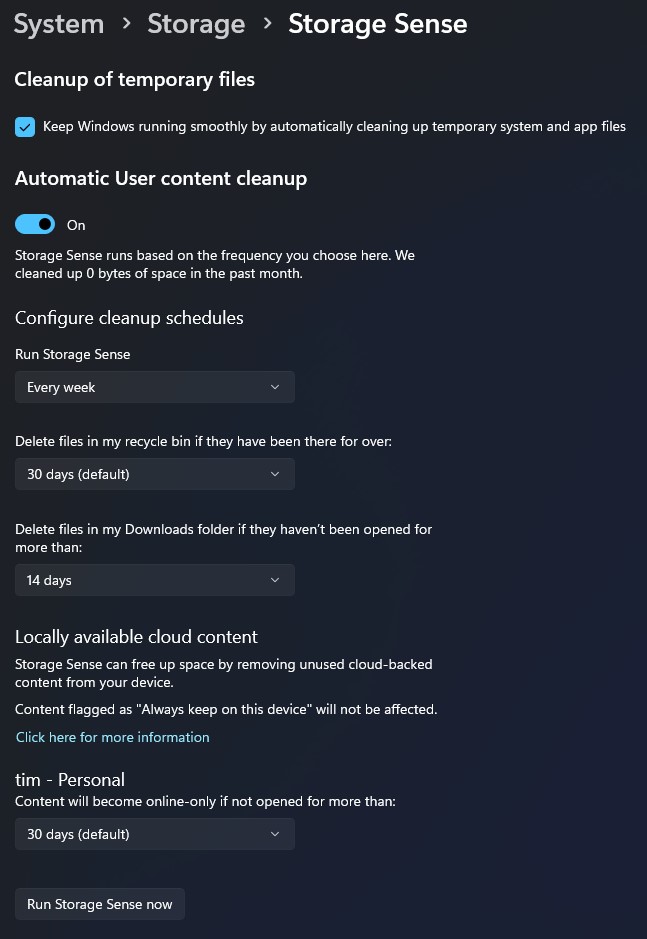
  • To access Storage Sense settings in Windows 10/11:
    • Open Settings.
    • Go to System > Storage > Storage Management > Storage Sense.
    • You can also search for “Storage Sense” in the Windows search bar for quick access.
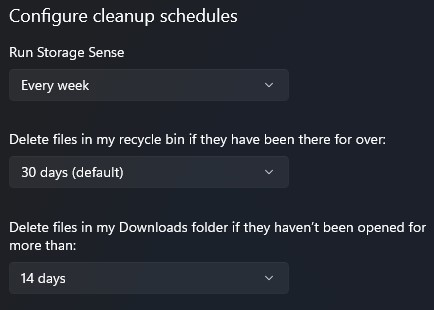
  • Customizing cleanup schedules
    • Configure Storage Sense or Run Storage Sense Now.
    • Under “Configure cleanup schedules” choose frequency (e.g., daily, weekly, monthly).
    • Adjust other cleanup settings as needed such as OneDrive.
Storage Sense
Storage Sense
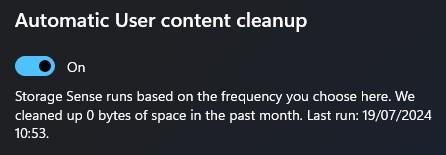
  • Configuring specific cleanup options
    • Scroll to the specific cleanup option you want to configure.Adjust the settings as desired (e.g., frequency, file age).
Storage Sense

Benefits and Best Practices

  • Advantages of using Storage Sense
    • Freeing up disk space, allowing faster file access.
    • Reducing fragmentation on the drive.
    • Improving system responsiveness.
    • Enabling faster boot times.
    • Preventing slowdowns due to low disk space.
    • Enhancing overall system efficiency and speed.
  • Recommended settings for different user types
    • Casual users: Enable automatic cleanup, run monthly.
    • Power users: Enable, run weekly, customize cleanup options.
    • Low storage devices: Enable, run daily, aggressive cleanup.
    • Enterprise: Centrally managed policies, tailored to org needs.

Troubleshooting and FAQs

Storage Sense

Intel i350 T4

Introduction

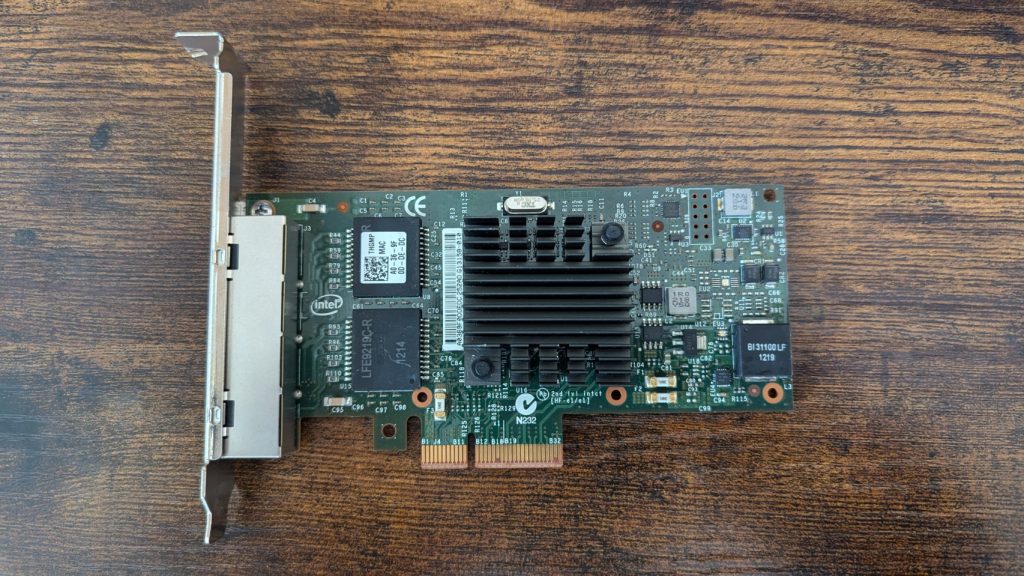
The first component of a custom router project has arrived. I will be pairing it with a Lenovo ThinkCentre M720q Micro PC that’s running pfSense. Can’t wait to start tinkering and learning more about networking with this homemade router.

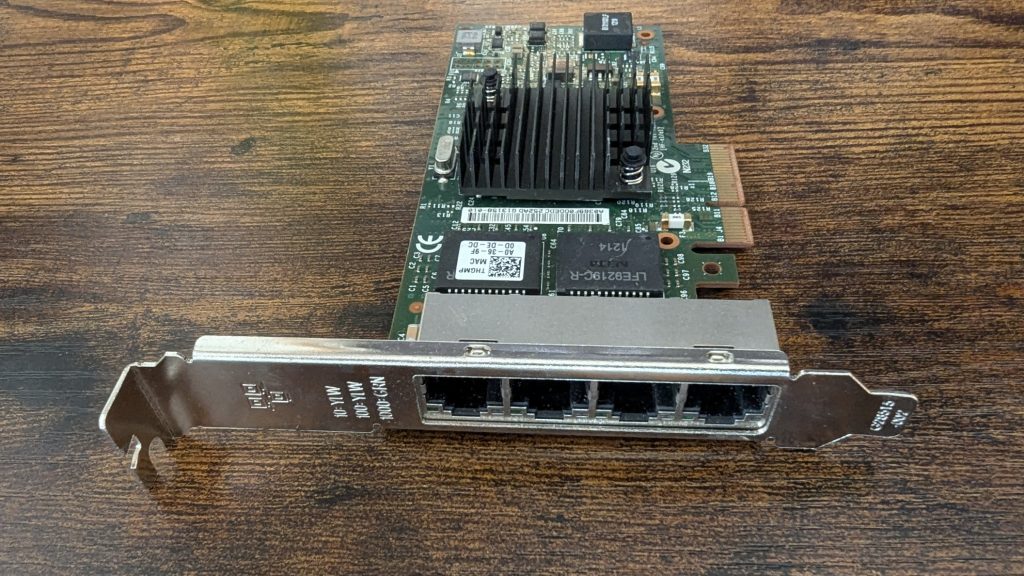
This is an Intel network interface card (NIC), specifically an Intel I350-T4 Gigabit Ethernet adapter. Here are some key points about this hardware:

  • PCIe network adapter card – designed for server and workstation use.
  • 4 Gigabit Ethernet ports – for network connectivity.
  • Manufactured by Intel – as evidenced by the Intel logo on the circuit board.
  • Intel I350 Ethernet controller chip
  • Large black heatsink – to dissipate heat from the main chip.
  • Full-height PCIe bracket – for installation in standard PC cases
Intel i350 T4
Intel i350 T4

Chips

Apart from the i350 chip itself under the heatsink we have:

  • LFE9219C-R – It appears to be the main controller chip for the network adapter. Likely an Intel I350 Ethernet controller, based on the card model.
  • A0-86-9F MAC – This is the smaller chip above the LFE9219C-R. It has a QR code on it. This chip likely contains the MAC (Media Access Control) addresses for the Ethernet ports

Together, they enable the card to process network traffic, manage multiple connections, and integrate with the host system’s PCIe interface. The presence of these specialized chips highlights the advanced capabilities of this Intel network adapter, designed for high-performance networking in professional and enterprise environments.

© 2025 timnott-it

Theme by Anders NorénUp ↑