You have found your next IT professional

Month: February 2023

Creating a Weather App in Python

How to create a very simple weather app in Python. In this tutorial, we will use the requests module to retrieve weather data from the OpenWeatherMap API and the tkinter module to build a simple GUI for our weather app.

Let’s get started!

Concept Weather App

Step 1: Setting up the environment.

First, we need to set up the environment for our project. We will be using Python 3, so make sure you have it installed on your computer. You can download it from the official website here.

Next, we need to install the requests module. To do this, open your terminal and run the following command:

pip install requests

We also need to install the tkinter module. If you’re using Python 3 on Windows or macOS, this should be installed by default. If you’re using a Linux distribution, you may need to install it separately. For example, on Ubuntu, you can install it by running the following command:

sudo apt-get install python3-tk

If you use an IDE such as Pycharm then it will give you the option of installing modules that you attempt to use but haven’t yet installed. Very handy.

Step 2: Register for OpenWeatherMap API Key.

Next, we need to register for an API key with OpenWeatherMap. To do this, go to their website here and create an account. Once you’ve created an account, log in and go to your API keys page. Create a new API key and copy it to your clipboard.

Step 3: Writing the code.

Now that we have everything set up, let’s start writing our code.

We’ll start by importing the necessary modules and defining a function to retrieve weather data from the OpenWeatherMap API.

Python code for getting weather data from an API

In this function, we specify the API endpoint and API key for OpenWeatherMap, and the location for which we want to retrieve weather data. We make a GET request to the API with these parameters, and check the status code of the response to make sure it was successful. If it was, we return the weather data as a JSON object. If not, we print an error message and return None.

Next, we’ll create a window for our weather app using the tkinter module.

Creating a window for a weather app using the tkinter module in Python

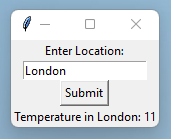
In this code, we create a new window with the title “Weather App”. We then create a label with the text “Enter Location:” and an entry widget for the user to input the location they want to retrieve weather data for.

We also create a button labelled “Submit” which will call the get_weather function with the location entered by the user.

Finally, we create a label to display the weather data retrieved from the API. We can now define the get_weather function to update the weather label with the current temperature for the given location.

Defining a function in Python

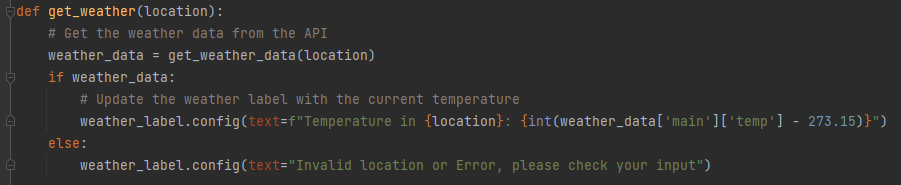
In this function, we call the get_weather_data function to retrieve weather data for the given location. If the function returns weather data, we update the weather label with the current temperature for that location.

We subtract 273.15 from the temperature value to convert it from Kelvin to Celsius. If the get_weather_data function returns None, we update the weather label with an error message.

Finally, we run the main loop of the tkinter application.

root.mainloop()

This will start the application and display the window we created.

Step 4: Putting it all together.

Now that we’ve written all the necessary code, put it all together in the order we have here.

Make sure you replace YOUR_API_KEY_HERE with the API key provided from OpenWeatherMap.

Once you have done that it is time to run the code!

Weather App. Progrrammed in Python.

Conclusion

In this tutorial, we’ve learned how to use the requests and tkinter modules in Python to create a weather app. We’ve used the OpenWeatherMap API to retrieve weather data for a specified location and displayed the current temperature in Celsius using a GUI built with tkinter. This is just a basic implementation and there’s a lot more that could be done to improve the app. For example, we could add more weather information, allow the user to specify units, or even display a forecast for the next few days.

I hope this tutorial was helpful and you were able to create your own weather app.

Concept of programming an app.

Getting Started With Hyper-V

Midjourney concept of a Virtual Machine

Virtual Machines are all the rage these days and there are many reasons for this. It can be a very cost effective way to run multiple ‘machines’. If you have one powerful server then you can have many VMs running at the same time, all performing different tasks. On top of that it is easy to add and remove them as you require.

VMs are easy to save (snapshot) and restore when things go wrong and also VMs can have enhanced security features such as isolation and secure boot. You can control the resource allocation with clicks of a mouse and you can run pretty much any OS you like, depending on licenses of course.

Hyper-V itself, and other hypervisors, allow for automation and simple management of your VMs with a simple GUI.

Installing a VM on Hyper-V

So let’s say that you want to try out your first VM on Windows, let’s have a look at the steps for that. (This will require administrative permissions). You will need an installer file for the OS you want to install. Linux Distros such as Ubuntu or Kali are free and easy to download.

First of all we need to enable the Hyper-V feature so go to Control Panel > Programs > Turn Windows Features on and off and you will be presented with this dialogue:

Turn Windows Features on or off

Then you check the box next to Hyper-V and press OK.

Next we can click in the search bar for windows and type in Hyper-V and should see these options:

Hyper-V manager

Choose Run as administrator.

This will open the Hyper-V manager window and we can get started on creating our first VM! Click on New:

Hyper-V manager main window

This will start the New Virtual Machine Wizard. Click Next:

Hyper-V manager New Virtual Machine Wizard

First option to choose is name and location for your VM. Here I am going to create an instance of Kali-Linux so I will call it Kali. When you get into many VMs you will want to have a regular naming convention so it’s best to start thinking about this early on. There is also the option to choose location here but to begin with I would just go with the default:

Hyper-V manager New Virtual Machine Wizard

Generation. Generally speaking Generation 1 is BIOS and Generation 2  is UEFI. Unless you are using legacy OS versions go with Generation 2:

Hyper-V manager New Virtual Machine Wizard

Assign memory. Depending on your host machine, VM OS and number of VMs you want to try and use at the same time you can set the allocated memory for the VM we are installing right now. You want to give a VM at least 4GB if you can. This is why VM workstations have 32 or 64 GB of RAM:

Hyper-V manager New Virtual Machine Wizard

Configure Networking. Do you want your VM to talk with the network? Or just keep it isolated? Choose Default Switch for the former:

Hyper-V manager New Virtual Machine Wizard

Similarly to the RAM allocation we now want to Create a VHD. Choose default location for now and decide the size you want to allocate:

Hyper-V manager New Virtual Machine Wizard

Installation options. Choose how you want to install the OS. Usually best to point it at the ISO you have downloaded:

Hyper-V manager New Virtual Machine Wizard

With all that done you can check the config you have asked for and click Finish:

Hyper-V manager New Virtual Machine Wizard

Now we are back at the Hyper-V Manager windows and our Kali VM is present. Click on it and in the lower right hand section click on Start and then Connect:

Hyper-V manager New Virtual Machine Wizard

All being well the machine will start and you will then go through the process of installing the OS as normal:

Hyper-V manager New Virtual Machine Wizard

Using Hyper-V To Your Advantage

Once you have installed a virtual machine on Hyper-V and it is running well, there are several useful features that Hyper-V provides to manage and maintain the virtual machine:

Snapshots: Hyper-V allows you to take snapshots of the virtual machine’s state, including the operating system and all data and applications. Snapshots can be used to revert the virtual machine to a previous state in the event of a problem or to test changes before making them permanent.

Live Migration: With Live Migration, you can move a running virtual machine from one physical host to another without any downtime. This can be useful for maintenance tasks, such as hardware upgrades or repairs, or to load balance virtual machines across multiple hosts.

High Availability: Hyper-V provides High Availability features, such as failover clustering, to ensure that virtual machines are always available, even in the event of a host failure. This helps to minimise downtime and ensures business continuity.

Resource allocation: Hyper-V allows you to allocate resources, such as CPU, memory, and storage, to virtual machines as needed. You can also use resource controls, such as resource metering and resource allocation policies, to ensure that virtual machines have the resources they need to run effectively.

Network virtualisation: Hyper-V provides network virtualization features, such as virtual switches, that allow you to create virtual networks that are isolated from the host and from each other. This helps to secure virtual machines and to control network traffic.

Remote management: Hyper-V allows you to manage virtual machines remotely, using the Hyper-V Manager or Windows PowerShell. This makes it easier to manage virtual machines from a centralized location and to automate management tasks.

Backup and recovery: Hyper-V provides backup and recovery features, such as checkpoint-based backups and replication, to help protect virtual machines and ensure that they can be recovered in the event of a disaster.

These are just some of the useful features that Hyper-V provides for virtual machines once they are installed and running. By leveraging these features, you can manage and maintain virtual machines more effectively and ensure that they are always available and running optimally.

© 2025 timnott-it

Theme by Anders NorénUp ↑