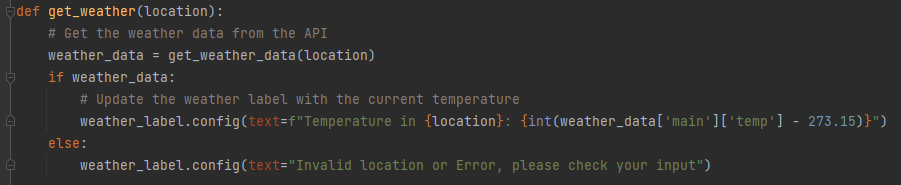
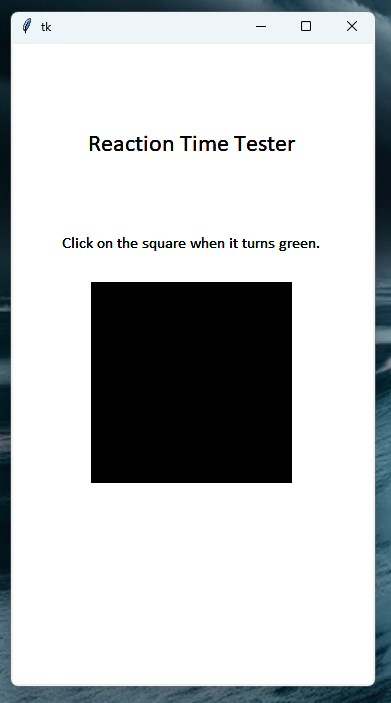
Brief
The brief for this exercise was to create a reaction time tester with a graphical interface. It proves to be a good exercise to learn about the tkinter module
import time
import random
import tkinter as tk
# Initialize the window
root = tk.Tk()
canvas = tk.Canvas(root, width=360, height=640, bg="white")
canvas.pack()
# Create the square and bind the click event
black_square = canvas.create_rectangle(80, 240, 280, 440, fill="black")
start_time = 0
reaction_text = None
best_time_text = None
# Create a best time
best_time = float('inf') # Initialize with infinity
def update_square(event):
global start_time, reaction_text, best_time, best_time_text
end_time = time.time()
reaction_time = round(end_time - start_time, 4)
canvas.itemconfig(black_square, fill="black")
if reaction_text is not None:
canvas.delete(reaction_text)
reaction_text = canvas.create_text(180, 500, text=f"Reaction Time: {reaction_time}s", font=("Calibri", 18), fill="black")
if reaction_time < best_time:
best_time = reaction_time
if best_time_text is not None:
canvas.delete(best_time_text)
best_time_text = canvas.create_text(180, 600, text=f"Best time: {best_time}s", font=("Calibri", 12), fill="black")
root.update()
root.after(6000, initialize_app) # reset after 6 seconds
def show_green():
global start_time
canvas.itemconfig(black_square, fill="green")
start_time = time.time()
def initialize_app():
global reaction_text, best_time_text
# Clear the canvas
canvas.delete("all")
# Recreate the square
global black_square
black_square = canvas.create_rectangle(80, 240, 280, 440, fill="black")
# Draw the title and instructions
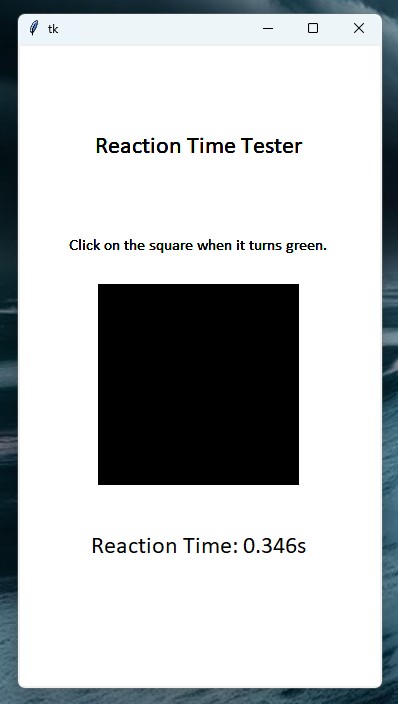
canvas.create_text(180, 100, text="Reaction Time Tester", font=("Calibri", 18), fill="black")
canvas.create_text(180, 200, text="Click on the square when it turns green.", font=("Calibri", 12), fill="black")
# Display the current best time
best_time_text = canvas.create_text(180, 600, text=f"Best time: {best_time:.4f}s", font=("Calibri", 12), fill="black")
# Bind the click event
canvas.tag_bind(black_square, "<Button-1>", update_square)
# Clear the previous reaction time text
reaction_text = None
# Wait a random interval between 2 to 4 seconds, then turn the square green and start the timer
root.after(2000 + random.randint(0, 2000), show_green)
# Initialize the app and start the main loop
initialize_app()
root.mainloop()Imports
Three modules are imported. time, random and tkinter. tkinter is for the graphical interface and random and time are used together to create the core function of the app.
Initialise The Window
# Initialize the window
root = tk.Tk()
canvas = tk.Canvas(root, width=360, height=640, bg="white")
canvas.pack()
This initialises a Tkinter window and creates a canvas within it. The window is the main application container, while the canvas is a drawing area. The canvas is set to 360×640 pixels with a white background. The canvas is then packed into the window, making it visible and ready for drawing or adding other elements.
Create The Square
# Create the square and bind the click event
black_square = canvas.create_rectangle(80, 240, 280, 440, fill="black")
start_time = 0
reaction_text = None
best_time_text = None
This code creates a black square on a canvas. It sets up variables to track the start time, and variables for displaying reaction time and best time. The square will be the target for user clicks, initiating the timing mechanism when interacted with.
Create a Best Time
# Create a best time
best_time = float('inf')  # Initialize with infinity
Here we initialise a variable called ‘best_time’ with positive infinity. In Python, float(‘inf’) represents infinity. This is a common technique used when you want to find the minimum value in a set of numbers. By starting with infinity, any real number will be smaller, allowing you to update ‘best_time’ as you compare values.
Define Update Square Function
def update_square(event):
    global start_time, reaction_text, best_time, best_time_text
    end_time = time.time()
    reaction_time = round(end_time - start_time, 4)
    canvas.itemconfig(black_square, fill="black")
    if reaction_text is not None:
        canvas.delete(reaction_text)
    reaction_text = canvas.create_text(180, 500, text=f"Reaction Time: {reaction_time}s", font=("Calibri", 18), fill="black")

    if reaction_time < best_time:
        best_time = reaction_time
        if best_time_text is not None:
            canvas.delete(best_time_text)
        best_time_text = canvas.create_text(180, 600, text=f"Best time: {best_time}s", font=("Calibri", 12), fill="black")

    root.update()
    root.after(6000, initialize_app)  # reset after 6 seconds
This function updates the game state after a player clicks the square. It calculates the reaction time, updates the display with the current time, and checks if it’s a new best time. The function then resets the game after a 6-second delay. Key actions include:
- Calculate reaction time
- Update square color
- Display reaction time
- Update best time if applicable
- Schedule game reset
The function uses global variables to maintain state across multiple function calls and interacts with a canvas object to update the visual elements of the game.
Define Show Green Function
def show_green():
    global start_time
    canvas.itemconfig(black_square, fill="green")
    start_time = time.time()
Now we define the function that turns the square to green which is the signal to the user that the timer has started and they should click on the square asap. The global variable start_time is used to record the start of the timing.
Define the Initialise App Function
def initialize_app():
    global reaction_text, best_time_text
    # Clear the canvas
    canvas.delete("all")

    # Recreate the square
    global black_square
    black_square = canvas.create_rectangle(80, 240, 280, 440, fill="black")

    # Draw the title and instructions
    canvas.create_text(180, 100, text="Reaction Time Tester", font=("Calibri", 18), fill="black")
    canvas.create_text(180, 200, text="Click on the square when it turns green.", font=("Calibri", 12), fill="black")

    # Display the current best time
    best_time_text = canvas.create_text(180, 600, text=f"Best time: {best_time:.4f}s", font=("Calibri", 12), fill="black")

    # Bind the click event
    canvas.tag_bind(black_square, "<Button-1>", update_square)

    # Clear the previous reaction time text
    reaction_text = None

    # Wait a random interval between 2 to 4 seconds, then turn the square green and start the timer
    root.after(2000 + random.randint(0, 2000), show_green)
This function initialises the reaction time test. It clears the canvas, creates a black square, displays instructions, and shows the best time. It then sets up a click event on the square and schedules the square to turn green after a random delay of 2-4 seconds. This prepares the game for a new round, resetting the display and setting up the next test.
Function Calls
initialize_app()
root.mainloop()
The initialize_app function is called which is the core of the program and the mainloop method is called on the root that starts the event loop for the GUI. It listens for user interactions (like button clicks) and keeps the window open.

Conclusion
There we have it. A simple GUI python program for testing how slow or fast your reactions are.