You have found your next IT professional

Author: Tim Nott (Page 4 of 4)

Enrolled in GICAST, The Open University.

I have enrolled and at the time of writing am halfway through this course provided by The Open University. Personally I find the ‘gamified’ element to be a bit strange but the actual content is relevant and a useful round up of the fundamentals of Cyber Security .

Main page here.

“The ‘Gamified Intelligent Cyber Aptitude and Skills Training’ (GICAST) course is developed by the Cyber security experts from The Open University and funded by Nesta and the Department for Education.”

“This course uses unique game-based assessment, which presents you with a series of cyber security scenarios to help assess your intuitive cyber behaviour and current understanding of cyber security concepts.”

“On completing the game, you’ll be provided with a personalised course pathway to support you with developing knowledge and understanding in cybersecurity.”

Website Under Attack!

The website is under attack.

This is clearly the reality of the internet. Many random attempts at gaining access into any web server that is available/insecure/badly configured. As far as I can tell so far none of these attempts has actually succeeded.

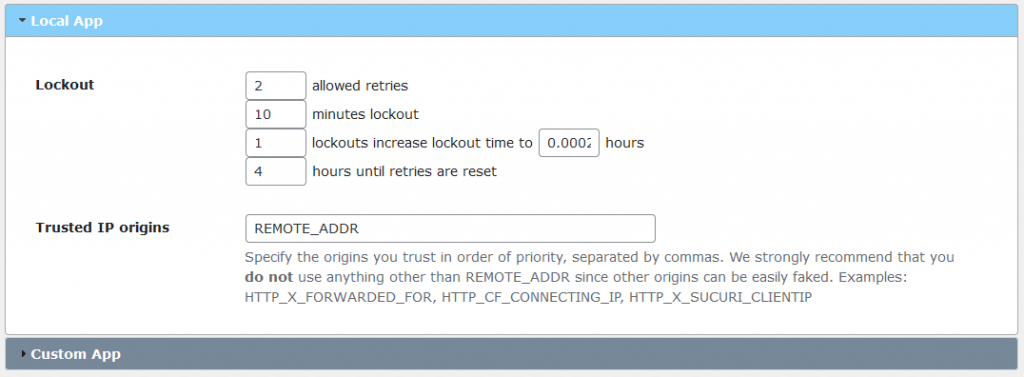
First response I had was to limit the Login Attempts to 1 allowed try and 24 hours until reset. This worked well but actually restricted me from getting in a couple of times. I ended up with these settings to restrict the attack as much as possible without making it a pain if I got the password wrong.

I have always used a strong password to protect the site and even though this seems like a lot of attacks it would take centuries, maybe even millennia to luck upon the right password that these bot-nets are guessing.

To make it effectively impossible for these particular attacks to gain access I have added a plugin called WordFence to add Multi-Factor Authentication to the mix.

On top of this looking in the WPScan plug in it is telling me that the XML-RPC is enabled and this will significantly increase your site’s attack surface which means there are many more points of entry that the attackers can use to attempt access to the site.

The WPScan blog has a good post on this https://blog.wpscan.com/is-wordpress-xmlrpc-a-security-problem/

Unfortunately it’s not a simple fix especially if you want to fully shut it down which many of the usual plug-ins won’t do.

For now the plan is to find one of these plug-ins to close it down as much as possible until I can figure out how to fully disable XML-RPC.

Update 11/07/22

After a couple of efforts at inserting code to disable XML-RPC I have gone with the XML-RPC Security plug-in as a quick fix. Let’s see how the failed attempts fare after this.

Now the WPS Scan is clear.

Final Update 14/07/22

So the XML-RPC disable plug in has fixed the problem. Reducing the size of the attack surface available to web has made all the difference.

Basic Linux Commands

If you are just getting started in Linux then these commands should be useful.

File System:

ls     : listing

cd     : change directory

cat     : concatenate

pwd     : print working directory

find    : find stuff    https://tryhackme.com/room/thefindcommand

grep    : find a value within a file. i.e. IP address

man      : manual

help    : help. More info than manual

touch  : create file

mkdir  : create directory/folder

cp           : copy (needs destination too)

scp    : secure copy

mv    : move

rm    : remove (need -R to remove directory)

file    : determine the type of file

echo    : output

nano    : text editor

vim    : advanced text editor

wget    : download from internet

strings: look for strings in a file

chmod: change mode/permissions

Operators:

&    : allows you to run commands in the background of your terminal

&&    : allows you to run multiple commands together in one line of your terminal

>    : direct output elsewhere

>>    : as above but appends so no overwriting

Switches

su    : switch user

l    : login

Common Directories

etc     : stores system files for OS

var    : variable data

root     : home directory for ‘root’ user

tmp    : temporary. wiped when session ended.

Processes

ps        : list processes

ps aux        : list all processes

top        : show all processes in live table

kill        : stop process

systemctl    : interact with systemd

ctrl z        : background process

fg        : foreground process

Automation

cron    : process to execute crontabs. Time based. https://crontab-generator.org/

I HACKED my wife’s web browser

My write up of NetworkChuck’s video on BeEF

BeEF – The Browser Exploitation Framework

(DISCLAIMER – DO NOT USE THIS TO ATTACK ANY COMPUTER OF ANY DESCRIPTION UNLESS YOU HAVE PERMISSION TO DO SO. IT’S COMPLETELY ILLEGAL)

What do you need?

  • Linux Server
  • BeEF
  • Victim (friends, family or even your own computer)

Linode sponsors NetworkChuck’s video and they are a good place to rent servers. They offer a minimalist server for $5 dollars a month and they also have an introductory offer of a certain amount of free credit when you sign up to an account. 

Setting up the BeEf Server

  • Go to Linode.com and set up an new account
  • Go to the Marketplace tab
  • Select BeEF
  • Go to BeEF options
  • Enter a password 
  • Enter an email address
  • Create a limited sudo user with password
  • Choose a region close to you
  • Select plan – go cheap
  • Label box
  • Password for root user (will be used for SSH)
  • Click ‘Create Linode’

The server will take a while to provision which basically means that the server is setting itself up with the BeEF software. Once that is done look for the Access panel and specifically the SSH Access option. There is a clipboard icon to the right which you can click to copy to the clipboard.

Open the Command Line (Windows) or Terminal (Mac/Linux) and paste the SHH command. It’s going to ask you if you want to continue, type yes and then give the root password.

So now you are in your BeEF server. Next enter cat /root/beef.info and it should come up with 

#BEEF INSTALLATION COMPLETE#

Below should be: Endpoint and then a URL. This is a legitimate SSL website. Grab this URL, copy and paste into notepad and then into a browser and there it is, the BeEF server!

User: beef

Password is the password you entered in the setup process under BeEF options.

This will take you to the Getting Started page. Notice on the left there are ‘Hooked Browsers’ where browsers that have been successfully attacked will be listed. To hook your first browser copy the ‘advanced version’ link. This is the link that you would send to your victim in the hope that they will click on it and then the browser they use will then be ‘hooked’ by your BeEF server! You can then go back to the BeEF console and you will see it listed under the hooked browsers. 

Attack!

To begin with, try this out on a dummy browser on your own computer. Once the browser is listed in the console then click on it and you will be given a page with various tabs available, go to Details and there is a whole list of information on the browser that has been hooked. Next go to Commands and this is where the fun begins. Let’s try:

Browser > Create Alert Dialog – enter “You just got hacked!!” in the ‘Alert text’ box. Click Execute and your victims browser will alert the user to this unfortunate fact.

Social Engineering > Google Phishing Page – this will create a fake google sign in page in the victim’s browser. Their google login details will then be captured by your BeEF server.

Social Engineering > Fake LastPass – this will create a LastPass pop up in their browser which will also capture their login details. In this case it will capture each keystroke so if they stop half way through because they get suspicious or something then you will still get some information.

Network > Identify LAN subnets, Ping Sweep, Get HTTP Servers, Fingerprint Local Network – various commands that will scan, map and log the victims network and systems.

Browser > Redirect Browser (RickRoll) – as the name suggests, will redirect their browser to a RickRoll video. Har har.

These are just a few of the many things that BeEF can do so go ahead and try some stuff out but only hack computers that you have permission for.  ETHICAL HACKING ONLY

If you are not already a follower of NetworkChuck then please go to his YouTube channel or website. He makes engaging and relevant IT videos.

Simple ASCII Converter

while True:
    x = (input("Enter character or ASCII value for conversion or q to quit: "))
    if x == "q":
        break
    if len(x) > 1 and not x.isdigit():
        print("not applicable: fail")
        break
    elif x.isdigit():
        print(chr(int(x)))
    else:
        print(ord(x))

So you are relatively new to programming, like me, and you have got a few concepts under your belt. Probably you are bored of print(“Hello world!”). You are looking for a basic program to write. Something that is actually relevant to IT.

While I was going over notes from the Programming Expert course, I was messing around with a while loop and ASCII conversion functions ord and chr. If you are not familiar with ASCII then just know that it is a numerical value given to each symbol/character we use in computing. So a = 97, A = 65, # = 35 and so on.

The Crux of the Matter

print(ord(x)) 

will print the ASCII value of the variable x

print(chr(x))

will print the character of the variable x

These are the active ingredients of this little program. Let’s look at the rest of it:

Line 1: Creates an infinite loop. In which we will put our block of code.

Line 2: Asks the user to input a number or character and puts this in the variable x. It also gives the user the option to quit the infinite loop.

Line 3+4: Enables the quit feature.

Line 5+6+7: Input validation. The ord and char functions are a bit fussy and will only take an integer or a single character respectively. So this if statement effectively says that if the length of the input is greater than one character and is not a digit then it’s no good and the user is told as much. (Note that even if a float is entered then this will be more than one character and will fail too.)

Line 8/9: The next part of the if statement is an elif which asks if x is a digit then print the character associated with the value. It has been converted from the string the user entered, to an integer which the function can read.

Line 10/11: Anything else must be a single character and is then converted to a value.

And there you have it. Admittedly this is a simple converter which only accepts one input at a time and can’t deal with [DELETE] for example but it’s still pretty neat. I am finding it’s important to gain confidence at coding by experimenting with small programs.

Programming Expert

Recently started a new course called Programming Expert.

Coding is not essential for an IT career but it sure as helps and although intimidating it is also fascinating. Getting a program to work for the first time is a buzz. If you intend to go into Cyber Security then you definitely need some coding skills and Python is a great language for this and also is beginner friendly.

I tried the usual YouTube offerings:

(too name just a few) for learning to code and no doubt this is absolutely a viable option but it is hard to get a structure to your learning going this way. So I signed up to an official course from a group of programmers including Tim Ruscica.


It was $59 for a year from the videos I’ve watched on his YT channel his style came across as easy to follow and he clearly knows what he’s talking about. In my opinion if you are going to be listening the same person for hours while they try and teach you to code, surely a experience which will get you frustrated at times, then you need to get on with their general style.

More importantly this course boasts the following features:

  • Streamlined Platform
  • A Comprehensive Curriculum
  • Designed By Experts. Taught By Experts
  • High-Quality Videos
  • Hundreds Of Practice Questions
  • Practical Programming Projects
  • Feature-Rich Coding Workspace
  • Certificate Of Completion

These add up to an experience which is on another level compared with trying to learn from a “Learn Python in 6 Hours” video. For example on the more challenging Practice Questions (most of them) there’s not just the solutions revealed but also a separate video to explain how to solve the problem.

I am halfway through the fundamentals stage and will post updates as I go.

Individual IT Certs OR Full Course?

Is it better to take individual IT certificates or enrol in a full course? 

I am looking at changing my career to something on the IT > Cyber Security spectrum. There is a world of choice out there and without having a degree the common consensus appears to be ‘get some certs’.

CompTIA is the most prominent organisation in terms of ‘industry standard’ certificates but there are many others like CISCO, AWS, ORACLE and more. On top of this you can find organisations who offer training for these courses: Codecademy, Esme Learning, TheKnowledgeAcademy, TheTrainingRoom etc

OR you can go down the university route with part-time/full-time diplomas, certificates and fast tracked MSCs (if you already have a degree or work experience) but these will cost you a lot more.

Looking at the official CompTIA website the pricing for the exams themselves you are looking at the £200 mark. TheTrainingRoom offer a course, amongst others, called Cyber Security Technologist which includes: ITF, A+, Network +, Security +, and a choice of CySA+ or PenTest+ for a total of £2995.

So roughly £2000 extra. For this you get structured learning, a tutor and after completion guaranteed job interviews with a Career Support Officer. It’s well worth noting that in this course you will only take one exam for the final certificate which, assuming you pass, then gives you the certificates for all the subjects. This is just one example of a training organisation but I think it gives a good idea of what the difference is between taking individual certs and a full course.

Attempting to do A+ off your own back is a reasonable prospect in my opinion but when you get into Security+ and CySA+ then I think you would be really struggling to learn effectively and continuously. However there are other options for tuition than an organisation such as TheTrainingRoom for example an online enterprise called ITProTv and they cover all the certificates in question here, and many many more. 

Their training model is primarily video based although they do have Job Resources and Learning Coach listed in the Resources menu. I enquired about the Learning Coach and it transpires that it’s not the same thing as a tutor, which TheTrainingRoom provide but simply someone who guides you through the learning process rather than the actual course content. This is a big difference if you have any tricky parts of the course which you are struggling to understand. ITProTV do provide a forum which is constantly monitored and replied to by their IT professionals. It’s up to the individual to decide which system they would prefer for the money.

The Premium Plan at ITProTV is $499 (£361) a year. This should be plenty of time for most people to complete the five certificates so you effectively spend £1634 for a tutor and the post completion job interviews that TheTrainingRoom provides. Seems like a lot.

To summarise, the best option for most people would be to buy the CompTIA exams individually and pay for separate online training. It saves you money and keeps your options open should you complete the first certificate(s) and then decide that you want to head in a different direction with your learning.

PicoCTF – Static Ain’t Always Noise

https://play.picoctf.org/practice/challenge/163

Description:

Can you look at the data in this binary: static? This BASH script might help!

Solution:

So I had seen the term ‘bash’ around quite a bit but didn’t actually know what it was or what it meant. A search for ‘bash script’ gave me: 

“A Bash script is a text file containing a series of commands. Any command that can be executed in the terminal can be put into a Bash script. Any series of commands to be executed in the terminal can be written in a text file, in that order, as a Bash script.”

Not complicated. But how to set it in motion? That’s not difficult either:

bash filename.sh 
I used wget to get the script downloaded and that gave me a file: ltdis.sh

#!/bin/bash

echo "Attempting disassembly of $1 ..."

#This usage of "objdump" disassembles all (-D) of the first file given by 
#invoker, but only prints out the ".text" section (-j .text) (only section
#that matters in almost any compiled program...

objdump -Dj .text $1 > $1.ltdis.x86_64.txt

#Check that $1.ltdis.x86_64.txt is non-empty
#Continue if it is, otherwise print error and eject

if [ -s "$1.ltdis.x86_64.txt" ]
then
		echo "Disassembly successful! Available at: $1.ltdis.x86_64.txt"

		echo "Ripping strings from binary with file offsets..."
		strings -a -t x $1 > $1.ltdis.strings.txt
		echo "Any strings found in $1 have been written to $1.ltdis.strings.txt with file offset"


else
		echo "Disassembly failed!"
		echo "Usage: ltdis.sh <program-file>"
		echo "Bye!"
fi


This turns out to be an if statement and tells you what you are looking out for with a successful outcome. “Disassembly successful!” At this stage I don’t understand the detail contained in this script but I knew enough to run it and hopefully find a flag. But how to insert the ‘static’ file into the script?

Using wget to download the ‘static’ file the obvious thing to then try was just putting the filename after the bash script command in the webshell:

bash ltdis.sh static

And yes that worked:

Attempting disassembly of static ...
Disassembly successful! Available at: static.ltdis.x86_64.txt
Ripping strings from binary with file offsets...
Any strings found in static have been written to static.ltdis.strings.txt with file offset

and gave me two more files: static.ltdis.x86_64.txt and static.ltdis.strings.txt the second of which contained the flag.

PicoCTF – Speeds and Feeds

https://play.picoctf.org/practice/challenge/116?page=3

Description:

There is something on my shop network running at nc mercury.picoctf.net 59953, but I can’t tell what it is. Can you?

Solution:

So if we run nc mercury.picoctf.net 59953 in the webshell we get a whole bunch of data lines all starting with the letter G. The hint in the challenge asks what code does a CNC machine use? Google tells us that it is called gcode. 

Next we can look for a CNC simulator online and of course there is such a thing:

https://ncviewer.com/

But the webshell doesn’t make it easy to copy all of the lines to the clipboard so we need a way to download the them to our local machine where we can open them in a text editor and clipboard all of the text. So to do this I used the command:

nc mercury.picoctf.net 59953 > gcode.txt

This created a .txt file containing all the data lines. Then I needed to find a way to download this file to my local machine. After searching online for a while and only coming up with complicated answers that didn’t work or needed an install that the picoCTF webshell wouldn’t allow, I went back to basics and read the READme.txt file! In this file we see:

# Experimental features

– Exporting files from the webshell to the browser or vice versa

  is possible using `sz <filename>` / `rz`.

So then it was just a case of: 

sz gcode.txt

Open this file in a text editor, copy all the lines of data to the clipboard and paste in the gcode file field in the NCViewer, hit ‘Plot’ and see the result:

Obviously I’m not going to reveal the answer that would be far too easy for you.

Newer posts »

© 2025 timnott-it

Theme by Anders NorénUp ↑